作者选择Code Org接受捐赠,作为Write for DOnations计划的一部分。
介绍
计算机视觉是计算机科学的一个子领域,旨在从图像和视频中提取更高层次的理解。这为有趣的视频聊天过滤器、移动设备的面部验证器和自动驾驶汽车等技术提供支持。
在本教程中,您将使用计算机视觉为您的网络摄像头构建美国手语翻译器。在学习本教程时,您将使用OpenCV计算机视觉库PyTorch来构建深度神经网络并onnx导出神经网络。在构建计算机视觉应用程序时,您还将应用以下概念:
- 您将使用与如何应用计算机视觉来构建基于情感的狗过滤器教程相同的三步法:预处理数据集、训练模型和评估模型。
- 您还将扩展这些步骤中的每一个:使用数据增强来解决旋转或不居中的手,更改学习率计划以提高模型准确性,并导出模型以加快推理速度。
- 在此过程中,您还将探索机器学习中的相关概念。
在本教程结束时,您将拥有美国手语翻译器和基础深度学习知识。您还可以访问此项目的完整源代码。
先决条件
要完成本教程,您将需要以下内容:
- 具有至少 1GB RAM 的 Python 3 本地开发环境。您可以按照如何为 Python 3 安装和设置本地编程环境来配置您需要的一切。
- 用于实时图像检测的工作网络摄像头。
- (推荐)构建基于情感的狗过滤器;本教程没有明确使用,但同样的想法得到了加强和构建。
第 1 步 – 创建项目并安装依赖项
让我们为这个项目创建一个工作区并安装我们需要的依赖项。
在 Linux 发行版上,首先准备系统包管理器并安装 Python3 virtualenv 包。用:
- apt-get update
- apt-get upgrade
- apt-get install python3-venv
我们将调用我们的工作区SignLanguage:
- mkdir ~/SignLanguage
导航到SignLanguage目录:
- cd ~/SignLanguage
然后为项目创建一个新的虚拟环境:
- python3 -m venv signlanguage
激活您的环境:
- source signlanguage/bin/activate
然后安装PyTorch,这是我们将在本教程中使用的 Python 深度学习框架。
在 macOS 上,使用以下命令安装 Pytorch:
- python -m pip install torch==1.2.0 torchvision==0.4.0
在 Linux 和 Windows 上,对仅 CPU 构建使用以下命令:
- pip install torch==1.2.0+cpu torchvision==0.4.0+cpu -f https://download.pytorch.org/whl/torch_stable.html
- pip install torchvision
现在为OpenCV、numpy和安装预打包的二进制文件onnx,它们分别是用于计算机视觉、线性代数、AI 模型导出和 AI 模型执行的库。OpenCV提供诸如图像旋转之类的实用程序,并numpy提供诸如矩阵求逆之类的线性代数实用程序:
- python -m pip install opencv-python==3.4.3.18 numpy==1.14.5 onnx==1.6.0 onnxruntime==1.0.0
在 Linux 发行版上,您需要安装libSM.so:
- apt-get install libsm6 libxext6 libxrender-dev
安装依赖项后,让我们构建我们的手语翻译器的第一个版本:手语分类器。
步骤 2 — 准备手语分类数据集
在接下来的三个部分中,您将使用神经网络构建一个手语分类器。您的目标是生成一个模型,该模型接受手的图片作为输入并输出一个字母。
构建机器学习分类模型需要以下三个步骤:
- 预处理数据:对标签应用one-hot 编码并将数据包装在 PyTorch 张量中。在增强数据上训练您的模型,为“不寻常”输入做好准备,例如偏心或旋转的手。
- 指定并训练模型:使用 PyTorch 设置神经网络。定义训练超参数——例如训练多长时间——并运行随机梯度下降。您还将改变特定的训练超参数,即学习率计划。这些将提高模型的准确性。
- 使用模型运行预测:在验证数据上评估神经网络以了解其准确性。然后,将模型导出为名为 ONNX 的格式,以加快推理速度。
在本教程的这一部分中,您将完成第 3 步中的第 1 步。您将下载数据,创建一个Dataset对象来迭代您的数据,最后应用数据增强。在这一步结束时,您将有一种编程方式来访问数据集中的图像和标签以提供给您的模型。
首先,将数据集下载到您当前的工作目录:
注意:在 macOS 上,wget默认情况下不可用。为此,请按照此 DigitalOcean 教程安装 Homebrew 。然后,运行brew install wget。
- wget https://assets.digitalocean.com/articles/signlanguage_data/sign-language-mnist.tar.gz
解压 zip 文件,其中包含一个data/目录:
- tar -xzf sign-language-mnist.tar.gz
创建一个新文件,命名为step_2_dataset.py:
- nano step_2_dataset.py
和以前一样,导入必要的实用程序并创建将保存数据的类。对于此处的数据处理,您将创建训练和测试数据集。您将实现 PyTorch 的Dataset接口,允许您为手语分类数据集加载和使用 PyTorch 的内置数据管道:
from torch.utils.data import Dataset
from torch.autograd import Variable
import torch.nn as nn
import numpy as np
import torch

import csv


class SignLanguageMNIST(Dataset):
    """Sign Language classification dataset.

    Utility for loading Sign Language dataset into PyTorch. Dataset posted on
    Kaggle in 2017, by an unnamed author with username `tecperson`:
    https://www.kaggle.com/datamunge/sign-language-mnist

    Each sample is 1 x 1 x 28 x 28, and each label is a scalar.
    """
    pass
删除类中的pass占位符SignLanguageMNIST。取而代之的是,添加一个方法来生成标签映射:
    @staticmethod
    def get_label_mapping():
        """
        We map all labels to [0, 23]. This mapping from dataset labels [0, 23]
        to letter indices [0, 25] is returned below.
        """
        mapping = list(range(25))
        mapping.pop(9)
        return mapping
标签范围从 0 到 25。但是,不包括字母 J (9) 和 Z (25)。这意味着只有 24 个有效标签值。为了使从 0 开始的所有标签值的集合是连续的,我们将所有标签映射到 [0, 23]。该方法提供了从数据集标签 [0, 23] 到字母索引 [0, 25] 的映射get_label_mapping。
接下来,添加一种从 CSV 文件中提取标签和样本的方法。下面假设每行以 开头,label然后是 784 个像素值。这 784 个像素值代表一个28x28图像:
    @staticmethod
    def read_label_samples_from_csv(path: str):
        """
        Assumes first column in CSV is the label and subsequent 28^2 values
        are image pixel values 0-255.
        """
        mapping = SignLanguageMNIST.get_label_mapping()
        labels, samples = [], []
        with open(path) as f:
            _ = next(f)  # skip header
            for line in csv.reader(f):
                label = int(line[0])
                labels.append(mapping.index(label))
                samples.append(list(map(int, line[1:])))
        return labels, samples
有关这 784 个值如何表示图像的说明,请参阅构建基于情绪的狗过滤器,步骤 4。
请注意,csv.reader迭代中的每一行都是一个字符串列表;在int和map(int, ...)调用投所有字符串为整数。在我们的静态方法正下方,添加一个函数来初始化我们的数据持有者:
    def __init__(self,
            path: str="data/sign_mnist_train.csv",
            mean: List[float]=[0.485],
            std: List[float]=[0.229]):
        """
        Args:
            path: Path to `.csv` file containing `label`, `pixel0`, `pixel1`...
        """
        labels, samples = SignLanguageMNIST.read_label_samples_from_csv(path)
        self._samples = np.array(samples, dtype=np.uint8).reshape((-1, 28, 28, 1))
        self._labels = np.array(labels, dtype=np.uint8).reshape((-1, 1))

        self._mean = mean
        self._std = std
该函数首先加载样本和标签。然后它将数据包装在 NumPy 数组中。均值和标准差信息将在下面的__getitem__部分中简要说明。
直接在__init__函数之后,添加一个__len__函数。在Dataset需要这种方法来确定何时停止迭代通过数据:
...
    def __len__(self):
        return len(self._labels)
最后,添加一个__getitem__方法,该方法返回一个包含样本和标签的字典:
    def __getitem__(self, idx):
        transform = transforms.Compose([
            transforms.ToPILImage(),
            transforms.RandomResizedCrop(28, scale=(0.8, 1.2)),
            transforms.ToTensor(),
            transforms.Normalize(mean=self._mean, std=self._std)])

        return {
            'image': transform(self._samples[idx]).float(),
            'label': torch.from_numpy(self._labels[idx]).float()
        }
您使用一种称为数据增强的技术,其中样本在训练期间受到扰动,以提高模型对这些扰动的鲁棒性。特别是,通过不同的数量和不同的位置随机放大图像,通过RandomResizedCrop。请注意,放大不应影响最终的手语课程;因此,标签不会被转换。您还对输入进行了标准化,以便将图像值重新缩放到预期的 [0, 1] 范围,而不是 [0, 255];为此,请使用数据集_mean并_std在标准化时使用。
您完成的SignLanguageMNIST课程将如下所示:
from torch.utils.data import Dataset
from torch.autograd import Variable
import torchvision.transforms as transforms
import torch.nn as nn
import numpy as np
import torch

from typing import List

import csv


class SignLanguageMNIST(Dataset):
    """Sign Language classification dataset.

    Utility for loading Sign Language dataset into PyTorch. Dataset posted on
    Kaggle in 2017, by an unnamed author with username `tecperson`:
    https://www.kaggle.com/datamunge/sign-language-mnist

    Each sample is 1 x 1 x 28 x 28, and each label is a scalar.
    """

    @staticmethod
    def get_label_mapping():
        """
        We map all labels to [0, 23]. This mapping from dataset labels [0, 23]
        to letter indices [0, 25] is returned below.
        """
        mapping = list(range(25))
        mapping.pop(9)
        return mapping

    @staticmethod
    def read_label_samples_from_csv(path: str):
        """
        Assumes first column in CSV is the label and subsequent 28^2 values
        are image pixel values 0-255.
        """
        mapping = SignLanguageMNIST.get_label_mapping()
        labels, samples = [], []
        with open(path) as f:
            _ = next(f)  # skip header
            for line in csv.reader(f):
                label = int(line[0])
                labels.append(mapping.index(label))
                samples.append(list(map(int, line[1:])))
        return labels, samples

    def __init__(self,
            path: str="data/sign_mnist_train.csv",
            mean: List[float]=[0.485],
            std: List[float]=[0.229]):
        """
        Args:
            path: Path to `.csv` file containing `label`, `pixel0`, `pixel1`...
        """
        labels, samples = SignLanguageMNIST.read_label_samples_from_csv(path)
        self._samples = np.array(samples, dtype=np.uint8).reshape((-1, 28, 28, 1))
        self._labels = np.array(labels, dtype=np.uint8).reshape((-1, 1))

        self._mean = mean
        self._std = std

    def __len__(self):
        return len(self._labels)

    def __getitem__(self, idx):
        transform = transforms.Compose([
            transforms.ToPILImage(),
            transforms.RandomResizedCrop(28, scale=(0.8, 1.2)),
            transforms.ToTensor(),
            transforms.Normalize(mean=self._mean, std=self._std)])

        return {
            'image': transform(self._samples[idx]).float(),
            'label': torch.from_numpy(self._labels[idx]).float()
        }
和以前一样,您现在将通过加载SignLanguageMNIST数据集来验证我们的数据集实用程序函数。将以下代码添加到SignLanguageMNIST课程后的文件末尾:
def get_train_test_loaders(batch_size=32):
    trainset = SignLanguageMNIST('data/sign_mnist_train.csv')
    trainloader = torch.utils.data.DataLoader(trainset, batch_size=batch_size, shuffle=True)

    testset = SignLanguageMNIST('data/sign_mnist_test.csv')
    testloader = torch.utils.data.DataLoader(testset, batch_size=batch_size, shuffle=False)
    return trainloader, testloader
此代码使用SignLanguageMNIST类初始化数据集。然后对于训练集和验证集,它将数据集包装在一个DataLoader. 这会将数据集转换为可迭代的以供以后使用。
现在您将验证数据集实用程序是否正常运行。使用DataLoader并打印该加载器的第一个元素创建示例数据集加载器。将以下内容添加到文件末尾:
if __name__ == '__main__':
    loader, _ = get_train_test_loaders(2)
    print(next(iter(loader)))
您可以检查您的文件是否与step_2_dataset此(存储库)中的文件匹配。退出编辑器并使用以下命令运行脚本:
- python step_2_dataset.py
这将输出以下一对张量。我们的数据管道输出两个样本和两个标签。这表明我们的数据管道已启动并准备就绪:
Output{'image': tensor([[[[ 0.4337,  0.5022,  0.5707,  ...,  0.9988,  0.9646,  0.9646],
          [ 0.4851,  0.5536,  0.6049,  ...,  1.0502,  1.0159,  0.9988],
          [ 0.5364,  0.6049,  0.6392,  ...,  1.0844,  1.0844,  1.0673],
          ...,
          [-0.5253, -0.4739, -0.4054,  ...,  0.9474,  1.2557,  1.2385],
          [-0.3369, -0.3369, -0.3369,  ...,  0.0569,  1.3584,  1.3242],
          [-0.3712, -0.3369, -0.3198,  ...,  0.5364,  0.5364,  1.4783]]],


        [[[ 0.2111,  0.2796,  0.3481,  ...,  0.2453, -0.1314, -0.2342],
          [ 0.2624,  0.3309,  0.3652,  ..., -0.3883, -0.0629, -0.4568],
          [ 0.3309,  0.3823,  0.4337,  ..., -0.4054, -0.0458, -1.0048],
          ...,
          [ 1.3242,  1.3584,  1.3927,  ..., -0.4054, -0.4568,  0.0227],
          [ 1.3242,  1.3927,  1.4612,  ..., -0.1657, -0.6281, -0.0287],
          [ 1.3242,  1.3927,  1.4440,  ..., -0.4397, -0.6452, -0.2856]]]]), 'label': tensor([[24.],
        [11.]])}
您现在已经验证您的数据管道工作正常。第一步 – 预处理您的数据 – 现在包括数据增强以提高模型稳健性。接下来,您将定义神经网络和优化器。
第 3 步 – 使用深度学习构建和训练手语分类器
使用正常运行的数据管道,您现在将定义一个模型并在数据上对其进行训练。特别是,您将构建一个具有六层的神经网络,定义一个损失、一个优化器,最后为您的神经网络预测优化损失函数。在此步骤结束时,您将拥有一个有效的手语分类器。
创建一个名为 的新文件step_3_train.py:
- nano step_3_train.py
导入必要的实用程序:
from torch.utils.data import Dataset
from torch.autograd import Variable
import torch.nn as nn
import torch.nn.functional as F
import torch.optim as optim
import torch

from step_2_dataset import get_train_test_loaders
定义一个 PyTorch 神经网络,它包括三个卷积层,后跟三个全连接层。将此添加到现有脚本的末尾:
class Net(nn.Module):
    def __init__(self):
        super(Net, self).__init__()
        self.conv1 = nn.Conv2d(1, 6, 3)
        self.pool = nn.MaxPool2d(2, 2)
        self.conv2 = nn.Conv2d(6, 6, 3)
        self.conv3 = nn.Conv2d(6, 16, 3)
        self.fc1 = nn.Linear(16 * 5 * 5, 120)
        self.fc2 = nn.Linear(120, 48)
        self.fc3 = nn.Linear(48, 24)

    def forward(self, x):
        x = F.relu(self.conv1(x))
        x = self.pool(F.relu(self.conv2(x)))
        x = self.pool(F.relu(self.conv3(x)))
        x = x.view(-1, 16 * 5 * 5)
        x = F.relu(self.fc1(x))
        x = F.relu(self.fc2(x))
        x = self.fc3(x)
        return x
现在初始化神经网络,定义损失函数,并通过在脚本末尾添加以下代码来定义优化超参数:
def main():
    net = Net().float()
    criterion = nn.CrossEntropyLoss()
    optimizer = optim.SGD(net.parameters(), lr=0.01, momentum=0.9)
最后,您将训练两个时期:
def main():
    net = Net().float()
    criterion = nn.CrossEntropyLoss()
    optimizer = optim.SGD(net.parameters(), lr=0.01, momentum=0.9)

    trainloader, _ = get_train_test_loaders()
    for epoch in range(2):  # loop over the dataset multiple times
        train(net, criterion, optimizer, trainloader, epoch)
    torch.save(net.state_dict(), "checkpoint.pth")
您将epoch定义为训练的迭代,其中每个训练样本都只使用了一次。在 main 函数结束时,模型参数将保存到一个名为"checkpoint.pth".
将以下代码添加到脚本末尾以从数据集加载器中提取image和提取label,然后将每个代码包装在 PyTorch 中Variable:
def train(net, criterion, optimizer, trainloader, epoch):
    running_loss = 0.0
    for i, data in enumerate(trainloader, 0):
        inputs = Variable(data['image'].float())
        labels = Variable(data['label'].long())
        optimizer.zero_grad()

        # forward + backward + optimize
        outputs = net(inputs)
        loss = criterion(outputs, labels[:, 0])
        loss.backward()
        optimizer.step()

        # print statistics
        running_loss += loss.item()
        if i % 100 == 0:
            print('[%d, %5d] loss: %.6f' % (epoch, i, running_loss / (i + 1)))
此代码还将运行前向传递,然后通过损失和神经网络进行反向传播。
在文件末尾,添加以下内容以调用该main函数:
if __name__ == '__main__':
    main()
仔细检查您的文件是否与以下内容匹配:
from torch.utils.data import Dataset
from torch.autograd import Variable
import torch.nn as nn
import torch.nn.functional as F
import torch.optim as optim
import torch

from step_2_dataset import get_train_test_loaders


class Net(nn.Module):
    def __init__(self):
        super(Net, self).__init__()
        self.conv1 = nn.Conv2d(1, 6, 3)
        self.pool = nn.MaxPool2d(2, 2)
        self.conv2 = nn.Conv2d(6, 6, 3)
        self.conv3 = nn.Conv2d(6, 16, 3)
        self.fc1 = nn.Linear(16 * 5 * 5, 120)
        self.fc2 = nn.Linear(120, 48)
        self.fc3 = nn.Linear(48, 25)

    def forward(self, x):
        x = F.relu(self.conv1(x))
        x = self.pool(F.relu(self.conv2(x)))
        x = self.pool(F.relu(self.conv3(x)))
        x = x.view(-1, 16 * 5 * 5)
        x = F.relu(self.fc1(x))
        x = F.relu(self.fc2(x))
        x = self.fc3(x)
        return x


def main():
    net = Net().float()
    criterion = nn.CrossEntropyLoss()
    optimizer = optim.SGD(net.parameters(), lr=0.01, momentum=0.9)

    trainloader, _ = get_train_test_loaders()
    for epoch in range(2):  # loop over the dataset multiple times
        train(net, criterion, optimizer, trainloader, epoch)
    torch.save(net.state_dict(), "checkpoint.pth")


def train(net, criterion, optimizer, trainloader, epoch):
    running_loss = 0.0
    for i, data in enumerate(trainloader, 0):
        inputs = Variable(data['image'].float())
        labels = Variable(data['label'].long())
        optimizer.zero_grad()

        # forward + backward + optimize
        outputs = net(inputs)
        loss = criterion(outputs, labels[:, 0])
        loss.backward()
        optimizer.step()

        # print statistics
        running_loss += loss.item()
        if i % 100 == 0:
            print('[%d, %5d] loss: %.6f' % (epoch, i, running_loss / (i + 1)))


if __name__ == '__main__':
    main()
保存并退出。然后,通过运行以下命令启动我们的概念验证培训:
- python step_3_train.py
在神经网络训练时,您将看到类似于以下内容的输出:
Output[0,     0] loss: 3.208171
[0,   100] loss: 3.211070
[0,   200] loss: 3.192235
[0,   300] loss: 2.943867
[0,   400] loss: 2.569440
[0,   500] loss: 2.243283
[0,   600] loss: 1.986425
[0,   700] loss: 1.768090
[0,   800] loss: 1.587308
[1,     0] loss: 0.254097
[1,   100] loss: 0.208116
[1,   200] loss: 0.196270
[1,   300] loss: 0.183676
[1,   400] loss: 0.169824
[1,   500] loss: 0.157704
[1,   600] loss: 0.151408
[1,   700] loss: 0.136470
[1,   800] loss: 0.123326
为了获得较低的损失,您可以将 epoch 数增加到 5、10 甚至 20。但是,经过一定的训练时间后,网络损失将随着训练时间的增加而停止减少。为了回避这个问题,随着训练时间的增加,您将引入一个学习率计划,随着时间的推移降低学习率。要了解为什么会这样,请参阅“为什么 Momentum 真正有效”中的Distill 可视化。
main使用以下两行修改您的函数,定义 ascheduler并调用scheduler.step. 此外,将时代数更改为12:
def main():
    net = Net().float()
    criterion = nn.CrossEntropyLoss()
    optimizer = optim.SGD(net.parameters(), lr=0.01, momentum=0.9)
    scheduler = optim.lr_scheduler.StepLR(optimizer, step_size=10, gamma=0.1)

    trainloader, _ = get_train_test_loaders()
    for epoch in range(12):  # loop over the dataset multiple times
        train(net, criterion, optimizer, trainloader, epoch)
        scheduler.step()
    torch.save(net.state_dict(), "checkpoint.pth")
检查您的文件是否与此存储库中的第 3 步文件匹配。训练将持续约 5 分钟。您的输出将类似于以下内容:
Output[0,     0] loss: 3.208171
[0,   100] loss: 3.211070
[0,   200] loss: 3.192235
[0,   300] loss: 2.943867
[0,   400] loss: 2.569440
[0,   500] loss: 2.243283
[0,   600] loss: 1.986425
[0,   700] loss: 1.768090
[0,   800] loss: 1.587308
...
[11,     0] loss: 0.000302
[11,   100] loss: 0.007548
[11,   200] loss: 0.009005
[11,   300] loss: 0.008193
[11,   400] loss: 0.007694
[11,   500] loss: 0.008509
[11,   600] loss: 0.008039
[11,   700] loss: 0.007524
[11,   800] loss: 0.007608
得到的最终损失为0.007608,比起始损失小 3 个数量级3.20。我们工作流程的第二步到此结束,我们在此设置和训练神经网络。话虽如此,这个损失值再小,也没有什么意义。为了正确看待模型的性能,我们将计算其准确性——模型正确分类的图像百分比。
第 4 步 – 评估手语分类器
您现在将通过计算验证集上的准确性来评估您的手语分类器,验证集是模型在训练期间未看到的一组图像。与最终损失值相比,这将提供更好的模型性能感知。此外,您将添加实用程序以在训练结束时保存我们的训练模型,并在执行推理时加载我们的预训练模型。
创建一个新文件,名为step_4_evaluate.py.
- nano step_4_evaluate.py
导入必要的实用程序:
from torch.utils.data import Dataset
from torch.autograd import Variable
import torch.nn as nn
import torch.nn.functional as F
import torch.optim as optim
import torch
import numpy as np

import onnx
import onnxruntime as ort

from step_2_dataset import get_train_test_loaders
from step_3_train import Net
接下来,定义一个实用程序来评估神经网络的性能。对于单个图像,以下函数将神经网络的预测字母与真实字母进行比较:
def evaluate(outputs: Variable, labels: Variable) -> float:
    """Evaluate neural network outputs against non-one-hotted labels."""
    Y = labels.numpy()
    Yhat = np.argmax(outputs, axis=1)
    return float(np.sum(Yhat == Y))
outputs是每个样本的类别概率列表。例如,outputs对于单个样本可能是[0.1, 0.3, 0.4, 0.2]。labels是标签类列表。例如,标签类别可能是3。
Y = ...将标签转换为 NumPy 数组。接下来,Yhat = np.argmax(...)将outputs类概率转换为预测类。例如,类概率列表[0.1, 0.3, 0.4, 0.2]将产生预测类2,因为索引 2 值 0.4 是最大值。
由于两者Y和Yhat现在都是类,您可以比较它们。Yhat == Y检查预测类是否与标签类匹配,并且np.sum(...)是计算真值数量的技巧。换句话说,np.sum将输出正确分类的样本数。
添加第二个函数batch_evaluate,它将第一个函数evaluate应用于所有图像:
def batch_evaluate(
        net: Net,
        dataloader: torch.utils.data.DataLoader) -> float:
    """Evaluate neural network in batches, if dataset is too large."""
    score = n = 0.0
    for batch in dataloader:
        n += len(batch['image'])
        outputs = net(batch['image'])
        if isinstance(outputs, torch.Tensor):
            outputs = outputs.detach().numpy()
        score += evaluate(outputs, batch['label'][:, 0])
    return score / n
batch是一组存储为单个张量的图像。首先,您将要评估的图像总数 ( n) 增加到此批次中的图像数。接下来,您使用这批图像在神经网络上运行推理outputs = net(...)。if isinstance(...)如果需要,类型检查会转换 NumPy 数组中的输出。最后,您使用evaluate计算正确分类的样本数。在函数结束时,您计算正确分类的样本百分比score / n。
最后,添加以下脚本以利用前面的实用程序:
def validate():
    trainloader, testloader = get_train_test_loaders()
    net = Net().float()

    pretrained_model = torch.load("checkpoint.pth")
    net.load_state_dict(pretrained_model)

    print('=' * 10, 'PyTorch', '=' * 10)
    train_acc = batch_evaluate(net, trainloader) * 100.
    print('Training accuracy: %.1f' % train_acc)
    test_acc = batch_evaluate(net, testloader) * 100.
    print('Validation accuracy: %.1f' % test_acc)


if __name__ == '__main__':
    validate()
这会加载一个预训练的神经网络并评估其在提供的手语数据集上的性能。具体来说,此处的脚本会输出用于训练的图像的准确性,以及用于测试目的的一组单独的图像,称为验证集。
接下来,您将 PyTorch 模型导出为 ONNX 二进制文件。然后可以在生产中使用此二进制文件对您的模型进行推理。最重要的是,运行这个二进制文件的代码不需要原始网络定义的副本。在validate函数的末尾,添加以下内容:
    trainloader, testloader = get_train_test_loaders(1)

    # export to onnx
    fname = "signlanguage.onnx"
    dummy = torch.randn(1, 1, 28, 28)
    torch.onnx.export(net, dummy, fname, input_names=['input'])

    # check exported model
    model = onnx.load(fname)
    onnx.checker.check_model(model)  # check model is well-formed

    # create runnable session with exported model
    ort_session = ort.InferenceSession(fname)
    net = lambda inp: ort_session.run(None, {'input': inp.data.numpy()})[0]

    print('=' * 10, 'ONNX', '=' * 10)
    train_acc = batch_evaluate(net, trainloader) * 100.
    print('Training accuracy: %.1f' % train_acc)
    test_acc = batch_evaluate(net, testloader) * 100.
    print('Validation accuracy: %.1f' % test_acc)
这会导出 ONNX 模型,检查导出的模型,然后使用导出的模型运行推理。仔细检查您的文件是否与此存储库中的第 4 步文件匹配:
from torch.utils.data import Dataset
from torch.autograd import Variable
import torch.nn as nn
import torch.nn.functional as F
import torch.optim as optim
import torch
import numpy as np

import onnx
import onnxruntime as ort

from step_2_dataset import get_train_test_loaders
from step_3_train import Net


def evaluate(outputs: Variable, labels: Variable) -> float:
    """Evaluate neural network outputs against non-one-hotted labels."""
    Y = labels.numpy()
    Yhat = np.argmax(outputs, axis=1)
    return float(np.sum(Yhat == Y))


def batch_evaluate(
        net: Net,
        dataloader: torch.utils.data.DataLoader) -> float:
    """Evaluate neural network in batches, if dataset is too large."""
    score = n = 0.0
    for batch in dataloader:
        n += len(batch['image'])
        outputs = net(batch['image'])
        if isinstance(outputs, torch.Tensor):
            outputs = outputs.detach().numpy()
        score += evaluate(outputs, batch['label'][:, 0])
    return score / n


def validate():
    trainloader, testloader = get_train_test_loaders()
    net = Net().float().eval()

    pretrained_model = torch.load("checkpoint.pth")
    net.load_state_dict(pretrained_model)

    print('=' * 10, 'PyTorch', '=' * 10)
    train_acc = batch_evaluate(net, trainloader) * 100.
    print('Training accuracy: %.1f' % train_acc)
    test_acc = batch_evaluate(net, testloader) * 100.
    print('Validation accuracy: %.1f' % test_acc)

    trainloader, testloader = get_train_test_loaders(1)

    # export to onnx
    fname = "signlanguage.onnx"
    dummy = torch.randn(1, 1, 28, 28)
    torch.onnx.export(net, dummy, fname, input_names=['input'])

    # check exported model
    model = onnx.load(fname)
    onnx.checker.check_model(model)  # check model is well-formed

    # create runnable session with exported model
    ort_session = ort.InferenceSession(fname)
    net = lambda inp: ort_session.run(None, {'input': inp.data.numpy()})[0]

    print('=' * 10, 'ONNX', '=' * 10)
    train_acc = batch_evaluate(net, trainloader) * 100.
    print('Training accuracy: %.1f' % train_acc)
    test_acc = batch_evaluate(net, testloader) * 100.
    print('Validation accuracy: %.1f' % test_acc)


if __name__ == '__main__':
    validate()
要使用和评估上一步中的检查点,请运行以下命令:
- python step_4_evaluate.py
这将产生类似于以下内容的输出,确认您导出的模型不仅有效,而且与您的原始 PyTorch 模型一致:
Output========== PyTorch ==========
Training accuracy: 99.9
Validation accuracy: 97.4
========== ONNX ==========
Training accuracy: 99.9
Validation accuracy: 97.4
您的神经网络达到了 99.9% 的训练准确度和 97.4% 的验证准确度。训练和验证准确性之间的这种差距表明您的模型过度拟合。这意味着您的模型没有学习可泛化的模式,而是记住了训练数据。要了解过度拟合的含义和原因,请参阅了解偏差-方差权衡。
至此,我们就完成了一个手语分类器。从本质上讲,我们的模型几乎一直都可以正确地消除符号之间的歧义。这是一个相当不错的模型,因此我们进入应用程序的最后阶段。我们将在实时网络摄像头应用程序中使用此手语分类器。
第 5 步 – 链接相机源
您的下一个目标是将计算机的摄像头连接到您的手语分类器。您将收集摄像头输入,对显示的手语进行分类,然后将分类后的手语报告给用户。
现在为人脸检测器创建一个 Python 脚本。step_6_camera.py使用nano或您喜欢的文本编辑器创建文件:
- nano step_5_camera.py
将以下代码添加到文件中:
"""Test for sign language classification"""
import cv2
import numpy as np
import onnxruntime as ort

def main():
    pass

if __name__ == '__main__':
    main()
此代码导入 OpenCV,其中包含您的图像实用程序和 ONNX 运行时,这是您对模型运行推理所需的全部内容。其余代码是典型的 Python 程序样板。
现在替换pass在main用下面的代码,它初始化使用您之前训练的参数手语分类功能。另外添加从索引到字母和图像统计的映射:
def main():
    # constants
    index_to_letter = list('ABCDEFGHIKLMNOPQRSTUVWXY')
    mean = 0.485 * 255.
    std = 0.229 * 255.

    # create runnable session with exported model
    ort_session = ort.InferenceSession("signlanguage.onnx")
您将使用官方 OpenCV 文档中此测试脚本的元素。具体来说,您将更新main函数的主体。首先初始化一个VideoCapture对象,该对象设置为从您的计算机摄像头捕获实时馈送。把它放在main函数的末尾:
def main():
    ...
    # create runnable session with exported model
    ort_session = ort.InferenceSession("signlanguage.onnx")

    cap = cv2.VideoCapture(0)
然后添加一个while循环,它在每个时间步从相机读取:
def main():
    ...
    cap = cv2.VideoCapture(0)
    while True:
        # Capture frame-by-frame
        ret, frame = cap.read()
编写一个实用函数,用于对相机帧进行中心裁剪。将此功能放在main:
def center_crop(frame):
    h, w, _ = frame.shape
    start = abs(h - w) // 2
    if h > w:
        frame = frame[start: start + w]
    else:
        frame = frame[:, start: start + h]
    return frame
接下来,取相机帧的中心裁剪,转换为灰度,标准化并调整大小为28x28。将其放在函数内的while循环中main:
def main():
    ...
    while True:
        # Capture frame-by-frame
        ret, frame = cap.read()

        # preprocess data
        frame = center_crop(frame)
        frame = cv2.cvtColor(frame, cv2.COLOR_RGB2GRAY)
        x = cv2.resize(frame, (28, 28))
        x = (frame - mean) / std
仍在while循环中,使用 ONNX 运行时运行推理。将输出转换为类索引,然后转换为字母:
        ...
        x = (frame - mean) / std

        x = x.reshape(1, 1, 28, 28).astype(np.float32)
        y = ort_session.run(None, {'input': x})[0]

        index = np.argmax(y, axis=1)
        letter = index_to_letter[int(index)]
在框架内显示预测的字母,并将框架显示回给用户:
        ...
        letter = index_to_letter[int(index)]

        cv2.putText(frame, letter, (100, 100), cv2.FONT_HERSHEY_SIMPLEX, 2.0, (0, 255, 0), thickness=2)
        cv2.imshow("Sign Language Translator", frame)
在while循环结束时,添加此代码以检查用户是否点击了该q字符,如果是,则退出应用程序。该行将程序暂停 1 毫秒。添加以下内容:
        ...
        cv2.imshow("Sign Language Translator", frame)

        if cv2.waitKey(1) & 0xFF == ord('q'):
            break
最后,释放捕获并关闭所有窗口。将它放在while循环之外以结束main函数。
...

    while True:
        ...
        if cv2.waitKey(1) & 0xFF == ord('q'):
            break


    cap.release()
    cv2.destroyAllWindows()
仔细检查您的文件是否与以下或此存储库匹配:
import cv2
import numpy as np
import onnxruntime as ort


def center_crop(frame):
    h, w, _ = frame.shape
    start = abs(h - w) // 2
    if h > w:
        return frame[start: start + w]
    return frame[:, start: start + h]


def main():
    # constants
    index_to_letter = list('ABCDEFGHIKLMNOPQRSTUVWXY')
    mean = 0.485 * 255.
    std = 0.229 * 255.

    # create runnable session with exported model
    ort_session = ort.InferenceSession("signlanguage.onnx")

    cap = cv2.VideoCapture(0)
    while True:
        # Capture frame-by-frame
        ret, frame = cap.read()

        # preprocess data
        frame = center_crop(frame)
        frame = cv2.cvtColor(frame, cv2.COLOR_RGB2GRAY)
        x = cv2.resize(frame, (28, 28))
        x = (x - mean) / std

        x = x.reshape(1, 1, 28, 28).astype(np.float32)
        y = ort_session.run(None, {'input': x})[0]

        index = np.argmax(y, axis=1)
        letter = index_to_letter[int(index)]

        cv2.putText(frame, letter, (100, 100), cv2.FONT_HERSHEY_SIMPLEX, 2.0, (0, 255, 0), thickness=2)
        cv2.imshow("Sign Language Translator", frame)

        if cv2.waitKey(1) & 0xFF == ord('q'):
            break

    cap.release()
    cv2.destroyAllWindows()

if __name__ == '__main__':
    main()
退出文件并运行脚本。
- python step_5_camera.py
脚本运行后,将弹出一个窗口,其中包含您的实时网络摄像头源。预测的手语字母将显示在左上角。举起你的手,做出你最喜欢的标志,看看你的分类器在运行。以下是一些显示字母L和D 的示例结果。
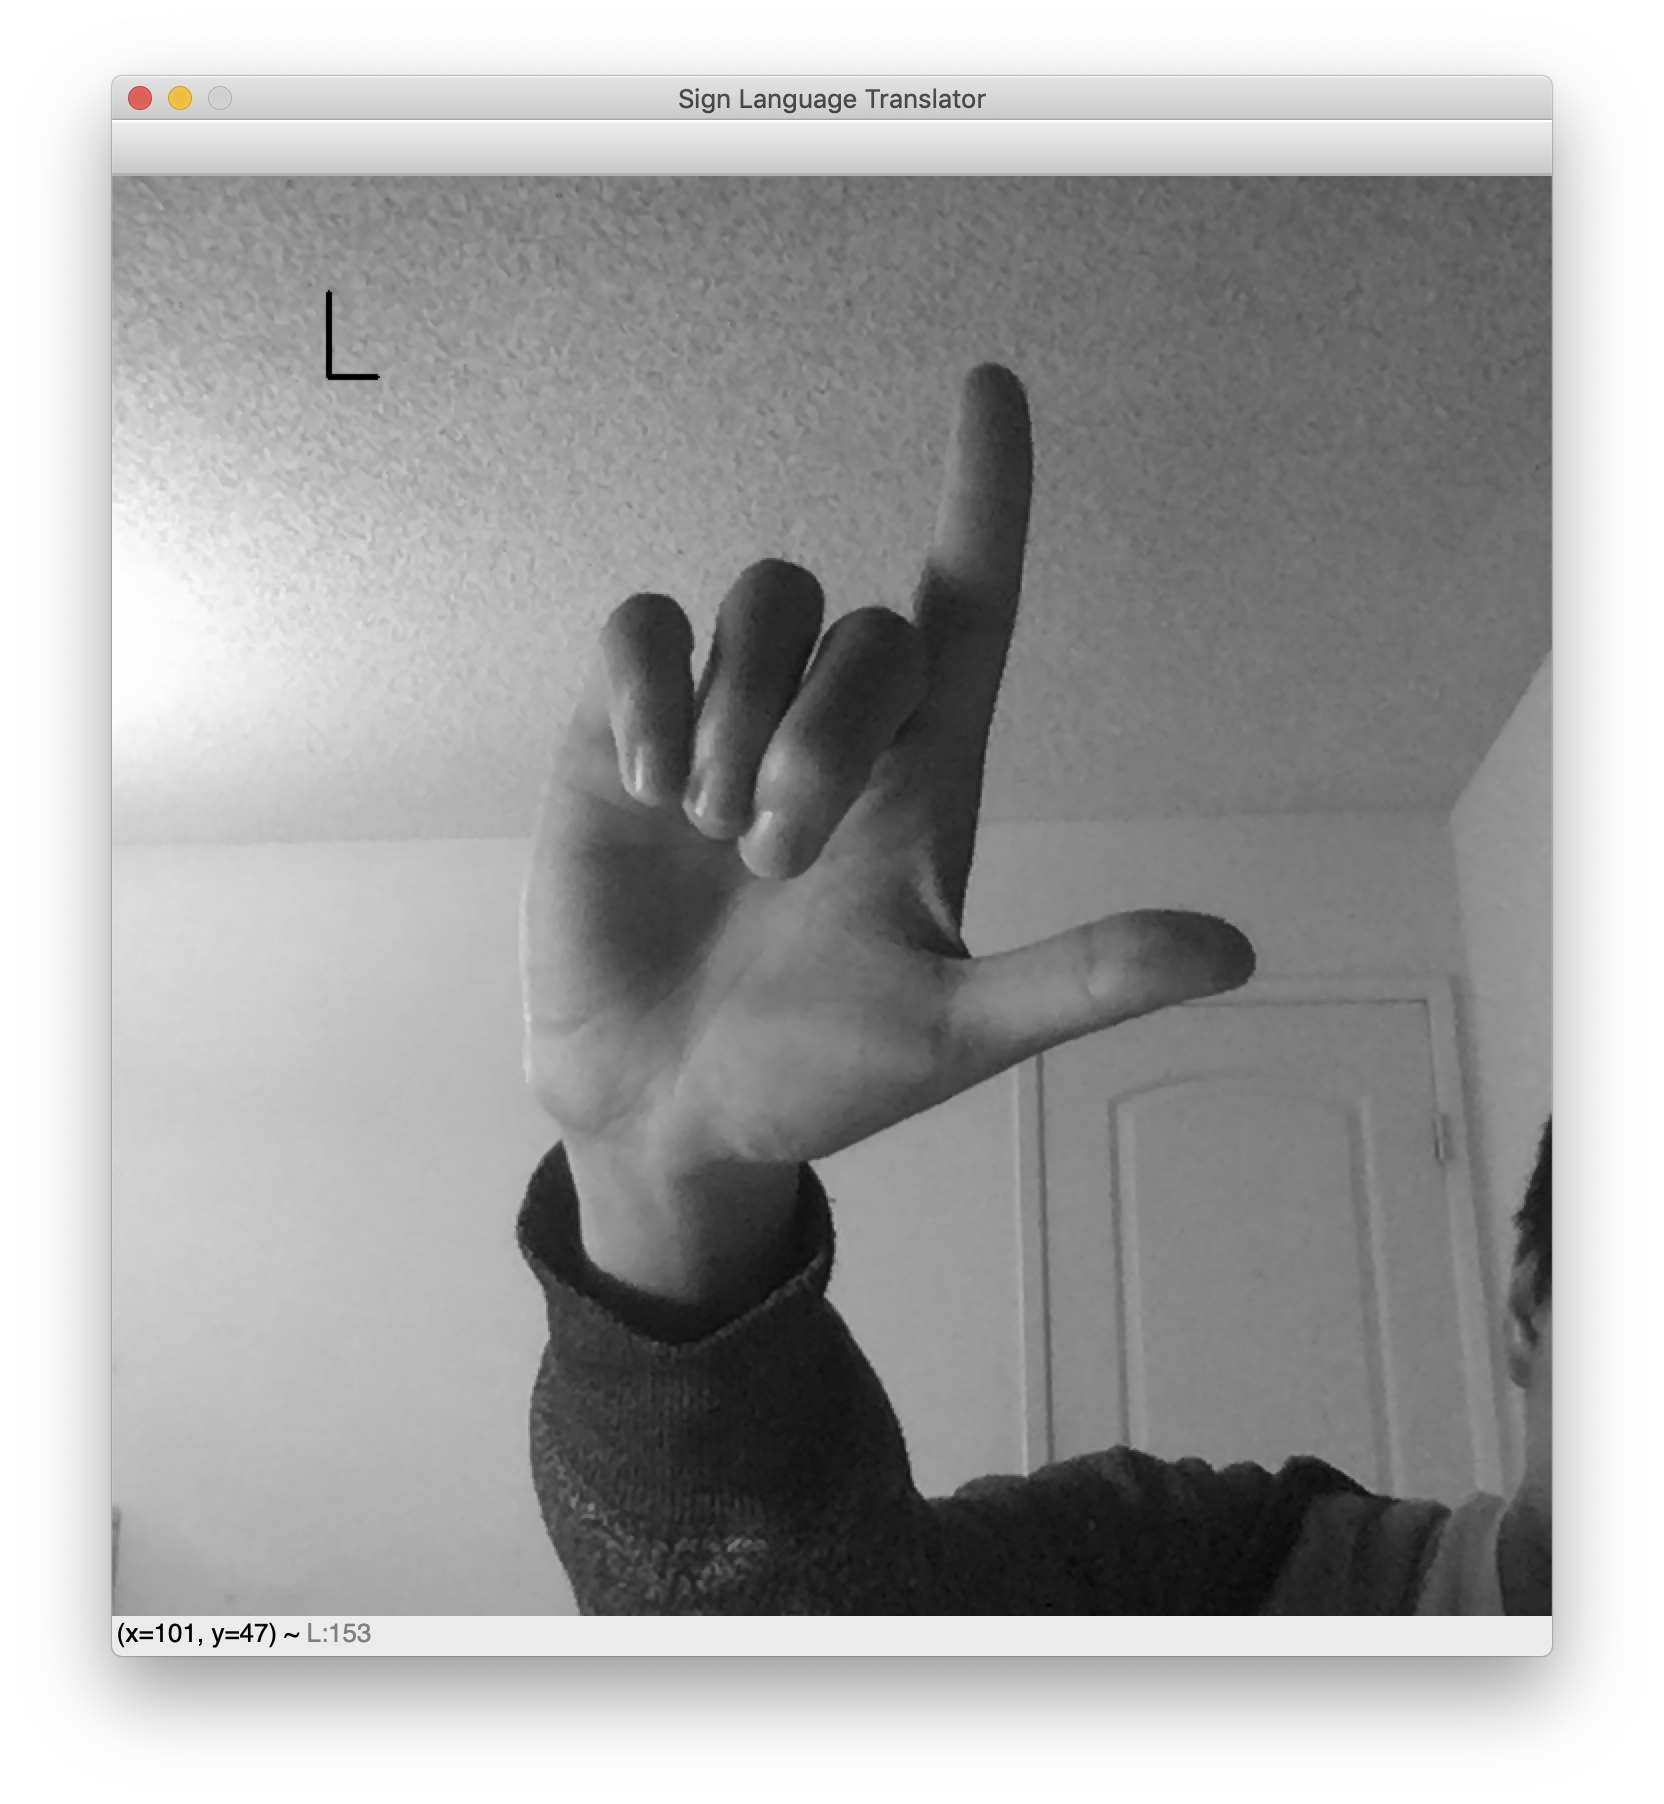

While testing, note that the background needs to be fairly clear for this translator to work. This is an unfortunate consequence of the dataset’s cleanliness. Had the dataset included images of hand signs with miscellaneous backgrounds, the network would be robust to noisy backgrounds. However, the dataset features blank backgrounds and nicely centered hands. As a result, this webcam translator works best when your hand is likewise centered and placed against a blank background.
This concludes the sign language translator application.
Conclusion
In this tutorial, you built an American Sign Language translator using computer vision and a machine learning model. In particular, you saw new aspects of training a machine learning model—specifically, data augmentation for model robustness, learning rate schedules for lower loss, and exporting AI models using ONNX for production use. This then culminated in a real-time computer vision application, which translates sign language into letters using a pipeline you built. It’s worth noting that combatting the brittleness of the final classifier can be tackled with any or all of the following methods. For further exploration try the following topics to in improve your application:
- 泛化:这不是计算机视觉中的子主题,而是贯穿所有机器学习的一个持续问题。请参阅了解偏差-方差权衡。
- 领域适应:假设您的模型是在领域 A 中训练的(例如,阳光充足的环境)。您能否让模型快速适应域 B(例如,多云环境)?
- 对抗性示例:假设对手有意设计图像以欺骗您的模型。你怎么能设计这样的图像?你怎么能对抗这样的图像?
