介绍
Let’s Encrypt 是一个证书颁发机构 (CA),它有助于获取和安装免费的TLS/SSL 证书,从而在 Web 服务器上启用加密的 HTTPS。它通过与Certbot等客户合作来自动执行必要的步骤,从而简化了流程。
在本教程中,您将使用 Certbot 在 CentOS 8 上的 Apache Web 服务器上设置 TLS/SSL 证书。此外,您将使用 cron 作业自动执行证书更新过程,您可以通过阅读如何使用了解更多信息Cron 在 CentOS 8 上自动执行任务。
先决条件
为了完成本指南,您需要:
- 按照CentOS 8 初始服务器设置指南设置了一台 CentOS 8 服务器,该服务器具有非root启用 sudo 的用户和基本
firewalld防火墙。 - Apache 安装在服务器上,并为您的域配置了虚拟主机。您可以按照我们的教程如何在 CentOS 8 上安装 Apache Web 服务器来了解如何进行设置。确保为您的域设置了虚拟主机。本教程将用作示例。
/etc/httpd/sites-available/example.com.conf - 您应该拥有或控制要使用证书的注册域名。如果你还没有注册的域名,你可以购买一个在Namecheap,免费获得一个在Freenom,或使用你选择的域名注册商。
- 将您的域指向服务器的公共 IP 地址的DNS
A记录。如果您通过 DigitalOcean 托管您的域,您可以参考DigitalOcean DNS 文档,了解有关如何使用 DigitalOcean 平台添加这些记录的详细信息。DNSA记录是必需的,因为 Let’s Encrypt 如何验证您拥有它为其颁发证书的域。例如,如果您想获得 的证书example.com,则该域必须解析到您的服务器才能进行验证过程。我们的设置将使用example.com和www.example.com作为域名,这两者都需要有效的 DNS 记录。
完成所有这些先决条件后,继续安装 Certbot 客户端软件。
步骤 1 — 安装 Certbot Let’s Encrypt 客户端
要使用 Let’s Encrypt 获取 SSL 证书,您首先需要安装 Certbot 和mod_sslApache 模块,它提供对 SSLv3 加密的支持。
该certbot包是不是可以通过默认的包管理器。您需要启用EPEL存储库才能安装 Certbot。
要添加 CentOS 8 EPEL 存储库,请运行以下命令:
- sudo dnf install epel-release
现在您可以访问存储库,安装所有必需的包:
- sudo dnf install certbot python3-certbot-apache mod_ssl
安装这些服务后,您现在可以运行 Certbot 并获取您的证书。
第 2 步 – 获得证书
现在安装了 Certbot,您可以使用它为您的域请求 SSL 证书。
使用certbotLet’s Encrypt 客户端为 Apache 生成 SSL 证书可以自动执行该过程中的许多步骤。客户端将自动获取并安装对您作为参数提供的域有效的新 SSL 证书。
要执行交互式安装并获取仅涵盖单个域的证书,请使用以下certbot命令运行命令:
- sudo certbot --apache -d example.com
这certbot与--apache插件一起运行,并使用-d标志指定要为其配置证书的域。
如果要安装对多个域或子域有效的单个证书,可以将它们作为附加参数传递给命令,用-d标志标记每个新域或子域。参数列表中的第一个域名将是Let’s Encrypt 用来创建证书的基本域。出于这个原因,将基本域名作为列表中的第一个传递,然后是任何其他子域或别名:
- sudo certbot --apache -d example.com -d www.example.com
此示例中的基本域是example.com.
该certbot实用程序还可以提示您根据现有的 Apache 配置选择域。要使用此功能,请在certbot不指定任何域的情况下调用:
- sudo certbot --apache
该计划将为您提供一个分步指南,以自定义您的证书选项。它会要求您提供丢失密钥恢复和通知的电子邮件地址,然后提示您同意服务条款。如果您没有在命令行中指定域,系统也会提示您进行指定。如果您的虚拟主机文件没有使用ServerName指令明确指定它们服务的域,您将被要求选择虚拟主机文件。
安装成功完成后,您将看到类似如下的消息:
OutputIMPORTANT NOTES:
 - Congratulations! Your certificate and chain have been saved at:
   /etc/letsencrypt/live/example.com/fullchain.pem
   Your key file has been saved at:
   /etc/letsencrypt/live/example.com/privkey.pem
   Your cert will expire on 2020-09-24. To obtain a new or tweaked
   version of this certificate in the future, simply run certbot again
   with the "certonly" option. To non-interactively renew *all* of
   your certificates, run "certbot renew"
 - Your account credentials have been saved in your Certbot
   configuration directory at /etc/letsencrypt. You should make a
   secure backup of this folder now. This configuration directory will
   also contain certificates and private keys obtained by Certbot so
   making regular backups of this folder is ideal.
 - If you like Certbot, please consider supporting our work by:

   Donating to ISRG / Let's Encrypt:   https://letsencrypt.org/donate
   Donating to EFF:                    https://eff.org/donate-le
生成的证书文件将在以您的基本域命名的子目录中提供/etc/letsencrypt/live。
现在您的证书已下载、安装和加载,您可以检查 SSL 证书状态以确保一切正常。
步骤 3 — 测试证书和 SSL 配置
此时,您可以使用云安全公司Qualys的SSL 服务器测试来确保 Certbot 正确创建了您的 SSL 证书。
在您的首选 Web 浏览器中打开以下链接,替换example.com为您的域:
https://www.ssllabs.com/ssltest/analyze.html?d=example.com
您将登陆一个页面,该页面立即开始测试与您的服务器的 SSL 连接:
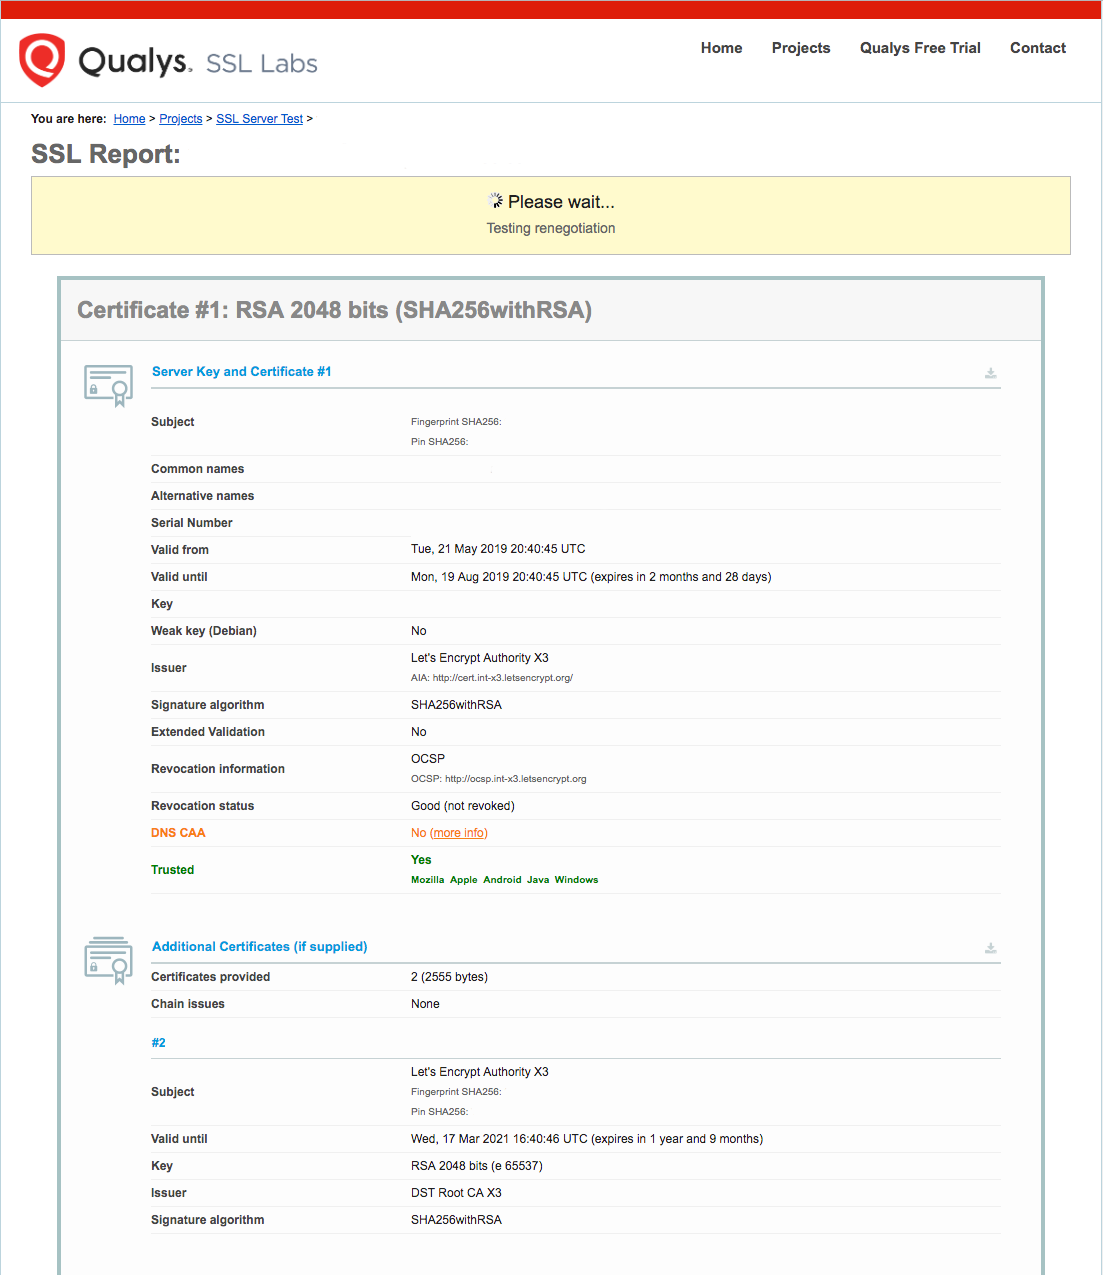
测试开始运行后,可能需要几分钟才能完成。测试状态将在您的浏览器中更新。
测试完成后,页面将显示一个字母等级,用于评估服务器配置的安全性和质量。在撰写本文时,默认设置将给出A评级:
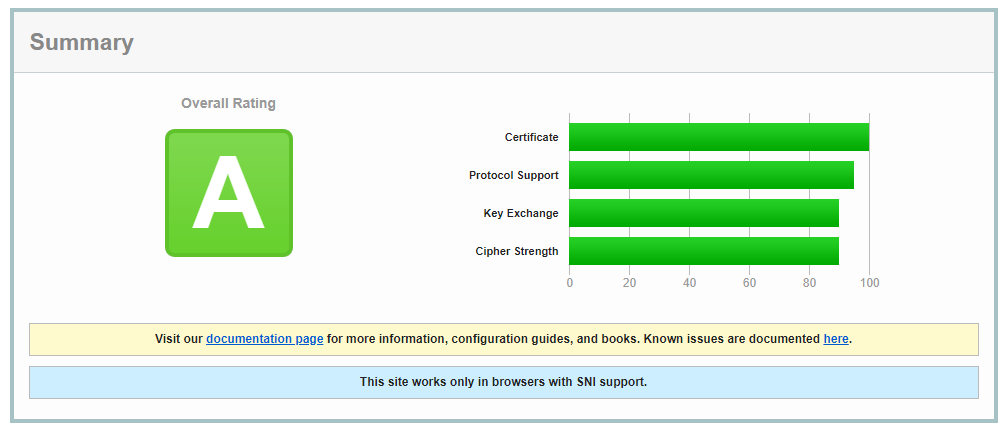
有关 SSL Labs 如何确定这些等级的更多信息,请查看SSL Labs 评分帖子,其中详细介绍了 2018 年 1 月对评分方案所做的更新。
尝试使用重新加载您的网站https://并注意浏览器的安全指示器。它现在将指示该站点已正确保护,通常带有锁定图标。
安装并验证您的 SSL 证书后,下一步是为您的证书设置自动续订以保持您的证书有效。
第 4 步 — 设置自动续订
Let’s Encrypt 证书的有效期为 90 天,但建议您每天检查两次更新,以防出现吊销或其他问题。因此,自动化此过程是最佳实践。
首先,让我们检查您将用于更新证书的命令。该certbot让我们加密客户端有一个renew命令可以自动检查当前已安装的证书,并试图续约他们,如果他们是从到期日不到30天了。通过使用该--dry-run选项,您可以运行此任务的模拟来测试renew工作原理:
- sudo certbot renew --dry-run
输出应该类似于:
OutputSaving debug log to /var/log/letsencrypt/letsencrypt.log

- - - - - - - - - - - - - - - - - - - - - - - - - - - - - - - - - - - - - - - -
Processing /etc/letsencrypt/renewal/example.com.conf
- - - - - - - - - - - - - - - - - - - - - - - - - - - - - - - - - - - - - - - -
Cert not due for renewal, but simulating renewal for dry run
Plugins selected: Authenticator apache, Installer apache
Starting new HTTPS connection (1): acme-staging-v02.api.letsencrypt.org
Renewing an existing certificate
Performing the following challenges:
http-01 challenge for example.com
http-01 challenge for www.example.com
Waiting for verification...
Cleaning up challenges
Resetting dropped connection: acme-staging-v02.api.letsencrypt.org

- - - - - - - - - - - - - - - - - - - - - - - - - - - - - - - - - - - - - - - -
new certificate deployed with reload of apache server; fullchain is
/etc/letsencrypt/live/example.com/fullchain.pem
- - - - - - - - - - - - - - - - - - - - - - - - - - - - - - - - - - - - - - - -

- - - - - - - - - - - - - - - - - - - - - - - - - - - - - - - - - - - - - - - -
** DRY RUN: simulating 'certbot renew' close to cert expiry
**          (The test certificates below have not been saved.)

Congratulations, all renewals succeeded. The following certs have been renewed:
  /etc/letsencrypt/live/example.com/fullchain.pem (success)
...
请注意,如果您创建了具有多个域的捆绑证书,则输出中只会显示基本域名,但续订将对该证书中包含的所有域有效。
确保您的证书不会过时的一种实用方法是创建一个cron 作业,它会定期为您执行自动更新命令。
该官员Certbot文档建议运行cron,每天两次。这将确保在 Let’s Encrypt 发起证书吊销的情况下,Certbot 更新您的证书的时间不会超过半天。文档建议使用以下命令向crontab 文件添加适当的cron作业/etc/crontab:
- echo "0 0,12 * * * root python3 -c 'import random; import time; time.sleep(random.random() * 3600)' && certbot renew -q" | sudo tee -a /etc/crontab > /dev/null
这将创建一个新的 cron 作业,该作业将在每天中午和午夜执行 ( 0 0,12 * * *)。然后它将运行简短的python3脚本,该脚本会在 0 到 60 分钟之间的随机时间段内暂停。建议这样做以减少 Let’s Encrypt 服务器的负载。
python 脚本退出后,certbot renew将运行实际命令。
有关如何创建和安排 cron 作业的更多信息,您可以查看我们的如何在 CentOS 8 上使用 Cron 自动化任务指南。有关续订的更多详细信息,请参阅Certbot 文档。
结论
在本指南中,您安装了 Let’s Encrypt Certbot 客户端,为您的域下载了 SSL 证书,并设置了自动证书续订。如果您对使用 Certbot 有任何疑问,可以查看Certbot官方文档。我们还建议您不时查看Let’s Encrypt官方博客以获取重要更新。
