DynamoDB – 创建表
DynamoDB – 创建表
创建表通常包括生成表、命名表、建立其主键属性和设置属性数据类型。
利用 GUI 控制台、Java 或其他选项来执行这些任务。
使用 GUI 控制台创建表
通过访问https://console.aws.amazon.com/dynamodb 上的控制台来创建表。然后选择“创建表”选项。
我们的示例生成一个填充有产品信息的表,其中产品具有由 ID 号(数字属性)标识的唯一属性。在创建表屏幕中,在表名字段中输入表名;在分区键字段中输入主键 (ID);并为数据类型输入“数字”。
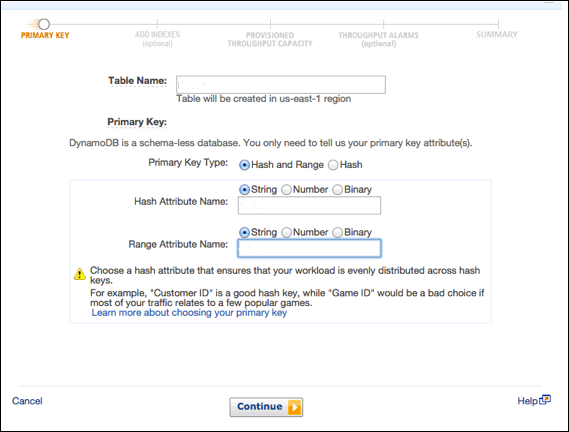
输入所有信息后,选择Create。
使用 Java 创建表
使用 Java 创建相同的表。它的主键由以下两个属性组成 –
-
ID – 使用分区键和 ScalarAttributeType N,意思是数字。
-
Nomenclature – 使用排序键和 ScalarAttributeType S,意思是字符串。
Java 使用createTable 方法生成表;在调用中,指定了表名、主键属性和属性数据类型。
您可以查看以下示例 –
import java.util.Arrays;

import com.amazonaws.services.dynamodbv2.AmazonDynamoDBClient;
import com.amazonaws.services.dynamodbv2.document.DynamoDB;
import com.amazonaws.services.dynamodbv2.document.Table;

import com.amazonaws.services.dynamodbv2.model.AttributeDefinition;
import com.amazonaws.services.dynamodbv2.model.KeySchemaElement;
import com.amazonaws.services.dynamodbv2.model.KeyType;
import com.amazonaws.services.dynamodbv2.model.ProvisionedThroughput;
import com.amazonaws.services.dynamodbv2.model.ScalarAttributeType;

public class ProductsCreateTable {
   public static void main(String[] args) throws Exception {
      AmazonDynamoDBClient client = new AmazonDynamoDBClient()
         .withEndpoint("http://localhost:8000");

      DynamoDB dynamoDB = new DynamoDB(client);
      String tableName = "Products";
      try {
         System.out.println("Creating the table, wait...");
         Table table = dynamoDB.createTable (tableName,
            Arrays.asList (
               new KeySchemaElement("ID", KeyType.HASH), // the partition key
                                                         // the sort key
               new KeySchemaElement("Nomenclature", KeyType.RANGE)
            ),
            Arrays.asList (
               new AttributeDefinition("ID", ScalarAttributeType.N),
               new AttributeDefinition("Nomenclature", ScalarAttributeType.S)
            ),
            new ProvisionedThroughput(10L, 10L)
         );
         table.waitForActive();
         System.out.println("Table created successfully.  Status: " +
            table.getDescription().getTableStatus());

      } catch (Exception e) {
         System.err.println("Cannot create the table: ");
         System.err.println(e.getMessage());
      }
   }
}
在上面的示例中,请注意端点:.withEndpoint。
它表示使用本地主机进行本地安装。另外,请注意本地安装会忽略所需的ProvisionedThroughput 参数。
