Kibana – 加载示例数据
Kibana – 加载示例数据
我们已经看到了如何将数据从 logstash 上传到 elasticsearch。我们将在这里使用 logstash 和 elasticsearch 上传数据。但是关于我们需要使用的具有日期、经度和纬度字段的数据,我们将在接下来的章节中学习。如果我们没有 CSV 文件,我们还将了解如何直接在 Kibana 中上传数据。
在本章中,我们将涵盖以下主题 –
- 在 Elasticsearch 中使用 Logstash 上传具有日期、经度和纬度字段的数据
- 使用开发工具上传批量数据
使用 Logstash 上传 Elasticsearch 中具有字段的数据
我们将使用 CSV 格式的数据,同样取自 Kaggle.com,它处理可用于分析的数据。
此处使用的家庭医疗访问数据来自 Kaggle.com 网站。
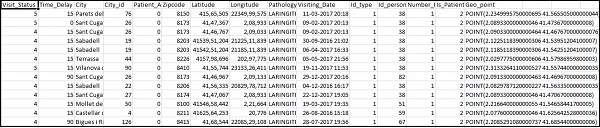
以下是 CSV 文件可用的字段 –
["Visit_Status","Time_Delay","City","City_id","Patient_Age","Zipcode","Latitude","Longitude",
"Pathology","Visiting_Date","Id_type","Id_personal","Number_Home_Visits","Is_Patient_Minor","Geo_point"]
Home_visits.csv 如下 –
以下是与 logstash 一起使用的 conf 文件 –
input {
   file {
      path => "C:/kibanaproject/home_visits.csv"
      start_position => "beginning"
      sincedb_path => "NUL"
   }
}
filter {
   csv {
      separator => ","
      columns =>
      ["Visit_Status","Time_Delay","City","City_id","Patient_Age",
      "Zipcode","Latitude","Longitude","Pathology","Visiting_Date",
      "Id_type","Id_personal","Number_Home_Visits","Is_Patient_Minor","Geo_point"]
   }
   date {
      match => ["Visiting_Date","dd-MM-YYYY HH:mm"]
      target => "Visiting_Date"
   }
   mutate {convert => ["Number_Home_Visits", "integer"]}
   mutate {convert => ["City_id", "integer"]}
   mutate {convert => ["Id_personal", "integer"]}
   mutate {convert => ["Id_type", "integer"]}
   mutate {convert => ["Zipcode", "integer"]}
   mutate {convert => ["Patient_Age", "integer"]}
   mutate {
      convert => { "Longitude" => "float" }
      convert => { "Latitude" => "float" }
   }
   mutate {
      rename => {
         "Longitude" => "[location][lon]"
         "Latitude" => "[location][lat]"
      }
   }
}
output {
   elasticsearch {
      hosts => ["localhost:9200"]
      index => "medicalvisits-%{+dd.MM.YYYY}"
   }
   stdout {codec => json_lines }
}
默认情况下,logstash 将所有要在 elasticsearch 中上传的内容视为字符串。如果您的 CSV 文件有日期字段,您需要执行以下操作以获取日期格式。
对于日期字段 –
date {
   match => ["Visiting_Date","dd-MM-YYYY HH:mm"]
   target => "Visiting_Date"
}
在地理位置的情况下,elasticsearch 的理解与 –
"location": {
   "lat":41.565505000000044,
   "lon": 2.2349995750000695
}
所以我们需要确保我们有elasticsearch需要的格式的经度和纬度。所以首先我们需要将经度和纬度转换为浮点数,然后重命名它,以便它可以作为带有lat和lon的location json 对象的一部分。此处显示相同的代码 –
mutate {
      convert => { "Longitude" => "float" }
      convert => { "Latitude" => "float" }
   }
mutate {
   rename => {
      "Longitude" => "[location][lon]"
      "Latitude" => "[location][lat]"
   }
}
要将字段转换为整数,请使用以下代码 –
mutate {convert => ["Number_Home_Visits", "integer"]}
mutate {convert => ["City_id", "integer"]}
mutate {convert => ["Id_personal", "integer"]}
mutate {convert => ["Id_type", "integer"]}
mutate {convert => ["Zipcode", "integer"]}
mutate {convert => ["Patient_Age", "integer"]}
处理好字段后,运行以下命令在 elasticsearch 中上传数据 –
- 进入 Logstash bin 目录并运行以下命令。
logstash -f logstash_homevisists.conf
- 完成后,您应该在elasticsearch中看到logstash conf文件中提到的索引,如下所示 –
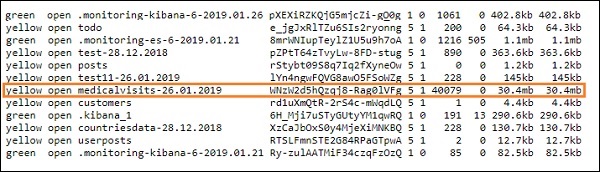
我们现在可以在上面上传的索引上创建索引模式,并进一步使用它来创建可视化。
使用开发工具上传批量数据
我们将使用 Kibana UI 中的开发工具。Dev Tools 有助于在 Elasticsearch 中上传数据,而无需使用 Logstash。我们可以使用 Dev Tools 在 Kibana 中发布、放置、删除、搜索我们想要的数据。
在本节中,我们将尝试在 Kibana 本身中加载示例数据。我们可以用它来练习示例数据并使用 Kibana 功能来更好地理解 Kibana。
让我们从以下 url 中获取 json 数据并将其上传到 Kibana。同样,您可以尝试在 Kibana 中加载任何示例 json 数据。
在我们开始上传示例数据之前,我们需要有带索引的 json 数据,以便在 elasticsearch 中使用。当我们使用 logstash 上传它时,logstash 会注意添加索引,用户不必担心 elasticsearch 所需的索引。
普通 Json 数据
[
   {"type":"act","line_id":1,"play_name":"Henry IV",

   "speech_number":"","line_number":"","speaker":"","text_entry":"ACT I"},
   {"type":"scene","line_id":2,"play_name":"Henry IV",
   "speech_number":"","line_number":"","speaker":"","text_entry":"SCENE I.London. The palace."},
   {"type":"line","line_id":3,"play_name":"Henry IV",
   "speech_number":"","line_number":"","speaker":"","text_entry":
   "Enter KING HENRY, LORD JOHN OF LANCASTER, the
   EARL of WESTMORELAND, SIR WALTER BLUNT, and others"}
]
与 Kibana 一起使用的 json 代码必须索引如下 –
{"index":{"_index":"shakespeare","_id":0}}
{"type":"act","line_id":1,"play_name":"Henry IV",
"speech_number":"","line_number":"","speaker":"","text_entry":"ACT I"}
{"index":{"_index":"shakespeare","_id":1}}
{"type":"scene","line_id":2,"play_name":"Henry IV",
"speech_number":"","line_number":"","speaker":"",
"text_entry":"SCENE I. London. The palace."}
{"index":{"_index":"shakespeare","_id":2}}
{"type":"line","line_id":3,"play_name":"Henry IV",
"speech_number":"","line_number":"","speaker":"","text_entry":
"Enter KING HENRY, LORD JOHN OF LANCASTER, the EARL
of WESTMORELAND, SIR WALTER BLUNT, and others"}
请注意,jsonfile 中有一个额外的数据 – {“index”:{“_index”:”nameofindex”,”_id”:key}}。
要转换任何与 elasticsearch 兼容的示例 json 文件,这里我们在 php 中有一个小代码,它将输出给定为 elasticsearch 想要的格式的 json 文件 –
PHP代码
<?php
   $myfile = fopen("todo.json", "r") or die("Unable to open file!"); // your json
   file here
   $alldata = fread($myfile,filesize("todo.json"));
   fclose($myfile);
   $farray = json_decode($alldata);
   $afinalarray = [];
   $index_name = "todo";
   $i=0;
   $myfile1 = fopen("todonewfile.json", "w") or die("Unable to open file!"); //
   writes a new file to be used in kibana dev tool
   foreach ($farray as $a => $value) {
      $_index = json_decode('{"index": {"_index": "'.$index_name.'", "_id": "'.$i.'"}}');
      fwrite($myfile1, json_encode($_index));
      fwrite($myfile1, "\n");
      fwrite($myfile1, json_encode($value));
      fwrite($myfile1, "\n");
      $i++;
   }
?>
我们从https://jsonplaceholder.typicode.com/todos 中获取了 todo json 文件,并使用 php 代码转换为我们需要在 Kibana 中上传的格式。
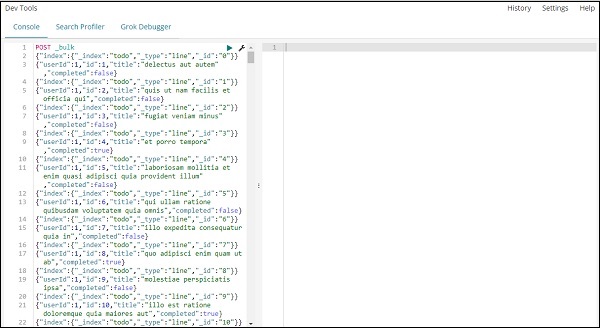
要加载示例数据,请打开开发工具选项卡,如下所示 –

我们现在将使用如上所示的控制台。我们将通过php代码运行我们得到的json数据。
在开发工具中用于上传 json 数据的命令是 –
POST _bulk
请注意,我们正在创建的索引的名称是todo。
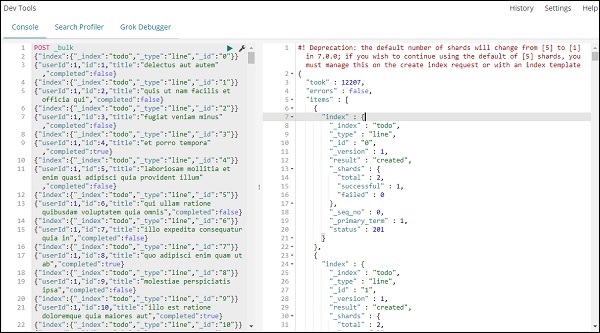
单击绿色按钮后,数据已上传,您可以检查是否在 elasticsearch 中创建了索引,如下所示 –

您可以在开发工具本身中检查相同的内容,如下所示 –
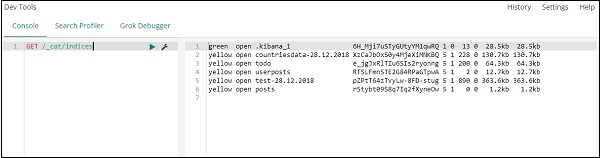
命令 –
GET /_cat/indices
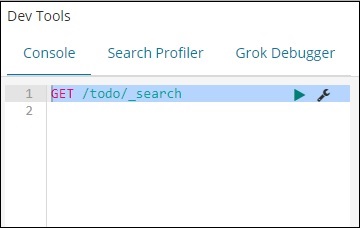
如果你想在你的 index:todo 中搜索一些东西,你可以这样做,如下所示 –
开发工具中的命令
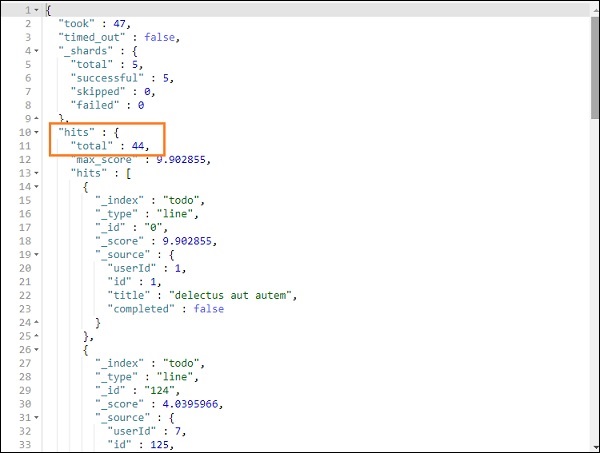
GET /todo/_search
上述搜索的输出如下所示 –
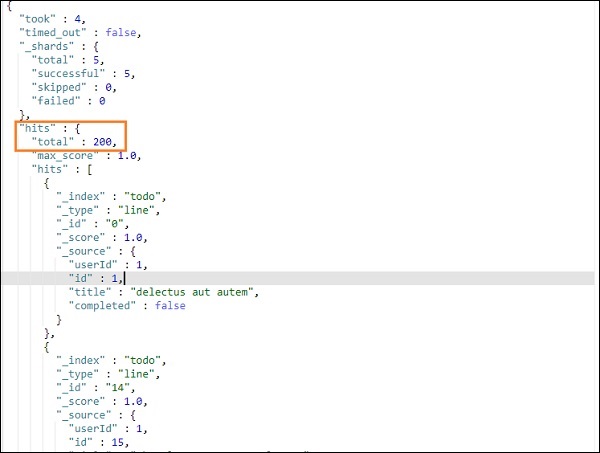
它给出了 todoindex 中存在的所有记录。我们得到的总记录是 200。
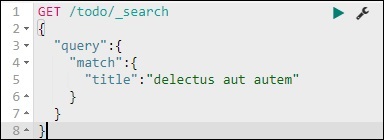
在 todo 索引中搜索记录
我们可以使用以下命令来做到这一点 –
GET /todo/_search
{
   "query":{
      "match":{
         "title":"delectusautautem"
      }
   }
}
我们能够获取与我们给出的标题匹配的记录。
