ASP.NET MVC – 数据模型
ASP.NET MVC – 数据模型
在本章中,我们将讨论在 ASP.NET MVC 框架应用程序中构建模型。甲模型存储被根据来自控制器的命令检索并在视图中显示的数据。
模型是一组类,您将在其中处理数据和业务逻辑。因此,基本上模型是特定于业务领域的容器。它用于与数据库交互。它还可以用于操作数据以实现业务逻辑。
让我们通过创建一个新的 ASP.Net MVC 项目来看看 Model 的一个简单示例。
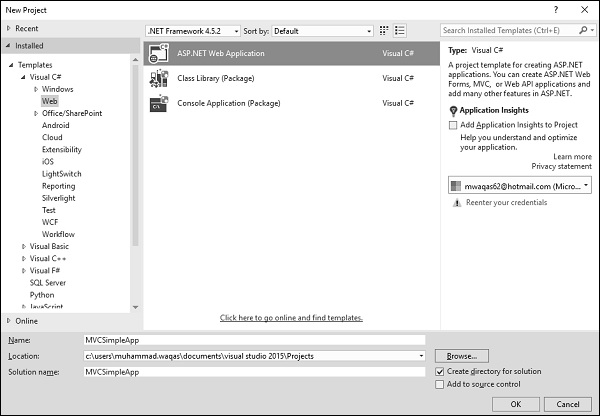
步骤 1 – 打开 Visual Studio。单击文件 → 新建 → 项目菜单选项。
一个新的项目对话框打开。
步骤 2 – 从左侧窗格中,选择模板 → Visual C# → Web。
步骤 3 – 在中间窗格中,选择 ASP.NET Web 应用程序。
第 4 步– 在名称字段中输入项目名称“MVCSimpleApp”,然后单击确定继续。您将看到以下对话框,要求您设置 ASP.NET 项目的初始内容。
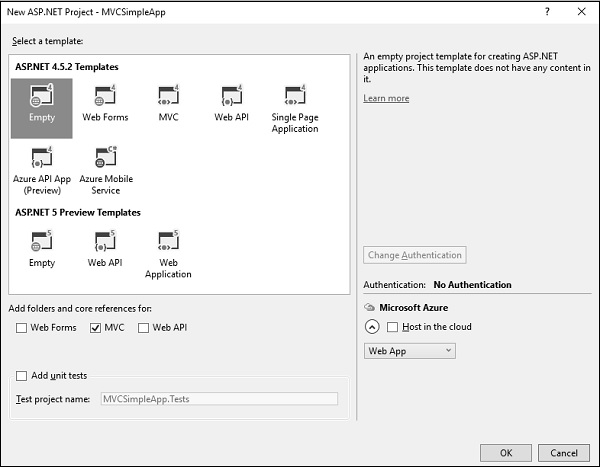
第 5 步– 为简单起见,选择“空”选项并选中“添加文件夹和核心引用”部分中的 MVC 复选框,然后单击“确定”。
它将创建一个具有最少预定义内容的基本 MVC 项目。
我们现在需要添加一个控制器。
步骤 6 – 右键单击解决方案资源管理器中的控制器文件夹,然后选择添加 → 控制器。
它将显示“添加脚手架”对话框。
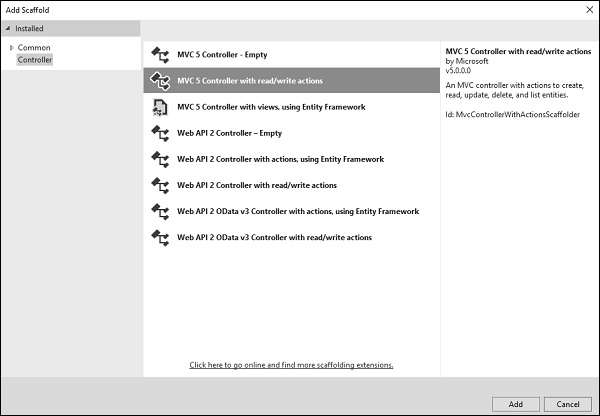
步骤 7 – 选择 MVC 5 控制器 – 带有读/写操作选项。此模板将为 Controller 创建一个具有默认操作的 Index 方法。这还将列出其他方法,如编辑/删除/创建。
步骤 8 – 单击“添加”按钮,将出现“添加控制器”对话框。

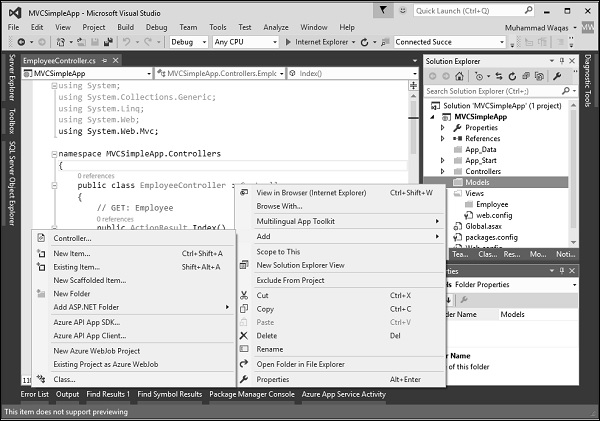
第 9 步– 将名称设置为 EmployeeController 并单击“添加”按钮。
第 10 步– 您将在 Controllers 文件夹中看到一个新的 C# 文件“EmployeeController.cs”,该文件在 Visual Studio 中打开以使用一些默认操作进行编辑。
using System;
using System.Collections.Generic;
using System.Linq;

using System.Web;
using System.Web.Mvc;

namespace MVCSimpleApp.Controllers {
   public class EmployeeController : Controller{
      // GET: Employee
      public ActionResult Index(){
         return View();
      }

      // GET: Employee/Details/5
      public ActionResult Details(int id){
         return View();
      }

      // GET: Employee/Create
      public ActionResult Create(){
         return View();
      }

      // POST: Employee/Create
      [HttpPost]
      public ActionResult Create(FormCollection collection){
         try{
            // TODO: Add insert logic here
            return RedirectToAction("Index");
         }catch{
            return View();
         }
      }

      // GET: Employee/Edit/5
      public ActionResult Edit(int id){
         return View();
      }

      // POST: Employee/Edit/5
      [HttpPost]
      public ActionResult Edit(int id, FormCollection collection){
         try{
            // TODO: Add update logic here
            return RedirectToAction("Index");
         }catch{
            return View();
         }
      }

      // GET: Employee/Delete/5
      public ActionResult Delete(int id){
         return View();
      }

      // POST: Employee/Delete/5
      [HttpPost]
      public ActionResult Delete(int id, FormCollection collection){
         try{
            // TODO: Add delete logic here
            return RedirectToAction("Index");
         }catch{
            return View();
         }
      }
   }
}
让我们添加一个模型。
步骤 11 – 右键单击解决方案资源管理器中的模型文件夹,然后选择添加 → 类。
您将看到“添加新项目”对话框。
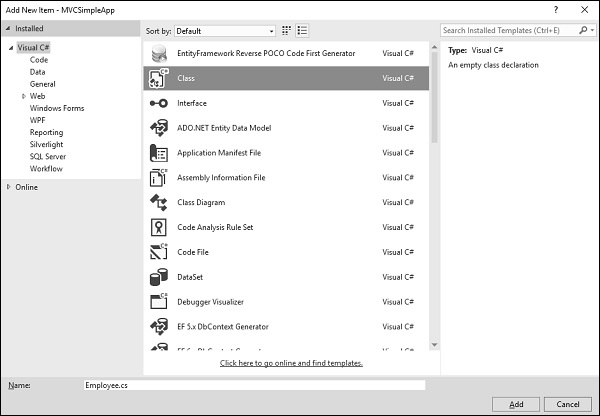
步骤 12 – 在中间盘中选择 Class 并在 name 字段中输入 Employee.cs。
步骤 13 – 使用以下代码向 Employee 类添加一些属性。
using System;
using System.Collections.Generic;
using System.Linq;
using System.Web;

namespace MVCSimpleApp.Models {
   public class Employee{
      public int ID { get; set; }
      public string Name { get; set; }
      public DateTime JoiningDate { get; set; }
      public int Age { get; set; }
   }
}
让我们通过添加另一个方法来更新 EmployeeController.cs 文件,该方法将返回员工列表。
[NonAction]
public List<Employee> GetEmployeeList(){
   return new List<Employee>{
      new Employee{
         ID = 1,
         Name = "Allan",
         JoiningDate = DateTime.Parse(DateTime.Today.ToString()),
         Age = 23
      },

      new Employee{
         ID = 2,
         Name = "Carson",
         JoiningDate = DateTime.Parse(DateTime.Today.ToString()),
         Age = 45
      },

      new Employee{
         ID = 3,
         Name = "Carson",
         JoiningDate = DateTime.Parse(DateTime.Today.ToString()),
         Age = 37
      },

      new Employee{
         ID = 4,
         Name = "Laura",
         JoiningDate = DateTime.Parse(DateTime.Today.ToString()),
         Age = 26
      },
   };
}
步骤 14 – 更新索引操作方法,如下面的代码所示。
public ActionResult Index(){
   var employees = from e in GetEmployeeList()
   orderby e.ID
   select e;
   return View(employees);
}
第 15 步– 运行此应用程序并将 /employee 附加到浏览器中的 URL,然后按 Enter。您将看到以下输出。
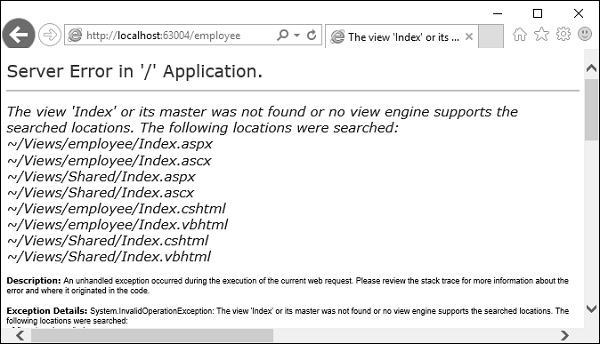
如上面的截图所示,有一个错误,这个错误实际上是非常具有描述性的,它告诉我们它找不到索引视图。
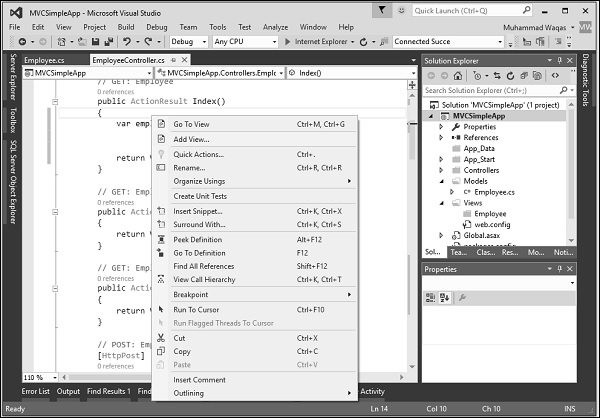
步骤 16 – 因此,要添加视图,请在“索引”操作内右键单击并选择“添加视图”。
它将显示“添加视图”对话框,并将添加默认名称。
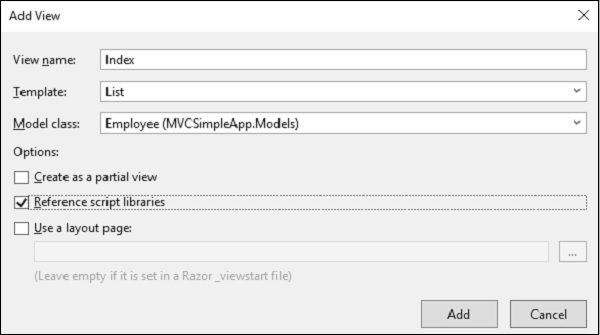
步骤 17 – 从模板下拉列表和模型类下拉列表中的员工中选择列表,并取消选中“使用布局页面”复选框并单击“添加”按钮。
它将在此视图中为您添加一些默认代码。
@model IEnumerable<MVCSimpleApp.Models.Employee>
@{
   Layout = null;
}

<!DOCTYPE html>
<html>
   <head>
      <meta name = "viewport" content = "width = device-width" />
      <title>Index</title>
   </head>

   <body>
      <p>@Html.ActionLink("Create New", "Create")</p>
         <table class = "table">
         <tr>
            <th>
               @Html.DisplayNameFor(model => model.Name)
            </th>

            <th>
               @Html.DisplayNameFor(model => model.JoiningDate)
            </th>

            <th>
               @Html.DisplayNameFor(model => model.Age)
            </th>

            <th></th>
         </tr>

         @foreach (var item in Model) {
            <tr>
               <td>
                  @Html.DisplayFor(modelItem => item.Name)
               </td>

               <td>
                  @Html.DisplayFor(modelItem => item.JoiningDate)
               </td>

               <td>
                  @Html.DisplayFor(modelItem => item.Age)
               </td>

               <td>
                  @Html.ActionLink("Edit", "Edit", new { id = item.ID }) |
                  @Html.ActionLink("Details", "Details", new { id = item.ID }) |
                  @Html.ActionLink("Delete", "Delete", new { id = item.ID })
               </td>

            </tr>
         }

      </table>
   </body>
</html>
步骤 18 – 运行此应用程序,您将收到以下输出。
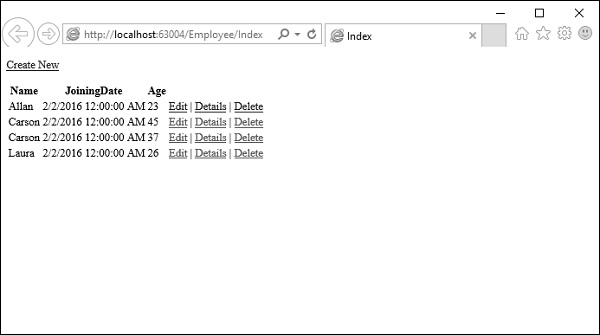
将显示员工列表。
