ASP.NET MVC – 脚手架
ASP.NET MVC – 脚手架
ASP.NET Scaffolding 是用于 ASP.NET Web 应用程序的代码生成框架。Visual Studio 2013 包括用于 MVC 和 Web API 项目的预安装代码生成器。当您想要快速添加与数据模型交互的代码时,您可以向项目添加脚手架。使用脚手架可以减少在项目中开发标准数据操作的时间。
如您所见,我们已经为索引、创建、编辑操作创建了视图,并且还需要更新操作方法。但是 ASP.Net MVC 提供了一种更简单的方法来使用脚手架创建所有这些视图和操作方法。
我们来看一个简单的例子。我们将创建包含模型类 Employee 的相同示例,但这次我们将使用脚手架。
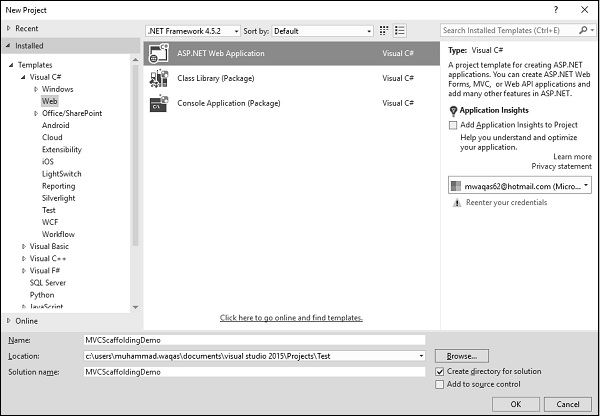
步骤 1 – 打开 Visual Studio 并单击文件 → 新建 → 项目菜单选项。
一个新的项目对话框打开。
步骤 2 – 从左侧窗格中,选择模板 → Visual C# → Web。
步骤 3 – 在中间窗格中,选择 ASP.NET Web 应用程序。
第 4 步– 在名称字段中输入项目名称“MVCScaffoldingDemo”,然后单击“确定”继续。您将看到以下对话框,要求您设置 ASP.NET 项目的初始内容。
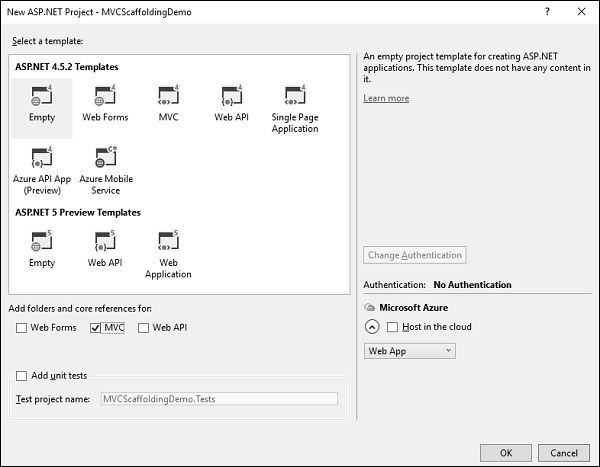
第 5 步– 为简单起见,选择“空”选项并选中“添加文件夹和核心引用”部分中的 MVC 复选框,然后单击“确定”。
它将创建一个具有最少预定义内容的基本 MVC 项目。
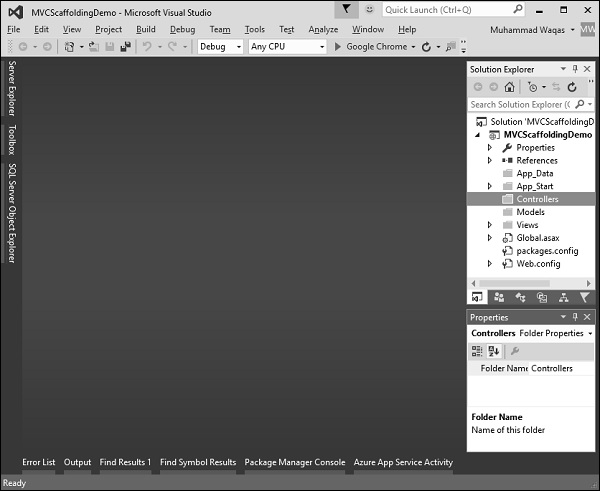
一旦 Visual Studio 创建了项目,您将在解决方案资源管理器窗口中看到许多文件和文件夹。
添加实体框架支持
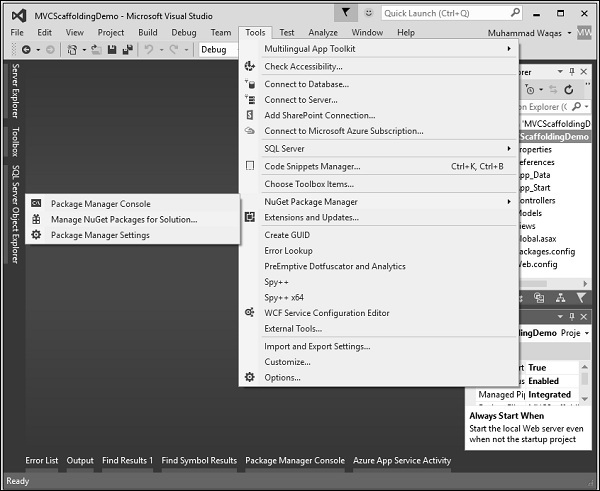
第一步是安装实体框架。右键单击该项目并选择 NuGet 包管理器 → 管理解决方案的 NuGet 包…
它将打开“NuGet 包管理器”。在搜索框中搜索实体框架。
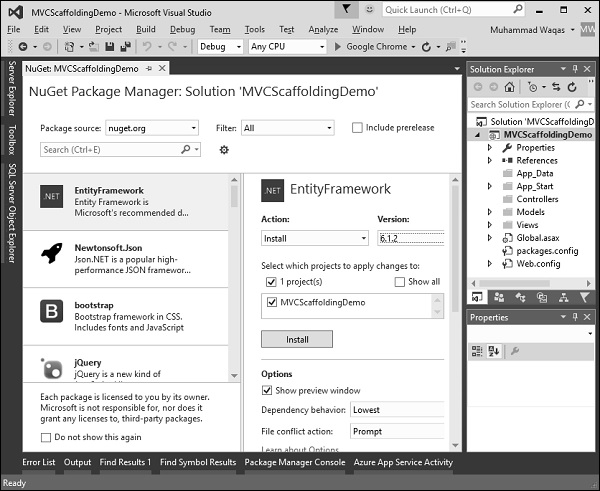
选择实体框架并单击“安装”按钮。它将打开“预览”对话框。
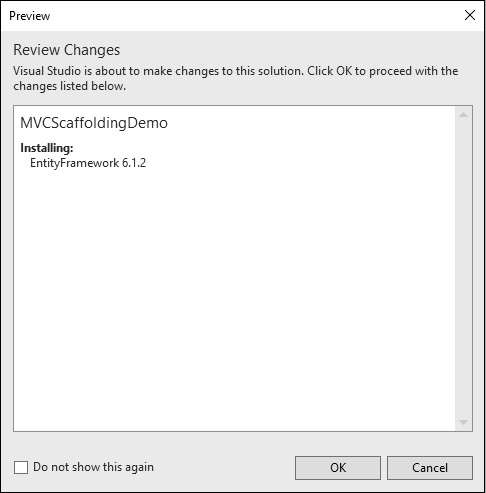
单击确定继续。
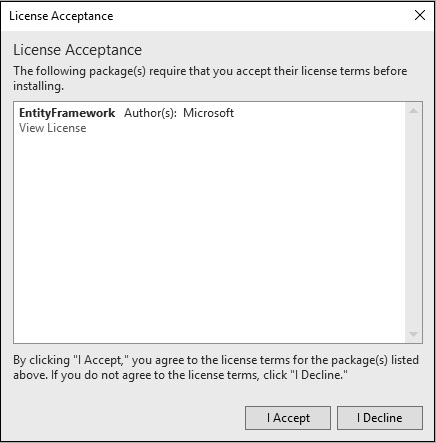
单击“我接受”按钮开始安装。
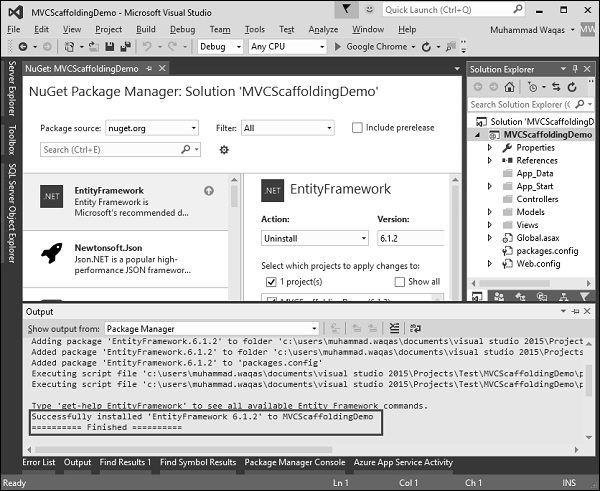
安装实体框架后,您将在输出窗口中看到消息,如上面的屏幕截图所示。
添加模型
要添加模型,请右键单击解决方案资源管理器中的模型文件夹,然后选择添加 → 类。您将看到“添加新项目”对话框。
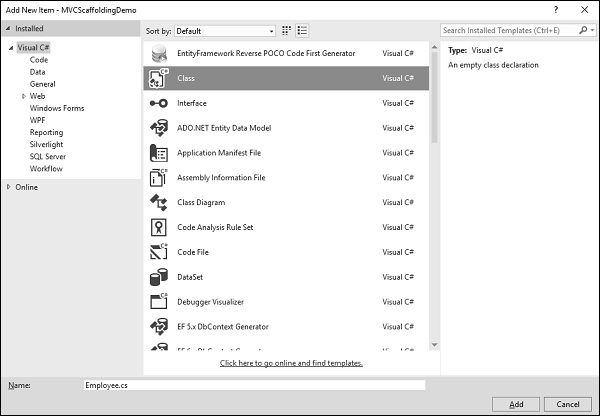
选择中间盘中的 Class 并在 name 字段中输入 Employee.cs。
使用以下代码向 Employee 类添加一些属性。
using System;

namespace MVCScaffoldingDemo.Models {
   public class Employee{
      public int ID { get; set; }
      public string Name { get; set; }
      public DateTime JoiningDate { get; set; }
      public int Age { get; set; }
   }
}
添加数据库上下文
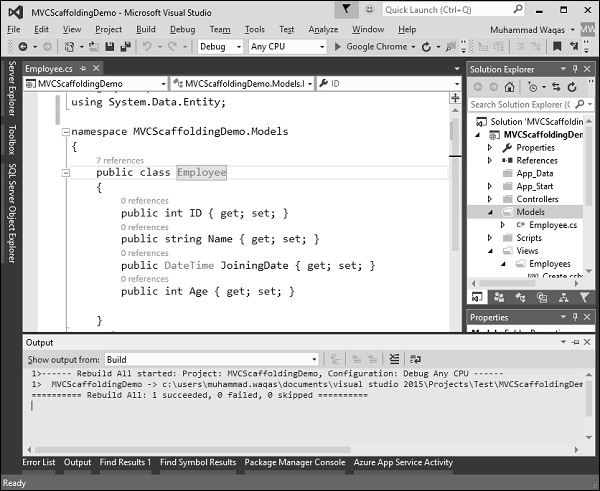
我们有一个员工模型,现在我们需要添加另一个类,它将与实体框架通信以检索和保存数据。以下是 Employee.cs 文件中的完整代码。
using System;
using System.Data.Entity;

namespace MVCScaffoldingDemo.Models{
   public class Employee{
      public int ID { get; set; }
      public string Name { get; set; }
      public DateTime JoiningDate { get; set; }
      public int Age { get; set; }
   }

   public class EmpDBContext : DbContext{
      public DbSet<Employee> Employees { get; set; }
   }
}
如您所见,“EmpDBContext”派生自称为“DbContext”的 EF 类。在这个类中,我们有一个名为 DbSet 的属性,它基本上代表您要查询和保存的实体。
现在让我们构建一个解决方案,当项目构建成功时,您将看到消息。
添加脚手架项目
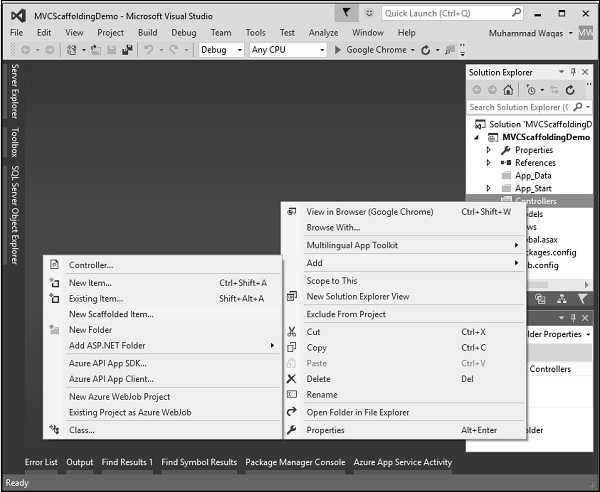
要添加脚手架,请右键单击解决方案资源管理器中的 Controllers 文件夹,然后选择添加 → 新建脚手架项。
它将显示“添加脚手架”对话框。
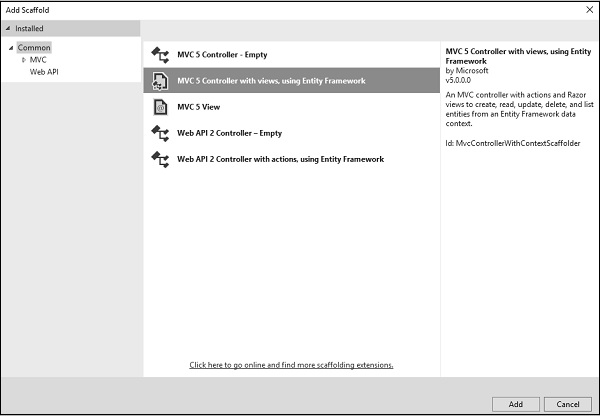
选择带有视图的 MVC 5 Controller,在中间窗格中使用实体框架,然后单击“添加”按钮,这将显示“添加控制器”对话框。
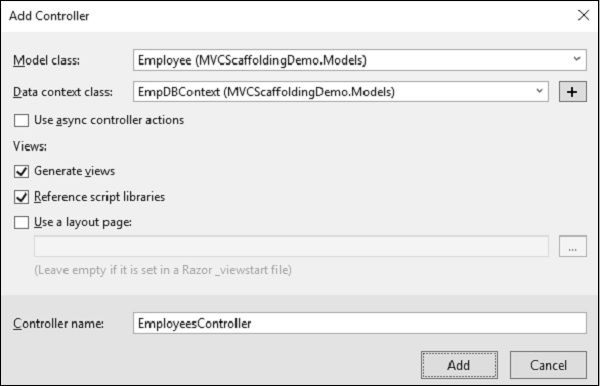
从模型类下拉列表中选择 Employee,从数据上下文类下拉列表中选择 EmpDBContext。您还将看到默认情况下选择了控制器名称。
单击“添加”按钮继续,您将在 Visual Studio 使用 Scaffolding 创建的 EmployeesController 中看到以下代码。
using System.Data.Entity;
using System.Linq;
using System.Net;
using System.Web.Mvc;
using MVCScaffoldingDemo.Models;

namespace MVCScaffoldingDemo.Controllers {
   public class EmployeesController : Controller{
      private EmpDBContext db = new EmpDBContext();

      // GET: Employees
      public ActionResult Index(){
         return View(db.Employees.ToList());
      }

      // GET: Employees/Details/5
      public ActionResult Details(int? id){
         if (id == null){
            return new HttpStatusCodeResult(HttpStatusCode.BadRequest);
         }

         Employee employee = db.Employees.Find(id);

         if (employee == null){
            return HttpNotFound();
         }
         return View(employee);
      }

      // GET: Employees/Create
      public ActionResult Create(){
         return View();
      }

      // POST: Employees/Create
      // To protect from overposting attacks, please enable the specific
      properties you want to bind to, for
      // more details see http://go.microsoft.com/fwlink/?LinkId=317598.
      [HttpPost]
      [ValidateAntiForgeryToken]

      public ActionResult Create([Bind(Include = "ID,Name,JoiningDate,Age")]
      Employee employee){
         if (ModelState.IsValid){
            db.Employees.Add(employee);
            db.SaveChanges();
            return RedirectToAction("Index");
         }
         return View(employee);
      }

      // GET: Employees/Edit/5
      public ActionResult Edit(int? id){
         if (id == null){
            return new HttpStatusCodeResult(HttpStatusCode.BadRequest);
         }

         Employee employee = db.Employees.Find(id);

         if (employee == null){
            return HttpNotFound();
         }
         return View(employee);
      }

      // POST: Employees/Edit/5
      // To protect from overposting attacks, please enable the specific
      properties you want to bind to, for
      // more details see http://go.microsoft.com/fwlink/?LinkId=317598.
      [HttpPost]
      [ValidateAntiForgeryToken]
      public ActionResult Edit([Bind(Include = "ID,Name,JoiningDate,Age")]Employee employee){
         if (ModelState.IsValid){
            db.Entry(employee).State = EntityState.Modified;
            db.SaveChanges();
            return RedirectToAction("Index");
         }
         return View(employee);
      }

      // GET: Employees/Delete/5
      public ActionResult Delete(int? id){
         if (id == null){
            return new HttpStatusCodeResult(HttpStatusCode.BadRequest);
         }

         Employee employee = db.Employees.Find(id);

         if (employee == null){
            return HttpNotFound();
         }
         return View(employee);
      }

      // POST: Employees/Delete/5
      [HttpPost, ActionName("Delete")]
      [ValidateAntiForgeryToken]

      public ActionResult DeleteConfirmed(int id){
         Employee employee = db.Employees.Find(id);
         db.Employees.Remove(employee);
         db.SaveChanges();
         return RedirectToAction("Index");
      }

      protected override void Dispose(bool disposing){
         if (disposing){
            db.Dispose();
         }

         base.Dispose(disposing);
      }
   }
}
运行您的应用程序并指定以下 URL http://localhost:59359/employees。您将看到以下输出。
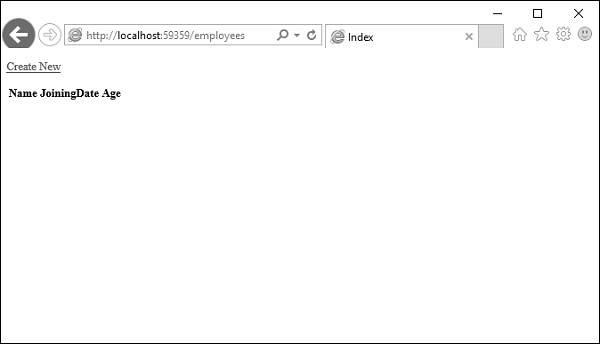
可以看到 View 中没有数据,因为我们还没有向数据库添加任何记录,该数据库是由 Visual Studio 创建的。
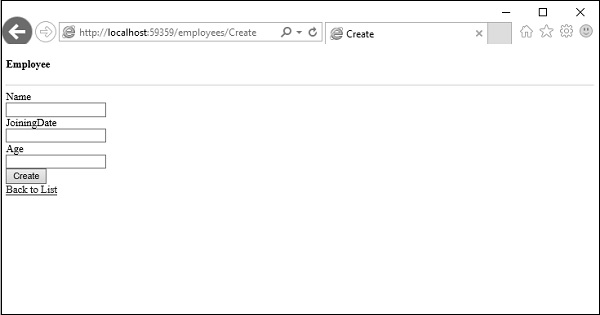
让我们通过单击“新建”链接从浏览器添加一条记录,它将显示“创建”视图。
让我们在以下字段中添加一些数据。
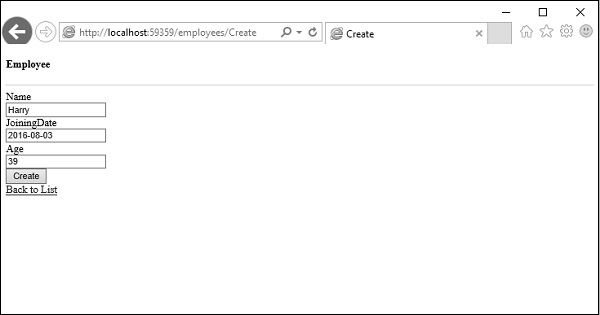
单击“创建”按钮,它将更新索引视图。
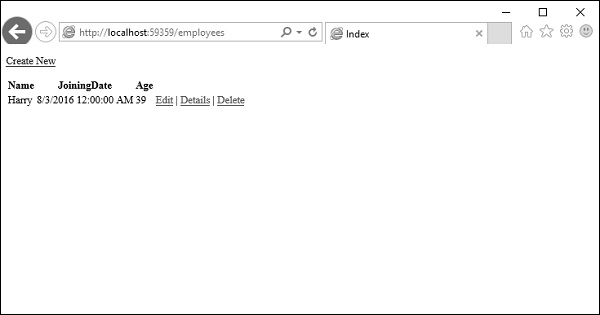
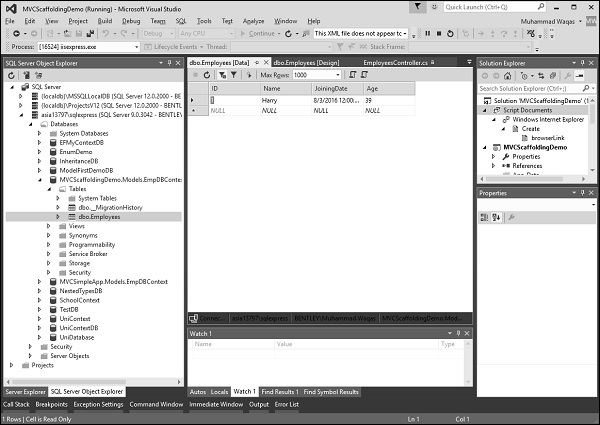
您可以看到新记录也被添加到数据库中。
如您所见,我们使用 Scaffolding 实现了相同的示例,这是从模型类创建 Views 和 Action 方法的更简单的方法。
