MVVM – 连接视图
MVVM – 连接视图
在本章中,我们将介绍将视图连接到 ViewModel 的不同方式。首先,让我们看看 View first 的构造,我们可以在 XAML 中声明它。正如我们在上一章中看到的那样,我们从主窗口连接了一个视图。现在我们将看到其他连接视图的方法。
我们也将在本章中使用相同的示例。以下是相同的 Model 类实现。
using System.ComponentModel;

namespace MVVMDemo.Model {

   public class StudentModel {}

   public class Student : INotifyPropertyChanged {
      private string firstName;
      private string lastName;

      public string FirstName {
         get { return firstName; }

         set {
            if (firstName != value) {
               firstName = value;
               RaisePropertyChanged("FirstName");
               RaisePropertyChanged("FullName");
            }
         }
      }

      public string LastName {
         get { return lastName; }

         set {
            if (lastName != value) {
               lastName = value;
               RaisePropertyChanged("LastName");
               RaisePropertyChanged("FullName");
            }
         }
      }

      public string FullName {
         get {
            return firstName + " " + lastName;
         }
      }

      public event PropertyChangedEventHandler PropertyChanged;

      private void RaisePropertyChanged(string property) {
         if (PropertyChanged != null) {
            PropertyChanged(this, new PropertyChangedEventArgs(property));
         }
      }
   }
}
这是 ViewModel 类的实现。这次在默认构造函数中调用了 LoadStudents 方法。
using MVVMDemo.Model;
using System.Collections.ObjectModel;

namespace MVVMDemo.ViewModel{

   public class StudentViewModel {

      public StudentViewModel() {
         LoadStudents();
      }

      public ObservableCollection<Student> Students {
         get;
         set;
      }

      public void LoadStudents() {
         ObservableCollection<Student> students = new ObservableCollection<Student>();

         students.Add(new Student { FirstName = "Mark", LastName = "Allain" });
         students.Add(new Student { FirstName = "Allen", LastName = "Brown" });
         students.Add(new Student { FirstName = "Linda", LastName = "Hamerski" });

         Students = students;
      }
   }
}
无论视图是窗口、用户控件还是页面,解析器通常从上到下从左到右工作。它在遇到每个元素时调用它的默认构造函数。有两种方法可以构建视图。您可以对它们使用任何一种。
- 查看 XAML 中的第一个构造
- 查看代码隐藏中的第一个构造
查看 XAML 中的第一个构造
一种方法是将您的 ViewModel 作为嵌套元素添加到 DataContext 属性的 setter 中,如以下代码所示。
<UserControl.DataContext>
   <viewModel:StudentViewModel/>
</UserControl.DataContext>
这是完整的查看 XAML 文件。
<UserControl x:Class="MVVMDemo.Views.StudentView"
   xmlns = "http://schemas.microsoft.com/winfx/2006/xaml/presentation"
   xmlns:x = "http://schemas.microsoft.com/winfx/2006/xaml"
   xmlns:mc = "http://schemas.openxmlformats.org/markup-compatibility/2006"
   xmlns:d = "http://schemas.microsoft.com/expression/blend/2008"
   xmlns:local = "clr-namespace:MVVMDemo.Views"
   xmlns:viewModel = "clr-namespace:MVVMDemo.ViewModel"
   mc:Ignorable = "d"
   d:DesignHeight = "300" d:DesignWidth = "300">

   <UserControl.DataContext>
      <viewModel:StudentViewModel/>
   </UserControl.DataContext>

   <Grid>
      <StackPanel HorizontalAlignment = "Left">
         <ItemsControl ItemsSource = "{Binding Path = Students}">

            <ItemsControl.ItemTemplate>
               <DataTemplate>

                  <StackPanel Orientation = "Horizontal">
                     <TextBox Text = "{Binding Path = FirstName, Mode = TwoWay}"
                        Width = "100" Margin = "3 5 3 5"/>

                      <TextBox Text = "{Binding Path = LastName, Mode = TwoWay}"
                        Width = "100" Margin = "0 5 3 5"/>

                     <TextBlock Text = "{Binding Path = FullName, Mode = OneWay}"
                        Margin = "0 5 3 5"/>

                  </StackPanel>

               </DataTemplate>
            </ItemsControl.ItemTemplate>

         </ItemsControl>
      </StackPanel>
   </Grid>

</UserControl>
查看代码隐藏中的第一个构造
另一种方法是,您可以通过在视图背后的代码中自己构建视图模型来获得视图优先构造,方法是使用实例在那里设置 DataContext 属性。
通常,DataContext 属性是在视图的构造函数方法中设置的,但您也可以将构造推迟到视图的 Load 事件触发。
using System.Windows.Controls;

namespace MVVMDemo.Views {

   /// <summary>
      /// Interaction logic for StudentView.xaml
   /// </summary>

   public partial class StudentView : UserControl {
      public StudentView() {
         InitializeComponent();
         this.DataContext = new MVVMDemo.ViewModel.StudentViewModel();
      }
   }
}
在代码隐藏而不是 XAML 中构造视图模型的原因之一是视图模型构造函数接受参数,但 XAML 解析只能构造默认构造函数中定义的元素。
现在,在这种情况下,View 的 XAML 文件将如下面的代码所示。
<UserControl x:Class = "MVVMDemo.Views.StudentView"
   xmlns = "http://schemas.microsoft.com/winfx/2006/xaml/presentation"
   xmlns:x = "http://schemas.microsoft.com/winfx/2006/xaml"
   xmlns:mc = "http://schemas.openxmlformats.org/markup-compatibility/2006"
   xmlns:d = "http://schemas.microsoft.com/expression/blend/2008"
   xmlns:local = "clr-namespace:MVVMDemo.Views"
   mc:Ignorable = "d"
   d:DesignHeight = "300"
   d:DesignWidth = "300">

   <Grid>
      <StackPanel HorizontalAlignment = "Left">
         <ItemsControl ItemsSource = "{Binding Path = Students}">

            <ItemsControl.ItemTemplate>
               <DataTemplate>

                  <StackPanel Orientation = "Horizontal"<
                     <TextBox Text = "{Binding Path = FirstName, Mode = TwoWay}"
                        Width = "100" Margin = "3 5 3 5"/>

                     <TextBox Text = "{Binding Path = LastName, Mode = TwoWay}"
                        Width = "100" Margin = "0 5 3 5"/>

                     <TextBlock Text = "{Binding Path = FullName, Mode = OneWay}"
                        Margin = "0 5 3 5"/>

                  </StackPanel>

               </DataTemplate>
            </ItemsControl.ItemTemplate>

         </ItemsControl>
      </StackPanel>
   </Grid>

</UserControl>
您可以在 MainWindow 中声明此视图,如 MainWindow.XAML 文件中所示。
<Window x:Class = "MVVMDemo.MainWindow"
   xmlns = "http://schemas.microsoft.com/winfx/2006/xaml/presentation"
   xmlns:x = "http://schemas.microsoft.com/winfx/2006/xaml"
   xmlns:d = "http://schemas.microsoft.com/expression/blend/2008"
   xmlns:mc = "http://schemas.openxmlformats.org/markup-compatibility/2006"
   xmlns:local = "clr-namespace:MVVMDemo"
   xmlns:views = "clr-namespace:MVVMDemo.Views"
   mc:Ignorable = "d"
   Title = "MainWindow" Height = "350" Width = "525">

   <Grid>
      <views:StudentView x:Name = "StudentViewControl"/>
   </Grid>

</Window>
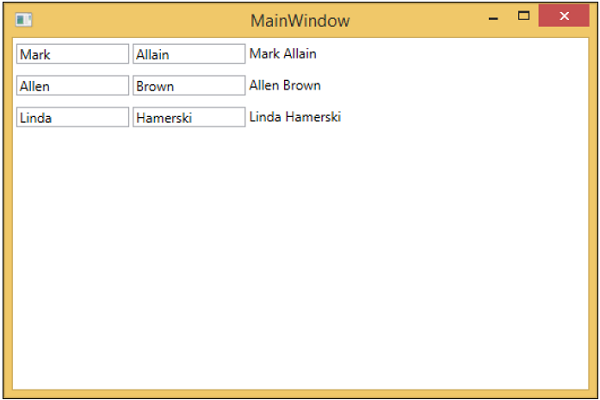
编译并执行上述代码后,您将在主窗口中看到以下输出。
我们建议您逐步执行上述示例,以便更好地理解。
