MVVM – 单元测试
MVVM – 单元测试
单元测试背后的想法是采用离散的代码块(单元)并编写以预期方式使用代码的测试方法,然后进行测试以查看它们是否获得预期结果。
-
作为代码本身,单元测试就像项目的其余部分一样被编译。
-
它们也由测试运行软件执行,该软件可以加快每个测试的速度,有效地分别表示赞许或不赞许以指示测试是通过还是失败。
让我们看一下之前创建的示例。以下是学生模型的实现。
using System.ComponentModel;

namespace MVVMDemo.Model {

   public class StudentModel {}

   public class Student : INotifyPropertyChanged {
      private string firstName;
      private string lastName;

      public string FirstName {
         get { return firstName; }

         set {
            if (firstName != value) {
               firstName = value;
               RaisePropertyChanged("FirstName");
               RaisePropertyChanged("FullName");
            }
         }
      }

      public string LastName {
         get { return lastName; }

         set {
            if (lastName != value) {
               lastName = value;
               RaisePropertyChanged("LastName");
               RaisePropertyChanged("FullName");
            }
         }
      }

      public string FullName {
         get {
            return firstName + " " + lastName;
         }
      }

      public event PropertyChangedEventHandler PropertyChanged;

      private void RaisePropertyChanged(string property) {
         if (PropertyChanged != null) {
            PropertyChanged(this, new PropertyChangedEventArgs(property));
         }
      }
   }
}
下面是StudentView的实现。
<UserControl x:Class="MVVMDemo.Views.StudentView"
   xmlns = "http://schemas.microsoft.com/winfx/2006/xaml/presentation"
   xmlns:x = "http://schemas.microsoft.com/winfx/2006/xaml"
   xmlns:mc = "http://schemas.openxmlformats.org/markup-compatibility/2006"
   xmlns:d = "http://schemas.microsoft.com/expression/blend/2008"
   xmlns:local = "clr-namespace:MVVMDemo.Views"
   xmlns:viewModel = "clr-namespace:MVVMDemo.ViewModel"
   xmlns:data = "clr-namespace:MVVMDemo.Model"
   xmlns:vml = "clr-namespace:MVVMDemo.VML"
   vml:ViewModelLocator.AutoHookedUpViewModel = "True"
   mc:Ignorable = "d"
   d:DesignHeight = "300" d:DesignWidth = "300">

   <UserControl.Resources>
      <DataTemplate DataType = "{x:Type data:Student}">

         <StackPanel Orientation = "Horizontal">
            <TextBox Text = "{Binding Path = FirstName, Mode = TwoWay}"
               Width = "100" Margin = "3 5 3 5"/>

            <TextBox Text = "{Binding Path = LastName, Mode = TwoWay}"
               Width = "100" Margin = "0 5 3 5"/>

            <TextBlock Text = "{Binding Path = FullName, Mode = OneWay}"
               Margin = "0 5 3 5"/>
         </StackPanel>

      </DataTemplate>
   </UserControl.Resources>

   <Grid>
      <StackPanel Orientation = "Horizontal">
         <ListBox ItemsSource = "{Binding Students}"
            SelectedItem = "{Binding SelectedStudent}"/>

         <Button Content = "Delete"
            Command = "{Binding DeleteCommand}"
            HorizontalAlignment = "Left"
            VerticalAlignment = "Top"
            Width = "75" />
      </StackPanel>
   </Grid>

</UserControl>
以下是 StudentViewModel 的实现。
using MVVMDemo.Model;

using System.Collections.ObjectModel;
using System.Windows.Input;
using System;

namespace MVVMDemo.ViewModel {

   public class StudentViewModel {

      public MyICommand DeleteCommand { get; set;}

      public StudentViewModel() {
         LoadStudents();
         DeleteCommand = new MyICommand(OnDelete, CanDelete);
      }

      public ObservableCollection<Student> Students {
         get;
         set;
      }

      public void LoadStudents() {
         ObservableCollection<Student> students = new ObservableCollection<Student>();

         students.Add(new Student { FirstName = "Mark", LastName = "Allain" });
         students.Add(new Student { FirstName = "Allen", LastName = "Brown" });
         students.Add(new Student { FirstName = "Linda", LastName = "Hamerski" });

         Students = students;
      }

      private Student _selectedStudent;

      public Student SelectedStudent {
         get {
            return _selectedStudent;
         }

         set {
            _selectedStudent = value;
            DeleteCommand.RaiseCanExecuteChanged();
         }
      }

      private void OnDelete() {
         Students.Remove(SelectedStudent);
      }

      private bool CanDelete() {
         return SelectedStudent != null;
      }

      public int GetStudentCount() {
         return Students.Count;
      }
   }
}
以下是 MainWindow.xaml 文件。
<Window x:Class = "MVVMDemo.MainWindow"
   xmlns = "http://schemas.microsoft.com/winfx/2006/xaml/presentation"
   xmlns:x = "http://schemas.microsoft.com/winfx/2006/xaml"
   xmlns:d = "http://schemas.microsoft.com/expression/blend/2008"
   xmlns:mc = "http://schemas.openxmlformats.org/markup-compatibility/2006"
   xmlns:local = "clr-namespace:MVVMDemo"
   xmlns:views = "clr-namespace:MVVMDemo.Views"
   mc:Ignorable = "d"
   Title = "MainWindow" Height = "350" Width = "525">

   <Grid>
      <views:StudentView x:Name = "StudentViewControl"/>
   </Grid>

</Window>
下面是 MyICommand 实现,它实现了 ICommand 接口。
using System;
using System.Windows.Input;

namespace MVVMDemo {

   public class MyICommand : ICommand {
      Action _TargetExecuteMethod;
      Func<bool> _TargetCanExecuteMethod;

      public MyICommand(Action executeMethod) {
         _TargetExecuteMethod = executeMethod;
      }

      public MyICommand(Action executeMethod, Func<bool> canExecuteMethod) {
         _TargetExecuteMethod = executeMethod;
         _TargetCanExecuteMethod = canExecuteMethod;
      }

      public void RaiseCanExecuteChanged() {
         CanExecuteChanged(this, EventArgs.Empty);
      }

      bool ICommand.CanExecute(object parameter) {

         if (_TargetCanExecuteMethod != null) {
            return _TargetCanExecuteMethod();
         }

         if (_TargetExecuteMethod != null) {
            return true;
         }

         return false;
      }

      // Beware - should use weak references if command instance lifetime
         is longer than lifetime of UI objects that get hooked up to command

      // Prism commands solve this in their implementation

      public event EventHandler CanExecuteChanged = delegate { };

      void ICommand.Execute(object parameter) {
         if (_TargetExecuteMethod != null) {
            _TargetExecuteMethod();
         }
      }
   }
}
编译并执行上述代码后,您将在主窗口中看到以下输出。

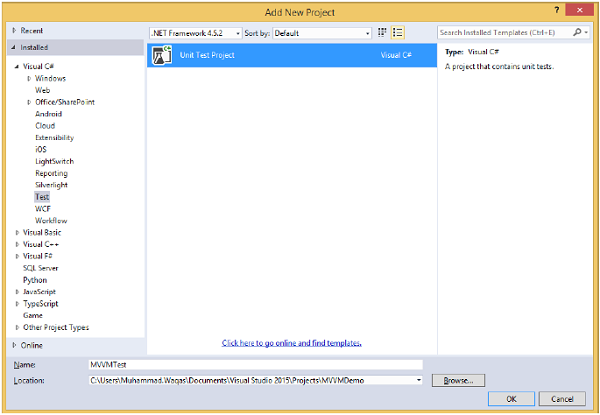
要为上述示例编写单元测试,让我们向解决方案添加一个新的测试项目。
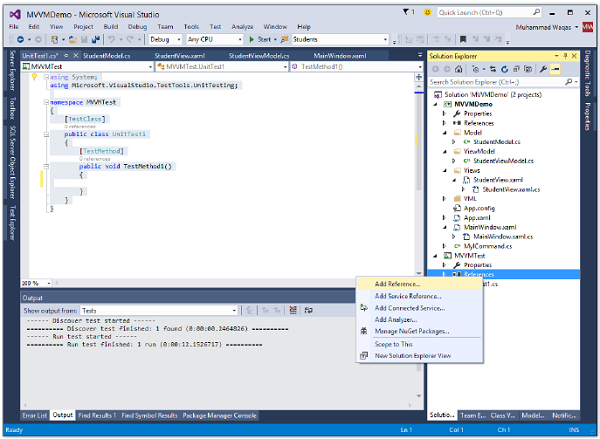
通过右键单击“引用”添加对项目的引用。
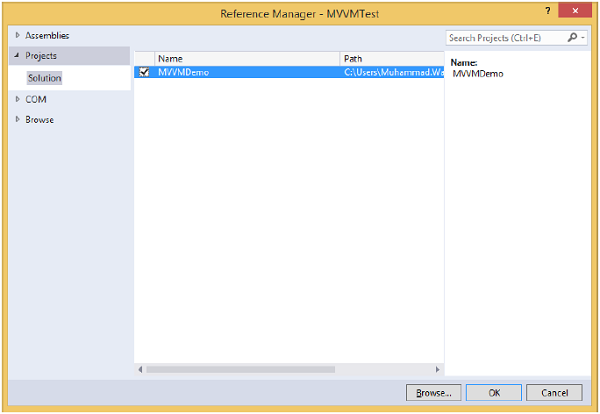
选择现有项目并单击确定。
现在让我们添加一个简单的测试,它将检查学生人数,如下面的代码所示。
using System;

using Microsoft.VisualStudio.TestTools.UnitTesting;
using MVVMDemo.ViewModel;

namespace MVVMTest {
   [TestClass]

   public class UnitTest1 {
      [TestMethod]

      public void TestMethod1() {
         StudentViewModel sViewModel = new StudentViewModel();
         int count = sViewModel.GetStudentCount();
         Assert.IsTrue(count == 3);
      }
   }
}
要执行此测试,请选择测试 → 运行 → 所有测试菜单选项。
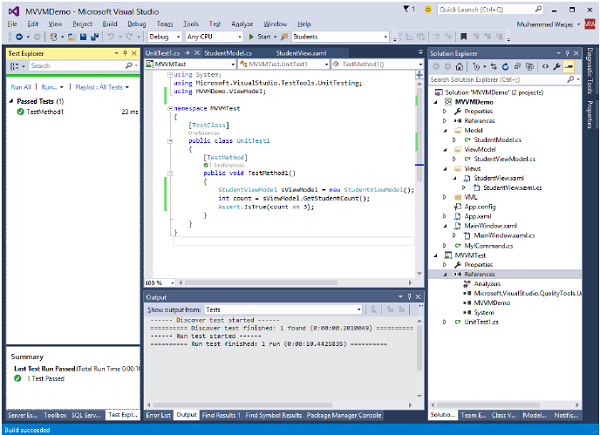
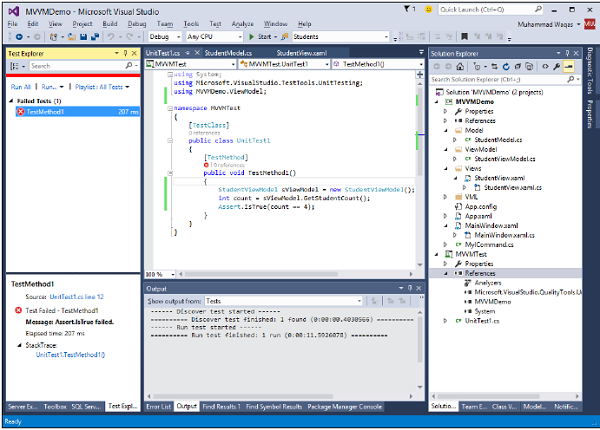
可以在Test Explorer中看到Test通过了,因为在StudentViewModel中,添加了三个学生。将计数条件从 3 更改为 4,如下面的代码所示。
using System;

using Microsoft.VisualStudio.TestTools.UnitTesting;
using MVVMDemo.ViewModel;

namespace MVVMTest {
   [TestClass]

   public class UnitTest1 {
      [TestMethod] public void TestMethod1() {
         StudentViewModel sViewModel = new StudentViewModel();
         int count = sViewModel.GetStudentCount();
         Assert.IsTrue(count == 4);
      }
   }
}
当再次执行测试计划时,您会看到测试失败,因为学生数不等于 4。
我们建议您以循序渐进的方式执行上述示例,以便更好地理解。
