MVVM – 快速指南
MVVM – 快速指南
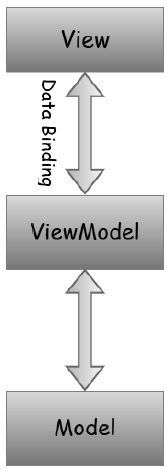
MVVM – 介绍
组织代码的有序且可能是最可重用的方法是使用“MVVM”模式。该模型,视图模型(MVVM模式)是所有关于指导你如何组织和构造代码,以写可维护,可测试性和可扩展的应用程序。
模型– 它只是保存数据,与任何业务逻辑无关。
ViewModel – 它充当模型和视图之间的链接/连接并使东西看起来很漂亮。
视图– 它只是保存格式化的数据,并将所有内容委托给模型。
分离演示
为了避免将应用程序逻辑置于代码隐藏或 XAML 中所导致的问题,最好使用一种称为分离呈现的技术。我们正在努力避免这种情况,我们将使用 XAML 和代码隐藏,并具有直接处理用户界面对象所需的最低限度。用户界面类还包含复杂交互行为、应用程序逻辑和其他所有内容的代码,如下图左侧所示。

-
通过分离呈现,用户界面类要简单得多。它当然有 XAML,但背后的代码做的很实用。
-
应用程序逻辑属于一个单独的类,通常称为模型。
-
然而,这并不是故事的全部。如果你停在这里,你很可能会重复一个非常常见的错误,这会导致你走上数据绑定的疯狂之路。
-
许多开发人员尝试使用数据绑定将 XAML 中的元素直接连接到模型中的属性。
-
现在有时这可能没问题,但通常不是。问题是该模型完全关注应用程序做什么,而不是用户如何与应用程序交互。
-
您呈现数据的方式通常与数据内部的结构方式有些不同。
-
此外,大多数用户界面都有一些不属于应用程序模型的状态。
-
例如,如果您的用户界面使用拖放,则需要跟踪一些内容,例如被拖动的项目现在在哪里,当它移过可能的放置目标时其外观应该如何变化,以及这些放置目标可能如何当项目拖过它们时发生变化。
-
这种状态会变得异常复杂,需要彻底测试。
-
在实践中,您通常希望一些其他类位于用户界面和模型之间。这有两个重要的作用。
-
首先,它使您的应用程序模型适应特定的用户界面视图。
-
其次,它是任何重要的交互逻辑存在的地方,我的意思是让您的用户界面按照您想要的方式运行所需的代码。
-
MVVM——优势
MVVM 模式归根结底是 MVC 模式的现代结构,因此主要目标仍然是在域逻辑和表示层之间提供清晰的分离。以下是 MVVM 模式的一些优点和缺点。
关键的好处是允许视图和模型之间真正分离,而不仅仅是实现分离和您从中获得的效率。这实际上意味着当您的模型需要更改时,它可以轻松更改而无需视图,反之亦然。
应用 MVVM 有以下三个重要的关键事项。
可维护性
-
不同类型代码的清晰分离应该更容易进入一个或几个更细粒度和重点的部分,并且无需担心地进行更改。
-
这意味着您可以保持敏捷并快速迁移到新版本。
可测试性
-
使用 MVVM,每段代码都更加细化,如果正确实现,则您的外部和内部依赖项位于与您要测试的核心逻辑部分不同的代码段中。
-
这使得针对核心逻辑编写单元测试变得更加容易。
-
确保它在编写时正常工作,并且即使在维护中发生变化时也能继续工作。
可扩展性
-
由于清晰的分离边界和更细粒度的代码段,它有时与可维护性重叠。
-
您有更好的机会使这些部件中的任何一个更具可重用性。
-
它还能够将执行类似操作的新代码替换或添加到架构中的正确位置。
MVVM 模式的明显目的是对视图进行抽象,从而减少代码隐藏中的业务逻辑量。但是,以下是其他一些可靠的优势 –
- ViewModel 比代码隐藏或事件驱动代码更容易进行单元测试。
- 您可以在没有笨拙的 UI 自动化和交互的情况下对其进行测试。
- 表示层和逻辑是松散耦合的。
缺点
- 有些人认为对于简单的 UI,MVVM 可能有点矫枉过正。
- 同样,在较大的情况下,设计 ViewModel 可能很困难。
- 当我们有复杂的数据绑定时,调试会有点困难。
MVVM——职责
MVVM 模式由三部分组成 – 模型、视图和视图模型。一开始的大多数开发人员对于 Model、View 和 ViewModel 应该或不应该包含什么以及每个部分的职责是什么都没有什么困惑。
本章我们将学习MVVM模式的每个部分的职责,以便您可以清楚地了解什么样的代码去哪里。MVVM 实际上是一个面向客户端的分层架构,如下图所示。
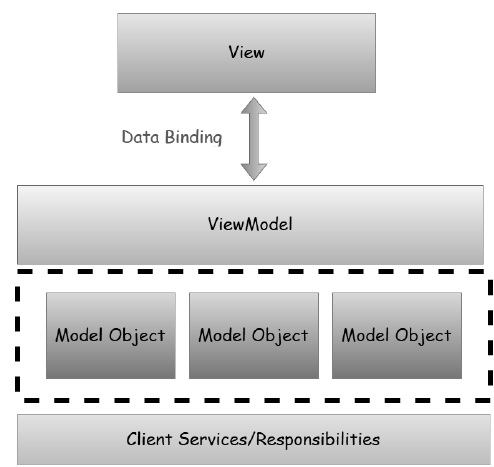
-
表示层由视图组成。
-
逻辑层是视图模型。
-
表示层是模型对象的组合。
-
生成和持久化它们的客户端服务要么在两层应用程序中直接访问,要么通过服务调用然后到您的应用程序。
-
客户端服务不是 MVVM 模式的正式组成部分,但它经常与 MVVM 一起使用以实现进一步分离并避免重复代码。
模特职责
一般来说,模型是最容易理解的。客户端数据模型支持应用程序中的视图。
-
它由具有属性的对象和一些变量组成,用于在内存中包含数据。
-
其中一些属性可能会引用其他模型对象并创建作为一个整体的模型对象的对象图。
-
模型对象应该引发属性更改通知,这在 WPF 中意味着数据绑定。
-
最后一个责任是验证,这是可选的,但您可以通过 INotifyDataErrorInfo/IDataErrorInfo 等接口使用 WPF 数据绑定验证功能将验证信息嵌入模型对象
查看职责
视图的主要目的和职责是定义用户在屏幕上看到的内容的结构。该结构可以包含静态和动态部分。
-
静态部件是 XAML 层次结构,用于定义组成视图的控件和控件布局。
-
动态部分就像定义为视图一部分的动画或状态变化。
-
MVVM 的主要目标是视图中不应该有任何代码。
-
视图中没有代码是不可能的。鉴于您至少需要构造函数和初始化组件的调用。
-
这个想法是事件处理、动作和数据操作逻辑代码不应该在 View 后面的代码中。
-
还有其他类型的代码必须包含在任何需要引用 UI 元素的代码后面的代码中,这些代码本质上是视图代码。
ViewModel 职责
-
ViewModel 是 MVVM 应用的重点。ViewModel 的主要职责是向视图提供数据,以便视图可以将该数据放在屏幕上。
-
它还允许用户与数据交互并更改数据。
-
ViewModel 的另一个关键职责是封装视图的交互逻辑,但这并不意味着应用程序的所有逻辑都应该进入 ViewModel。
-
它应该能够处理适当的调用顺序,以根据用户或视图上的任何更改使正确的事情发生。
-
ViewModel 还应该管理任何导航逻辑,例如决定何时导航到不同的视图。
MVVM——第一个应用程序
在本章中,我们将学习如何将 MVVM 模式用于简单的输入屏幕和您可能已经习惯的 WPF 应用程序。
让我们看一个简单的例子,在这个例子中我们将使用 MVVM 方法。
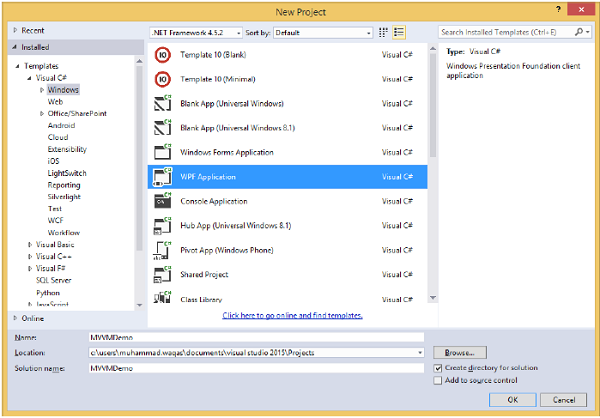
步骤 1 – 创建一个新的 WPF 应用程序项目 MVVMDemo。
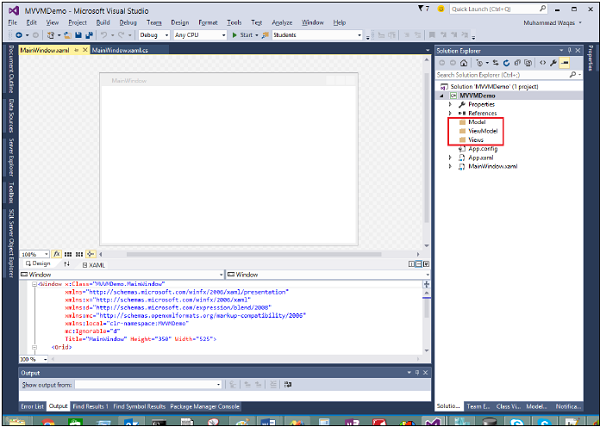
第 2 步– 将三个文件夹(模型、视图模型和视图)添加到您的项目中。
步骤 3 – 在 Model 文件夹中添加一个 StudentModel 类并将以下代码粘贴到该类中
using System.ComponentModel;

namespace MVVMDemo.Model {

   public class StudentModel {}

   public class Student : INotifyPropertyChanged {
      private string firstName;
      private string lastName;

      public string FirstName {
         get {
            return firstName;
         }

         set {
            if (firstName != value) {
               firstName = value;
               RaisePropertyChanged("FirstName");
               RaisePropertyChanged("FullName");
            }
         }
      }

      public string LastName {
         get {return lastName; }

         set {
            if (lastName != value) {
               lastName = value;
               RaisePropertyChanged("LastName");
               RaisePropertyChanged("FullName");
            }
         }
      }

      public string FullName {
         get {
            return firstName + " " + lastName;
         }
      }

      public event PropertyChangedEventHandler PropertyChanged;

      private void RaisePropertyChanged(string property) {
         if (PropertyChanged != null) {
            PropertyChanged(this, new PropertyChangedEventArgs(property));
         }
      }
   }
}
第 4 步– 将另一个 StudentViewModel 类添加到 ViewModel 文件夹中并粘贴以下代码。
using MVVMDemo.Model;
using System.Collections.ObjectModel;

namespace MVVMDemo.ViewModel {

   public class StudentViewModel {

      public ObservableCollection<Student> Students {
         get;
         set;
      }

      public void LoadStudents() {
         ObservableCollection<Student> students = new ObservableCollection<Student>();

         students.Add(new Student { FirstName = "Mark", LastName = "Allain" });
         students.Add(new Student { FirstName = "Allen", LastName = "Brown" });
         students.Add(new Student { FirstName = "Linda", LastName = "Hamerski" });

         Students = students;
      }
   }
}
第 5 步– 通过右键单击“视图”文件夹并选择“添加”>“新项目”来添加新的用户控件(WPF)…
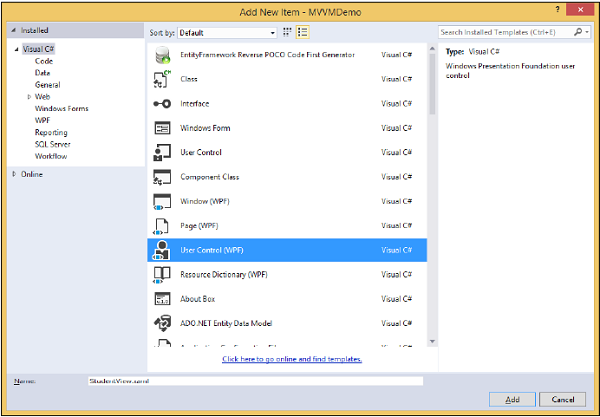
步骤 6 – 单击添加按钮。现在您将看到 XAML 文件。将以下代码添加到包含不同 UI 元素的 StudentView.xaml 文件中。
<UserControl x:Class = "MVVMDemo.Views.StudentView"
   xmlns = "http://schemas.microsoft.com/winfx/2006/xaml/presentation"
   xmlns:x = "http://schemas.microsoft.com/winfx/2006/xaml"
   xmlns:mc = "http://schemas.openxmlformats.org/markup-compatibility/2006"
   xmlns:d = "http://schemas.microsoft.com/expression/blend/2008"
   xmlns:local = "clr-namespace:MVVMDemo.Views"
   mc:Ignorable = "d"
   d:DesignHeight = "300" d:DesignWidth = "300">

   <Grid>
      <StackPanel HorizontalAlignment = "Left">

         <ItemsControl ItemsSource = "{Binding Path = Students}">

            <ItemsControl.ItemTemplate>
               <DataTemplate>
                  <StackPanel Orientation = "Horizontal">
                     <TextBox Text = "{Binding Path = FirstName, Mode = TwoWay}"
                        Width = "100" Margin = "3 5 3 5"/>

                     <TextBox Text = "{Binding Path = LastName, Mode = TwoWay}"
                        Width = "100" Margin = "0 5 3 5"/>

                     <TextBlock Text = "{Binding Path = FullName, Mode = OneWay}"
                        Margin = "0 5 3 5"/>

                  </StackPanel>
               </DataTemplate>
            </ItemsControl.ItemTemplate>

         </ItemsControl>

      </StackPanel>
   </Grid>

</UserControl>
第 7 步– 现在使用以下代码将 StudentView 添加到 MainPage.xaml 文件中。
<Window x:Class = "MVVMDemo.MainWindow"
   xmlns = "http://schemas.microsoft.com/winfx/2006/xaml/presentation"
   xmlns:x = "http://schemas.microsoft.com/winfx/2006/xaml"
   xmlns:d = "http://schemas.microsoft.com/expression/blend/2008"
   xmlns:mc = "http://schemas.openxmlformats.org/markup-compatibility/2006"
   xmlns:local = "clr-namespace:MVVMDemo"
   xmlns:views = "clr-namespace:MVVMDemo.Views"
   mc:Ignorable = "d"
   Title = "MainWindow" Height = "350" Width = "525">

   <Grid>
      <views:StudentView x:Name = "StudentViewControl" Loaded = "StudentViewControl_Loaded"/>
   </Grid>

</Window>
第 8 步– 这是 MainPage.xaml.cs 文件中 Loaded 事件的实现,它将从 ViewModel 更新视图。
using System.Windows;

namespace MVVMDemo {

   /// <summary>
      /// Interaction logic for MainWindow.xaml
   /// </summary>

   public partial class MainWindow : Window {

      public MainWindow() {
         InitializeComponent();
      }

      private void StudentViewControl_Loaded(object sender, RoutedEventArgs e) {
         MVVMDemo.ViewModel.StudentViewModel studentViewModelObject =
            new MVVMDemo.ViewModel.StudentViewModel();
         studentViewModelObject.LoadStudents();

         StudentViewControl.DataContext = studentViewModelObject;
      }
   }
}
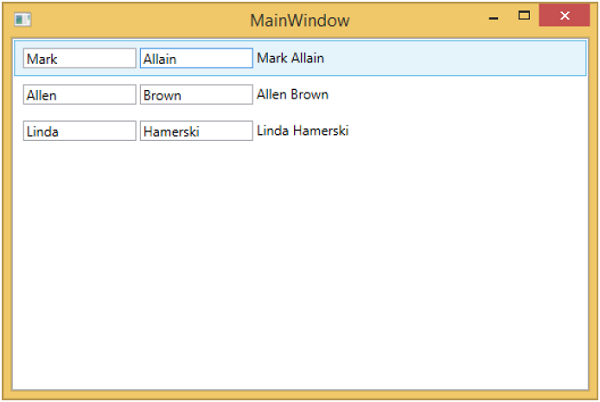
步骤 9 – 编译并执行上述代码后,您将在主窗口中收到以下输出。
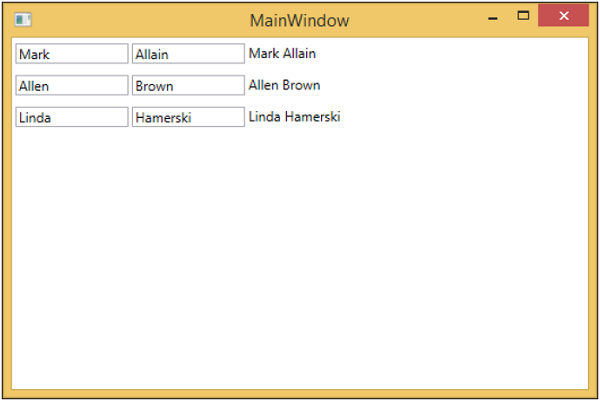
我们建议您逐步执行上述示例,以便更好地理解。
MVVM – 连接视图
在本章中,我们将介绍将视图连接到 ViewModel 的不同方式。首先,让我们看看 View first 的构造,我们可以在 XAML 中声明它。正如我们在上一章中看到的那样,我们从主窗口连接了一个视图。现在我们将看到其他连接视图的方法。
我们也将在本章中使用相同的示例。以下是相同的 Model 类实现。
using System.ComponentModel;

namespace MVVMDemo.Model {

   public class StudentModel {}

   public class Student : INotifyPropertyChanged {
      private string firstName;
      private string lastName;

      public string FirstName {
         get { return firstName; }

         set {
            if (firstName != value) {
               firstName = value;
               RaisePropertyChanged("FirstName");
               RaisePropertyChanged("FullName");
            }
         }
      }

      public string LastName {
         get { return lastName; }

         set {
            if (lastName != value) {
               lastName = value;
               RaisePropertyChanged("LastName");
               RaisePropertyChanged("FullName");
            }
         }
      }

      public string FullName {
         get {
            return firstName + " " + lastName;
         }
      }

      public event PropertyChangedEventHandler PropertyChanged;

      private void RaisePropertyChanged(string property) {
         if (PropertyChanged != null) {
            PropertyChanged(this, new PropertyChangedEventArgs(property));
         }
      }
   }
}
这是 ViewModel 类的实现。这次在默认构造函数中调用了 LoadStudents 方法。
using MVVMDemo.Model;
using System.Collections.ObjectModel;

namespace MVVMDemo.ViewModel{

   public class StudentViewModel {

      public StudentViewModel() {
         LoadStudents();
      }

      public ObservableCollection<Student> Students {
         get;
         set;
      }

      public void LoadStudents() {
         ObservableCollection<Student> students = new ObservableCollection<Student>();

         students.Add(new Student { FirstName = "Mark", LastName = "Allain" });
         students.Add(new Student { FirstName = "Allen", LastName = "Brown" });
         students.Add(new Student { FirstName = "Linda", LastName = "Hamerski" });

         Students = students;
      }
   }
}
无论视图是窗口、用户控件还是页面,解析器通常从上到下从左到右工作。它在遇到每个元素时调用它的默认构造函数。有两种方法可以构建视图。您可以对它们使用任何一种。
- 查看 XAML 中的第一个构造
- 查看代码隐藏中的第一个构造
查看 XAML 中的第一个构造
一种方法是将您的 ViewModel 作为嵌套元素添加到 DataContext 属性的 setter 中,如以下代码所示。
<UserControl.DataContext>
   <viewModel:StudentViewModel/>
</UserControl.DataContext>
这是完整的查看 XAML 文件。
<UserControl x:Class="MVVMDemo.Views.StudentView"
   xmlns = "http://schemas.microsoft.com/winfx/2006/xaml/presentation"
   xmlns:x = "http://schemas.microsoft.com/winfx/2006/xaml"
   xmlns:mc = "http://schemas.openxmlformats.org/markup-compatibility/2006"
   xmlns:d = "http://schemas.microsoft.com/expression/blend/2008"
   xmlns:local = "clr-namespace:MVVMDemo.Views"
   xmlns:viewModel = "clr-namespace:MVVMDemo.ViewModel"
   mc:Ignorable = "d"
   d:DesignHeight = "300" d:DesignWidth = "300">

   <UserControl.DataContext>
      <viewModel:StudentViewModel/>
   </UserControl.DataContext>

   <Grid>
      <StackPanel HorizontalAlignment = "Left">
         <ItemsControl ItemsSource = "{Binding Path = Students}">

            <ItemsControl.ItemTemplate>
               <DataTemplate>

                  <StackPanel Orientation = "Horizontal">
                     <TextBox Text = "{Binding Path = FirstName, Mode = TwoWay}"
                        Width = "100" Margin = "3 5 3 5"/>

                      <TextBox Text = "{Binding Path = LastName, Mode = TwoWay}"
                        Width = "100" Margin = "0 5 3 5"/>

                     <TextBlock Text = "{Binding Path = FullName, Mode = OneWay}"
                        Margin = "0 5 3 5"/>

                  </StackPanel>

               </DataTemplate>
            </ItemsControl.ItemTemplate>

         </ItemsControl>
      </StackPanel>
   </Grid>

</UserControl>
查看代码隐藏中的第一个构造
另一种方法是,您可以通过在视图背后的代码中自己构建视图模型来获得视图优先构造,方法是使用实例在那里设置 DataContext 属性。
通常,DataContext 属性是在视图的构造函数方法中设置的,但您也可以将构造推迟到视图的 Load 事件触发。
using System.Windows.Controls;

namespace MVVMDemo.Views {

   /// <summary>
      /// Interaction logic for StudentView.xaml
   /// </summary>

   public partial class StudentView : UserControl {
      public StudentView() {
         InitializeComponent();
         this.DataContext = new MVVMDemo.ViewModel.StudentViewModel();
      }
   }
}
在代码隐藏而不是 XAML 中构造视图模型的原因之一是视图模型构造函数接受参数,但 XAML 解析只能构造默认构造函数中定义的元素。
现在,在这种情况下,View 的 XAML 文件将如下面的代码所示。
<UserControl x:Class = "MVVMDemo.Views.StudentView"
   xmlns = "http://schemas.microsoft.com/winfx/2006/xaml/presentation"
   xmlns:x = "http://schemas.microsoft.com/winfx/2006/xaml"
   xmlns:mc = "http://schemas.openxmlformats.org/markup-compatibility/2006"
   xmlns:d = "http://schemas.microsoft.com/expression/blend/2008"
   xmlns:local = "clr-namespace:MVVMDemo.Views"
   mc:Ignorable = "d"
   d:DesignHeight = "300"
   d:DesignWidth = "300">

   <Grid>
      <StackPanel HorizontalAlignment = "Left">
         <ItemsControl ItemsSource = "{Binding Path = Students}">

            <ItemsControl.ItemTemplate>
               <DataTemplate>

                  <StackPanel Orientation = "Horizontal"<
                     <TextBox Text = "{Binding Path = FirstName, Mode = TwoWay}"
                        Width = "100" Margin = "3 5 3 5"/>

                     <TextBox Text = "{Binding Path = LastName, Mode = TwoWay}"
                        Width = "100" Margin = "0 5 3 5"/>

                     <TextBlock Text = "{Binding Path = FullName, Mode = OneWay}"
                        Margin = "0 5 3 5"/>

                  </StackPanel>

               </DataTemplate>
            </ItemsControl.ItemTemplate>

         </ItemsControl>
      </StackPanel>
   </Grid>

</UserControl>
您可以在 MainWindow 中声明此视图,如 MainWindow.XAML 文件中所示。
<Window x:Class = "MVVMDemo.MainWindow"
   xmlns = "http://schemas.microsoft.com/winfx/2006/xaml/presentation"
   xmlns:x = "http://schemas.microsoft.com/winfx/2006/xaml"
   xmlns:d = "http://schemas.microsoft.com/expression/blend/2008"
   xmlns:mc = "http://schemas.openxmlformats.org/markup-compatibility/2006"
   xmlns:local = "clr-namespace:MVVMDemo"
   xmlns:views = "clr-namespace:MVVMDemo.Views"
   mc:Ignorable = "d"
   Title = "MainWindow" Height = "350" Width = "525">

   <Grid>
      <views:StudentView x:Name = "StudentViewControl"/>
   </Grid>

</Window>
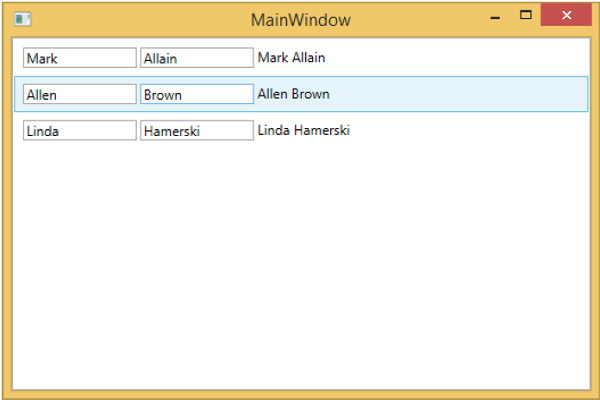
编译并执行上述代码后,您将在主窗口中看到以下输出。
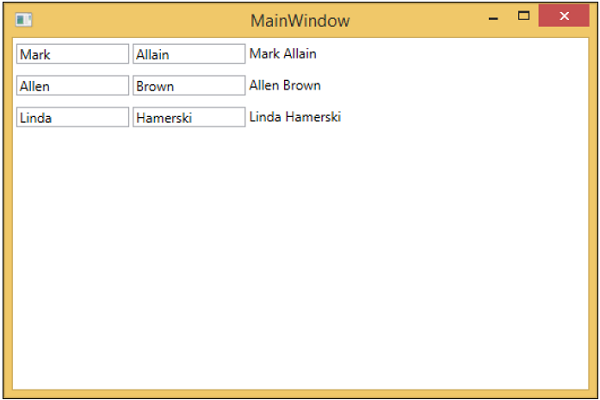
我们建议您逐步执行上述示例,以便更好地理解。
MVVM – 连接 ViewModel
在本章中,我们将介绍如何连接 ViewModel。它是上一章的延续,其中我们讨论了 View first 构造。现在,第一个构造的下一个形式是称为ViewModelLocator的元模式。它是一种伪模式,位于 MVVM 模式之上。
-
在 MVVM 中,每个 View 都需要连接到它的 ViewModel。
-
ViewModelLocator 是一种集中代码和更多分离视图的简单方法。
-
这意味着它不必明确了解 ViewModel 类型以及如何构造它。
-
有许多不同的方法可以使用 ViewModelLocator,但这里我们使用与 PRISM 框架中最相似的方法。
ViewModelLocator 提供了一种标准的、一致的、声明性的和松散耦合的方式来进行视图优先构造,它可以自动化将 ViewModel 连接到视图的过程。下图代表了 ViewModelLocator 的高层流程。
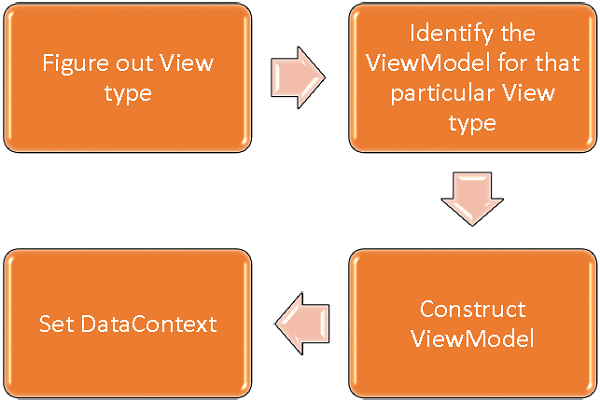
步骤 1 – 找出正在构建的视图类型。
第 2 步– 确定该特定视图类型的视图模型。
第 3 步– 构建该 ViewModel。
第 4 步– 将 Views DataContext 设置为 ViewModel。
为了理解基本概念,让我们继续上一章的相同示例,看一下 ViewModelLocator 的简单示例。如果您查看 StudentView.xaml 文件,您将看到我们已经静态连接了 ViewModel。
现在如以下程序所示,注释这些 XAML 代码也从代码隐藏中删除代码。
<UserControl x:Class = "MVVMDemo.Views.StudentView"
   xmlns = "http://schemas.microsoft.com/winfx/2006/xaml/presentation"
   xmlns:x = "http://schemas.microsoft.com/winfx/2006/xaml"
   xmlns:mc = "http://schemas.openxmlformats.org/markup-compatibility/2006"
   xmlns:d = "http://schemas.microsoft.com/expression/blend/2008"
   xmlns:local = "clr-namespace:MVVMDemo.Views"
   xmlns:viewModel = "clr-namespace:MVVMDemo.ViewModel"
   mc:Ignorable = "d" d:DesignHeight = "300" d:DesignWidth = "300">

   <!--<UserControl.DataContext>
      <viewModel:StudentViewModel/>
   </UserControl.DataContext>-->

   <Grid>
      <StackPanel HorizontalAlignment = "Left">
         <ItemsControl ItemsSource = "{Binding Path = Students}">
            <ItemsControl.ItemTemplate>
               <DataTemplate>

                  <StackPanel Orientation = "Horizontal">
                     <TextBox Text = "{Binding Path = FirstName, Mode = TwoWay}"
                        Width = "100" Margin = "3 5 3 5"/>

                     <TextBox Text = "{Binding Path = LastName, Mode = TwoWay}"
                        Width = "100" Margin = "0 5 3 5"/>

                     <TextBlock Text = "{Binding Path = FullName, Mode = OneWay}"
                        Margin = "0 5 3 5"/>

                  </StackPanel>

               </DataTemplate>
            </ItemsControl.ItemTemplate>
         </ItemsControl>
      </StackPanel>
   </Grid>

</UserControl>
现在让我们创建一个新文件夹 VML 并添加一个新的公共类 ViewModelLocator,它将包含一个附加属性(依赖属性)AutoHookedUpViewModel,如以下代码所示。
public static bool GetAutoHookedUpViewModel(DependencyObject obj) {
   return (bool)obj.GetValue(AutoHookedUpViewModelProperty);
}

public static void SetAutoHookedUpViewModel(DependencyObject obj, bool value) {
   obj.SetValue(AutoHookedUpViewModelProperty, value);
}

// Using a DependencyProperty as the backing store for AutoHookedUpViewModel.
//This enables animation, styling, binding, etc...

public static readonly DependencyProperty AutoHookedUpViewModelProperty =
   DependencyProperty.RegisterAttached("AutoHookedUpViewModel",
   typeof(bool), typeof(ViewModelLocator), new PropertyMetadata(false,
   AutoHookedUpViewModelChanged));
现在您可以看到一个基本的附加属性定义。要向属性添加行为,我们需要为此属性添加一个已更改的事件处理程序,其中包含为 View 连接 ViewModel 的自动过程。执行此操作的代码如下 –
private static void AutoHookedUpViewModelChanged(DependencyObject d,
   DependencyPropertyChangedEventArgs e) {
   if (DesignerProperties.GetIsInDesignMode(d)) return;
   var viewType = d.GetType();
   string str = viewType.FullName;
   str = str.Replace(".Views.", ".ViewModel.");

   var viewTypeName = str;
   var viewModelTypeName = viewTypeName + "Model";
   var viewModelType = Type.GetType(viewModelTypeName);
   var viewModel = Activator.CreateInstance(viewModelType);
   ((FrameworkElement)d).DataContext = viewModel;
}
以下是 ViewModelLocator 类的完整实现。
using System;
using System.ComponentModel;
using System.Windows;

namespace MVVMDemo.VML {

   public static class ViewModelLocator {

      public static bool GetAutoHookedUpViewModel(DependencyObject obj) {
         return (bool)obj.GetValue(AutoHookedUpViewModelProperty);
      }

      public static void SetAutoHookedUpViewModel(DependencyObject obj, bool value) {
         obj.SetValue(AutoHookedUpViewModelProperty, value);
      }

      // Using a DependencyProperty as the backing store for AutoHookedUpViewModel.

      //This enables animation, styling, binding, etc...
      public static readonly DependencyProperty AutoHookedUpViewModelProperty =
         DependencyProperty.RegisterAttached("AutoHookedUpViewModel",
         typeof(bool), typeof(ViewModelLocator), new
         PropertyMetadata(false, AutoHookedUpViewModelChanged));

      private static void AutoHookedUpViewModelChanged(DependencyObject d,
         DependencyPropertyChangedEventArgs e) {
         if (DesignerProperties.GetIsInDesignMode(d)) return;
         var viewType = d.GetType();

         string str = viewType.FullName;
         str = str.Replace(".Views.", ".ViewModel.");

         var viewTypeName = str;
         var viewModelTypeName = viewTypeName + "Model";
         var viewModelType = Type.GetType(viewModelTypeName);
         var viewModel = Activator.CreateInstance(viewModelType);

        ((FrameworkElement)d).DataContext = viewModel;
      }
   }
}
首先要做的是添加一个命名空间,以便我们可以在项目的根目录中访问该 ViewModelLocator 类型。然后在视图类型的路由元素上,添加 AutoHookedUpViewModel 属性并将其设置为 true。
xmlns:vml = "clr-namespace:MVVMDemo.VML"
vml:ViewModelLocator.AutoHookedUpViewModel = "True"
这是 StudentView.xaml 文件的完整实现。
<UserControl x:Class = "MVVMDemo.Views.StudentView"
   xmlns = "http://schemas.microsoft.com/winfx/2006/xaml/presentation"
   xmlns:x = "http://schemas.microsoft.com/winfx/2006/xaml"
   xmlns:mc = "http://schemas.openxmlformats.org/markup-compatibility/2006"
   xmlns:d = "http://schemas.microsoft.com/expression/blend/2008"
   xmlns:local = "clr-namespace:MVVMDemo.Views"
   xmlns:viewModel = "clr-namespace:MVVMDemo.ViewModel"
   xmlns:vml = "clr-namespace:MVVMDemo.VML"
   vml:ViewModelLocator.AutoHookedUpViewModel = "True"
   mc:Ignorable = "d" d:DesignHeight = "300" d:DesignWidth = "300">

   <!--<UserControl.DataContext>
      <viewModel:StudentViewModel/>
   </UserControl.DataContext>-->

   <Grid>
      <StackPanel HorizontalAlignment = "Left">
         <ItemsControl ItemsSource = "{Binding Path = Students}">
            <ItemsControl.ItemTemplate>
               <DataTemplate>

                  <StackPanel Orientation = "Horizontal">
                     <TextBox Text = "{Binding Path = FirstName, Mode = TwoWay}"
                        Width = "100" Margin = "3 5 3 5"/>

                     <TextBox Text = "{Binding Path = LastName, Mode = TwoWay}"
                        Width = "100" Margin = "0 5 3 5"/>

                     <TextBlock Text = "{Binding Path = FullName, Mode = OneWay}"
                        Margin = "0 5 3 5"/>

                  </StackPanel>

               </DataTemplate>
            </ItemsControl.ItemTemplate>
         </ItemsControl>
      </StackPanel>
   </Grid>

</UserControl>
编译并执行上述代码后,您将看到 ViewModelLocator 正在为该特定视图连接 ViewModel。
需要注意的一个关键点是,视图不再与其 ViewModel 的类型或构造方式耦合。所有这些都移到了 ViewModelLocator 内的中心位置。
MVVM – WPF 数据绑定
在本章中,我们将学习数据绑定如何支持 MVVM 模式。数据绑定是将 MVVM 与其他 UI 分离模式(如 MVC 和 MVP)区分开来的关键特性。
-
对于数据绑定,您需要构建一个视图或一组 UI 元素,然后您需要绑定将指向的其他一些对象。
-
视图中的 UI 元素绑定到 ViewModel 公开的属性。
-
View 和 ViewModel 的构建顺序取决于具体情况,因为我们首先介绍了 View。
-
构建了一个视图和视图模型,并将视图的 DataContext 设置为视图模型。
-
绑定可以是 OneWay 或 TwoWay 数据绑定,以在 View 和 ViewModel 之间来回流动数据。
让我们看看同一个例子中的数据绑定。下面是 StudentView 的 XAML 代码。
<UserControl x:Class = "MVVMDemo.Views.StudentView"
   xmlns = "http://schemas.microsoft.com/winfx/2006/xaml/presentation"
   xmlns:x = "http://schemas.microsoft.com/winfx/2006/xaml"
   xmlns:mc = "http://schemas.openxmlformats.org/markup-compatibility/2006"
   xmlns:d = "http://schemas.microsoft.com/expression/blend/2008"
   xmlns:local = "clr-namespace:MVVMDemo.Views"
   xmlns:viewModel = "clr-namespace:MVVMDemo.ViewModel"
   xmlns:vml = "clr-namespace:MVVMDemo.VML"
   vml:ViewModelLocator.AutoHookedUpViewModel = "True"
   mc:Ignorable = "d" d:DesignHeight = "300" d:DesignWidth = "300">

   <!--<UserControl.DataContext>
      <viewModel:StudentViewModel/>
   </UserControl.DataContext>-->

   <Grid>
      <StackPanel HorizontalAlignment = "Left">
         <ItemsControl ItemsSource = "{Binding Path = Students}">
            <ItemsControl.ItemTemplate>
               <DataTemplate>

                  <StackPanel Orientation = "Horizontal">
                     <TextBox Text = "{Binding Path = FirstName, Mode = TwoWay}"
                        Width = "100" Margin = "3 5 3 5"/>

                     <TextBox Text = "{Binding Path = LastName, Mode = TwoWay}"
                        Width = "100" Margin = "0 5 3 5"/>

                     <TextBlock Text = "{Binding Path = FullName, Mode = OneWay}"
                        Margin = "0 5 3 5"/>

                  </StackPanel>

               </DataTemplate>
            </ItemsControl.ItemTemplate>
         </ItemsControl>
      </StackPanel>
   </Grid>

</UserControl>
-
如果您查看上面的 XAML 代码,您将看到 ItemsControl 绑定到 ViewModel 公开的 Students 集合。
-
您还可以看到 Student 模型的属性也有自己的单独绑定,这些绑定到 Textboxes 和 TextBlock。
-
ItemsControl 的 ItemSource 能够绑定到 Students 属性,因为 View 的整体 DataContext 设置为 ViewModel。
-
此处的各个属性绑定也是 DataContext 绑定,但由于 ItemSource 的工作方式,它们不绑定 ViewModel 本身。
-
当项目源绑定到其集合时,它会在呈现时为每个项目呈现一个容器,并将该容器的 DataContext 设置为该项目。因此,一行中每个文本框和文本块的整体 DataContext 将是集合中的单个学生。您还可以看到,这些 TextBox 的绑定是双向数据绑定,而 TextBlock 的这些绑定是 OneWay 数据绑定,因为您无法编辑 TextBlock。
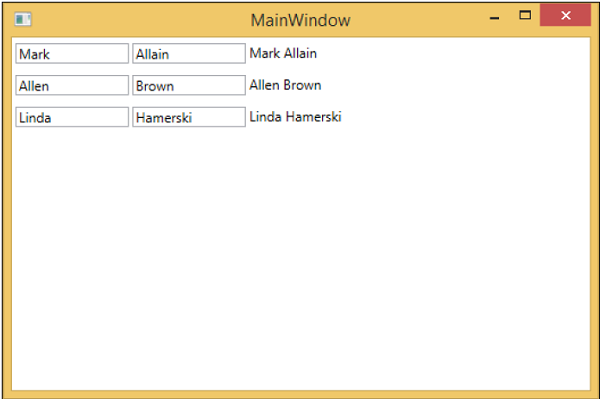
当您再次运行此应用程序时,您将看到以下输出。

现在让我们将第一行第二个文本框中的文本从 Allain 更改为 Upston,然后按 Tab 键以失去焦点。您将看到 TextBlock 文本也已更新。
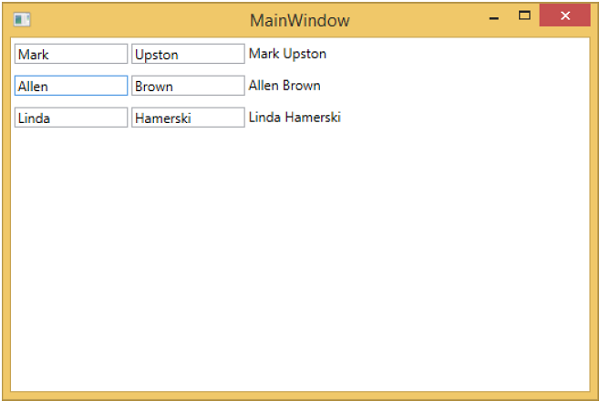
这是因为 TextBox 的绑定设置为 TwoWay 并且它也更新模型,并且再次从模型更新 TextBlock。
MVVM – WPF 数据模板
模板描述了控件的整体外观和视觉外观。对于每个控件,都有一个与之关联的默认模板,该模板为该控件提供外观。在 WPF 应用程序中,当您想要自定义控件的视觉行为和视觉外观时,您可以轻松创建自己的模板。逻辑和模板之间的连接可以通过数据绑定来实现。
在 MVVM 中,还有另一种主要形式,称为 ViewModel 优先构造。
-
ViewModel 第一种构造方法利用了 WPF 中隐式数据模板的功能。
-
隐式数据模板可以自动从当前资源字典中为使用数据绑定的元素选择合适的模板。他们根据数据绑定呈现的数据对象的类型来执行此操作。首先,您需要有一些绑定到数据对象的元素。
让我们再次看一下我们的简单示例,在该示例中您将了解如何首先利用数据模板(特别是隐式数据模板)进行视图模型。这是我们的 StudentViewModel 类的实现。
using MVVMDemo.Model;
using System.Collections.ObjectModel;

namespace MVVMDemo.ViewModel {

   public class StudentViewModel {

      public StudentViewModel() {
         LoadStudents();
      }

      public ObservableCollection<Student> Students {
         get;
         set;
      }

      public void LoadStudents() {
         ObservableCollection<Student> students = new ObservableCollection<Student>();

         students.Add(new Student { FirstName = "Mark", LastName = "Allain" });
         students.Add(new Student { FirstName = "Allen", LastName = "Brown" });
         students.Add(new Student { FirstName = "Linda", LastName = "Hamerski" });

         Students = students;
      }
   }
}
可以看到上面的ViewModel没有变化。我们将继续使用上一章中的相同示例。这个 ViewModel 类只公开学生集合属性并在构造时填充它。让我们转到 StudentView.xaml 文件,删除现有的实现并在参考资料部分定义一个数据模板。
<UserControl.Resources>
   <DataTemplate x:Key = "studentsTemplate">

      <StackPanel Orientation = "Horizontal">
         <TextBox Text = "{Binding Path = FirstName, Mode = TwoWay}"
            Width = "100" Margin = "3 5 3 5"/>

         <TextBox Text = "{Binding Path = LastName, Mode = TwoWay}"
            Width = "100" Margin = "0 5 3 5"/>

         <TextBlock Text = "{Binding Path = FullName, Mode = OneWay}"
            Margin = "0 5 3 5"/>
      </StackPanel>

   </DataTemplate>
</UserControl.Resources>
现在添加一个列表框并将该列表框数据绑定到 Students 属性,如以下代码所示。
<ListBox ItemsSource = "{Binding Students}" ItemTemplate = "{StaticResource studentsTemplate}"/>
在 Resource 部分,DataTemplate 有一个 studentTemplate 键,然后要实际使用该模板,我们需要使用 ListBox 的 ItemTemplate 属性。所以现在您可以看到我们指示列表框使用该特定模板来渲染这些学生。以下是 StudentView.xaml 文件的完整实现。
<UserControl x:Class = "MVVMDemo.Views.StudentView"
   xmlns = "http://schemas.microsoft.com/winfx/2006/xaml/presentation"
   xmlns:x = "http://schemas.microsoft.com/winfx/2006/xaml"
   xmlns:mc = "http://schemas.openxmlformats.org/markup-compatibility/2006"
   xmlns:d = "http://schemas.microsoft.com/expression/blend/2008"
   xmlns:local = "clr-namespace:MVVMDemo.Views"
   xmlns:viewModel = "clr-namespace:MVVMDemo.ViewModel"
   xmlns:vml = "clr-namespace:MVVMDemo.VML"
   vml:ViewModelLocator.AutoHookedUpViewModel = "True"
   mc:Ignorable = "d" d:DesignHeight = "300" d:DesignWidth = "300">

   <UserControl.Resources>
      <DataTemplate x:Key = "studentsTemplate">

         <StackPanel Orientation = "Horizontal">
            <TextBox Text = "{Binding Path = FirstName, Mode = TwoWay}"
               Width = "100" Margin = "3 5 3 5"/>

            <TextBox Text = "{Binding Path = LastName, Mode = TwoWay}"
               Width = "100" Margin = "0 5 3 5"/>

            <TextBlock Text = "{Binding Path = FullName, Mode = OneWay}"
               Margin = "0 5 3 5"/>

         </StackPanel>

      </DataTemplate>
   </UserControl.Resources>

   <Grid>
      <ListBox
         ItemsSource = "{Binding Students}"
         ItemTemplate = "{StaticResource studentsTemplate}"/>
   </Grid>

</UserControl>
上述代码编译执行后,会看到如下窗口,其中包含一个ListBox。每个 ListBoxItem 包含显示在 TextBlock 和文本框上的 Student 类对象数据。
要使其成为隐式模板,我们需要从列表框中删除 ItemTemplate 属性并在我们的模板定义中添加一个 DataType 属性,如以下代码所示。
<UserControl.Resources>
   <DataTemplate DataType = "{x:Type data:Student}">

      <StackPanel Orientation = "Horizontal">
         <TextBox Text = "{Binding Path = FirstName, Mode = TwoWay}"
            Width = "100" Margin = "3 5 3 5"/>

         <TextBox Text = "{Binding Path = LastName, Mode = TwoWay}"
            Width = "100" Margin = "0 5 3 5"/>

         <TextBlock Text = "{Binding Path = FullName, Mode = OneWay}"
            Margin = "0 5 3 5"/>

      </StackPanel>

   </DataTemplate>
</UserControl.Resources>

<Grid>
   <ListBox ItemsSource = "{Binding Students}"/>
</Grid>
在 DataTemplate 中,x:Type 标记扩展非常重要,它就像 XAML 中的一种运算符。所以,基本上我们需要指向 MVVMDemo.Model 命名空间中的 Student 数据类型。以下是更新后的完整 XAML 文件。
<UserControl x:Class="MVVMDemo.Views.StudentView"
   xmlns = "http://schemas.microsoft.com/winfx/2006/xaml/presentation"
   xmlns:x = "http://schemas.microsoft.com/winfx/2006/xaml"
   xmlns:mc = "http://schemas.openxmlformats.org/markup-compatibility/2006"
   xmlns:d = "http://schemas.microsoft.com/expression/blend/2008"
   xmlns:local = "clr-namespace:MVVMDemo.Views"
   xmlns:viewModel = "clr-namespace:MVVMDemo.ViewModel"
   xmlns:data = "clr-namespace:MVVMDemo.Model"
   xmlns:vml = "clr-namespace:MVVMDemo.VML"
   vml:ViewModelLocator.AutoHookedUpViewModel = "True"
   mc:Ignorable = "d" d:DesignHeight = "300" d:DesignWidth = "300">

   <UserControl.Resources>
      <DataTemplate DataType = "{x:Type data:Student}">

         <StackPanel Orientation = "Horizontal">
            <TextBox Text = "{Binding Path = FirstName, Mode = TwoWay}"
               Width = "100" Margin = "3 5 3 5"/>

            <TextBox Text = "{Binding Path = LastName, Mode = TwoWay}"
               Width = "100" Margin = "0 5 3 5"/>

            <TextBlock Text = "{Binding Path = FullName, Mode = OneWay}"
               Margin = "0 5 3 5"/>

         </StackPanel>

      </DataTemplate>
   </UserControl.Resources>

   <Grid>
      <ListBox ItemsSource = "{Binding Students}"/>
   </Grid>

</UserControl>
当您再次运行此应用程序时,您仍将获得具有数据模板的学生的相同呈现,因为它通过定位适当的 DataTemplate 自动映射正在呈现的对象的类型。
我们建议您以循序渐进的方式执行上述示例,以便更好地理解。
MVVM——视图/视图模型通信
在本章中,我们将学习如何为 MVVM 应用程序添加交互性以及如何干净地调用逻辑。您还将看到所有这些都是通过保持松散耦合和良好结构来完成的,这是 MVVM 模式的核心。要理解这一切,首先让我们了解命令。
通过命令查看/查看模型通信
命令模式已被很好地记录下来,并且几十年来经常使用设计模式。在此模式中,有两个主要参与者,调用者和接收者。
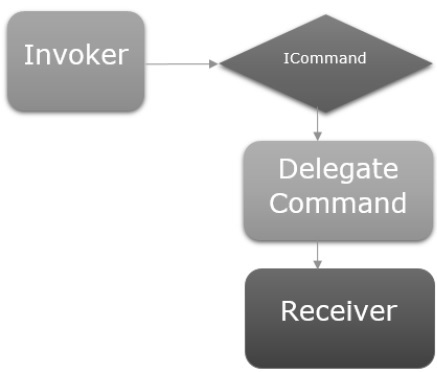
调用者
-
调用程序是一段可以执行一些命令式逻辑的代码。
-
通常,它是用户在 UI 框架上下文中与之交互的 UI 元素。
-
它可能只是应用程序中其他地方的另一块逻辑代码。
接收者
-
接收者是在调用者触发时执行的逻辑。
-
在 MVVM 的上下文中,接收器通常是您的 ViewModel 中需要调用的方法。
在这两者之间,您有一个阻塞层,这意味着调用者和接收者不必明确了解彼此。这通常表示为向调用者公开的接口抽象,并且该接口的具体实现能够调用接收器。
让我们看一个简单的示例,您将在其中学习命令以及如何使用它们在 View 和 ViewModel 之间进行通信。在本章中,我们将继续使用上一章中的相同示例。
在 StudentView.xaml 文件中,我们有一个 ListBox,它连接了 ViewModel 中的学生数据。现在让我们添加一个用于从 ListBox 中删除学生的按钮。
重要的是在按钮上使用命令非常容易,因为它们有一个命令属性可以连接到 ICommand。
因此,我们可以在 ViewModel 上公开一个具有 ICommand 的属性,并从按钮的 command 属性绑定到它,如下面的代码所示。
<Button Content = "Delete"
   Command = "{Binding DeleteCommand}"
   HorizontalAlignment = "Left"
   VerticalAlignment = "Top"
   Width = "75" />
让我们在您的项目中添加一个新类,它将实现 ICommand 接口。下面是ICommand接口的实现。
using System;
using System.Windows.Input;

namespace MVVMDemo {

   public class MyICommand : ICommand {
      Action _TargetExecuteMethod;
      Func<bool> _TargetCanExecuteMethod;

      public MyICommand(Action executeMethod) {
         _TargetExecuteMethod = executeMethod;
      }

      public MyICommand(Action executeMethod, Func<bool> canExecuteMethod){
         _TargetExecuteMethod = executeMethod;
         _TargetCanExecuteMethod = canExecuteMethod;
      }

      public void RaiseCanExecuteChanged() {
         CanExecuteChanged(this, EventArgs.Empty);
      }

      bool ICommand.CanExecute(object parameter) {

         if (_TargetCanExecuteMethod != null) {
            return _TargetCanExecuteMethod();
         }

         if (_TargetExecuteMethod != null) {
            return true;
         }

         return false;
      }

      // Beware - should use weak references if command instance lifetime
         is longer than lifetime of UI objects that get hooked up to command

      // Prism commands solve this in their implementation
      public event EventHandler CanExecuteChanged = delegate { };

      void ICommand.Execute(object parameter) {
         if (_TargetExecuteMethod != null) {
            _TargetExecuteMethod();
         }
      }
   }
}
如您所见,这是 ICommand 的一个简单委托实现,其中我们有两个委托,一个用于 executeMethod,另一个用于可以在构造时传入的 canExecuteMethod。
在上面的实现中,有两个重载的构造函数,一个只用于executeMethod,一个用于executeMethod和I canExecuteMethod。
让我们在 StudentView 模型类中添加一个 MyICommand 类型的属性。现在我们需要在 StudentViewModel 中构造一个实例。我们将使用带有两个参数的 MyICommand 的重载构造函数。
public MyICommand DeleteCommand { get; set;}

public StudentViewModel() {
   LoadStudents();
   DeleteCommand = new MyICommand(OnDelete, CanDelete);
}
现在添加 OnDelete 和 CanDelete 方法的实现。
private void OnDelete() {
   Students.Remove(SelectedStudent);
}

private bool CanDelete() {
   return SelectedStudent != null;
}
我们还需要添加一个新的 SelectedStudent,以便用户可以从 ListBox 中删除 Selected Item。
private Student _selectedStudent;

public Student SelectedStudent {
   get {
      return _selectedStudent;
   }

   set {
      _selectedStudent = value;
      DeleteCommand.RaiseCanExecuteChanged();
   }
}
以下是 ViewModel 类的完整实现。
using MVVMDemo.Model;

using System.Collections.ObjectModel;
using System.Windows.Input;
using System;

namespace MVVMDemo.ViewModel {

   public class StudentViewModel {

      public MyICommand DeleteCommand { get; set;}

      public StudentViewModel() {
         LoadStudents();
         DeleteCommand = new MyICommand(OnDelete, CanDelete);
      }

      public ObservableCollection<Student> Students {
         get;
         set;
      }

      public void LoadStudents() {
         ObservableCollection<Student> students = new ObservableCollection<Student>();

         students.Add(new Student { FirstName = "Mark", LastName = "Allain" });
         students.Add(new Student { FirstName = "Allen", LastName = "Brown" });
         students.Add(new Student { FirstName = "Linda", LastName = "Hamerski" });

         Students = students;
      }

      private Student _selectedStudent;

      public Student SelectedStudent {
         get {
            return _selectedStudent;
         }

         set {
            _selectedStudent = value;
            DeleteCommand.RaiseCanExecuteChanged();
         }
      }

      private void OnDelete() {
         Students.Remove(SelectedStudent);
      }

      private bool CanDelete() {
         return SelectedStudent != null;
      }
   }
}
在 StudentView.xaml 中,我们需要在 ListBox 中添加 SelectedItem 属性,该属性将绑定到 SelectStudent 属性。
<ListBox ItemsSource = "{Binding Students}" SelectedItem = "{Binding SelectedStudent}"/>
以下是完整的 xaml 文件。
<UserControl x:Class = "MVVMDemo.Views.StudentView"
   xmlns = "http://schemas.microsoft.com/winfx/2006/xaml/presentation"
   xmlns:x = "http://schemas.microsoft.com/winfx/2006/xaml"
   xmlns:mc = "http://schemas.openxmlformats.org/markup-compatibility/2006"
   xmlns:d = "http://schemas.microsoft.com/expression/blend/2008"
   xmlns:local = "clr-namespace:MVVMDemo.Views"
   xmlns:viewModel = "clr-namespace:MVVMDemo.ViewModel"
   xmlns:data = "clr-namespace:MVVMDemo.Model"
   xmlns:vml = "clr-namespace:MVVMDemo.VML"
   vml:ViewModelLocator.AutoHookedUpViewModel = "True"
   mc:Ignorable = "d"
   d:DesignHeight = "300" d:DesignWidth = "300">

   <UserControl.Resources>
      <DataTemplate DataType = "{x:Type data:Student}">

         <StackPanel Orientation = "Horizontal">

            <TextBox Text = "{Binding Path = FirstName, Mode = TwoWay}"
               Width = "100" Margin = "3 5 3 5"/>

            <TextBox Text = "{Binding Path = LastName, Mode = TwoWay}"
               Width = "100" Margin = "0 5 3 5"/>

            <TextBlock Text = "{Binding Path = FullName, Mode = OneWay}"
               Margin = "0 5 3 5"/>

         </StackPanel>

      </DataTemplate>
   </UserControl.Resources>

   <Grid>
      <StackPanel Orientation = "Horizontal">
         <ListBox ItemsSource = "{Binding Students}"
            SelectedItem = "{Binding SelectedStudent}"/>

         <Button Content = "Delete"
            Command = "{Binding DeleteCommand}"
            HorizontalAlignment = "Left"
            VerticalAlignment = "Top"
            Width = "75" />
      </StackPanel>
   </Grid>

</UserControl>
上述代码编译执行后,会看到如下窗口。
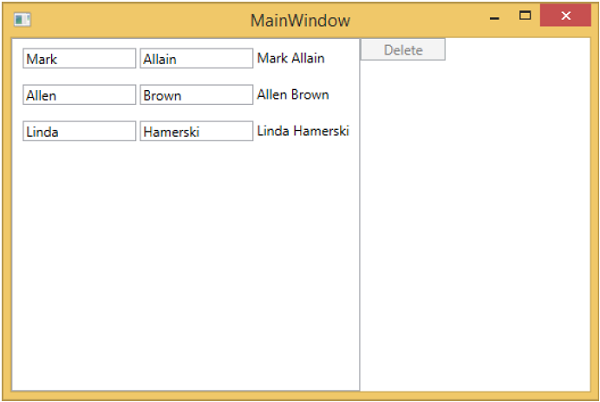
您可以看到删除按钮被禁用。当您选择任何项目时,它将被启用。
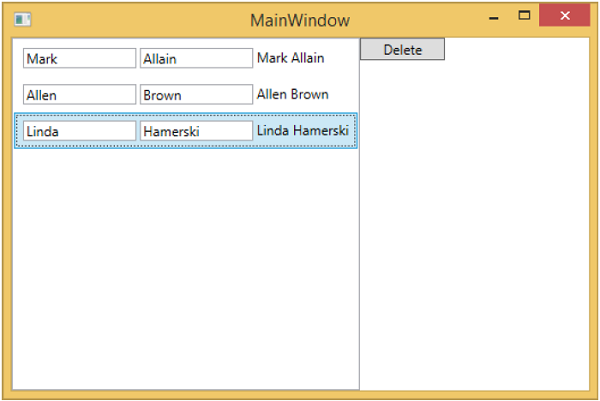
当您选择任何项目并按删除时。您将看到所选项目列表被删除,并且删除按钮再次变为禁用状态。

我们建议您逐步执行上述示例,以便更好地理解。
MVVM – 层次结构和导航
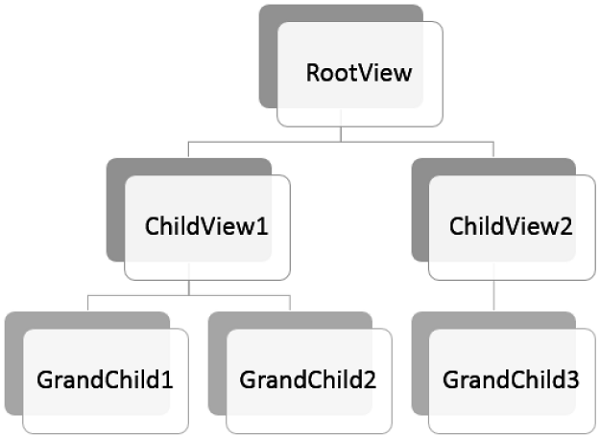
在构建 MVVM 应用程序时,您通常将复杂的信息屏幕分解为一组父视图和子视图,其中子视图包含在面板或容器控件中的父视图中,并形成使用层次结构本身。
-
分解复杂的视图后,这并不意味着您分离到其自己的 XAML 文件中的每个子内容都必须是 MVVM 视图。
-
内容块仅提供将某些内容呈现到屏幕上的结构,不支持用户对该内容的任何输入或操作。
-
它可能不需要单独的 ViewModel,但它可能只是一个基于父 ViewModel 公开的属性呈现的块 XAML。
-
最后,如果您有视图和视图模型的层次结构,父视图模型可以成为通信的中心,这样每个子视图模型可以尽可能地与其他子视图模型及其父视图保持解耦。
让我们看一个例子,在这个例子中,我们将在不同的视图之间定义一个简单的层次结构。创建一个新的 WPF 应用程序项目MVVMHierarchiesDemo
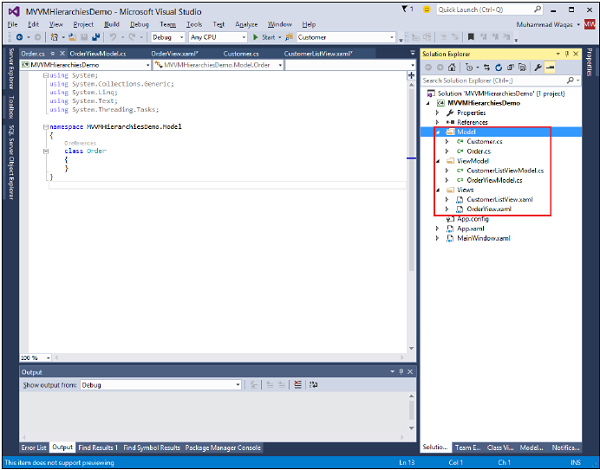
步骤 1 – 将三个文件夹(模型、视图模型和视图)添加到您的项目中。

步骤 2 – 在 Model 文件夹中添加 Customer 和 Order 类,在 Views 文件夹中添加 CustomerListView 和 OrderView,在 ViewModel 文件夹中添加 CustomerListViewModel 和 OrderViewModel,如下图所示。
第 3 步– 在 CustomerListView 和 OrderView 中添加文本块。这是 CustomerListView.xaml 文件。
<UserControl x:Class="MVVMHierarchiesDemo.Views.CustomerListView"
   xmlns = "http://schemas.microsoft.com/winfx/2006/xaml/presentation"
   xmlns:x = "http://schemas.microsoft.com/winfx/2006/xaml"
   xmlns:mc = "http://schemas.openxmlformats.org/markup-compatibility/2006"
   xmlns:d = "http://schemas.microsoft.com/expression/blend/2008"
   xmlns:local = "clr-namespace:MVVMHierarchiesDemo.Views"
   mc:Ignorable = "d"
   d:DesignHeight = "300" d:DesignWidth = "300">

   <Grid>
      <TextBlock Text = "Customer List View"/>
   </Grid>

</UserControl>
以下是 OrderView.xaml 文件。
<UserControl x:Class = "MVVMHierarchiesDemo.Views.OrderView"
   xmlns = "http://schemas.microsoft.com/winfx/2006/xaml/presentation"
   xmlns:x ="http://schemas.microsoft.com/winfx/2006/xaml"
   xmlns:mc ="http://schemas.openxmlformats.org/markup-compatibility/2006"
   xmlns:d ="http://schemas.microsoft.com/expression/blend/2008"
   xmlns:local = "clr-namespace:MVVMHierarchiesDemo.Views" mc:Ignorable = "d"
   d:DesignHeight = "300" d:DesignWidth = "300">

   <Grid>
      <TextBlock Text = "Order View"/>
   </Grid>

</UserControl>
现在我们需要一些东西来承载这些视图,并且在我们的 MainWindow 中有一个很好的地方,因为它是一个简单的应用程序。我们需要一个容器控件,我们可以放置我们的视图并以导航方式切换它们。为此,我们需要在 MainWindow.xaml 文件中添加 ContentControl,我们将使用其内容属性并将其绑定到 ViewModel 引用。
现在为资源字典中的每个视图定义数据模板。以下是 MainWindow.xaml 文件。请注意每个数据模板如何将数据类型(ViewModel 类型)映射到相应的视图。
<Window x:Class = "MVVMHierarchiesDemo.MainWindow"
   xmlns = "http://schemas.microsoft.com/winfx/2006/xaml/presentation"
   xmlns:x = "http://schemas.microsoft.com/winfx/2006/xaml"
   xmlns:d = "http://schemas.microsoft.com/expression/blend/2008"
   xmlns:mc = "http://schemas.openxmlformats.org/markup-compatibility/2006"
   xmlns:local = "clr-namespace:MVVMHierarchiesDemo"
   xmlns:views = "clr-namespace:MVVMHierarchiesDemo.Views"
   xmlns:viewModels = "clr-namespace:MVVMHierarchiesDemo.ViewModel"
   mc:Ignorable = "d"
   Title = "MainWindow" Height = "350" Width = "525">

   <Window.DataContext>
      <local:MainWindowViewModel/>
   </Window.DataContext>

   <Window.Resources>
      <DataTemplate DataType = "{x:Type viewModels:CustomerListViewModel}">
         <views:CustomerListView/>
      </DataTemplate>

      <DataTemplate DataType = "{x:Type viewModels:OrderViewModel}">
         <views:OrderView/>
      </DataTemplate>
   </Window.Resources>

   <Grid>
      <ContentControl Content = "{Binding CurrentView}"/>
   </Grid>

</Window>
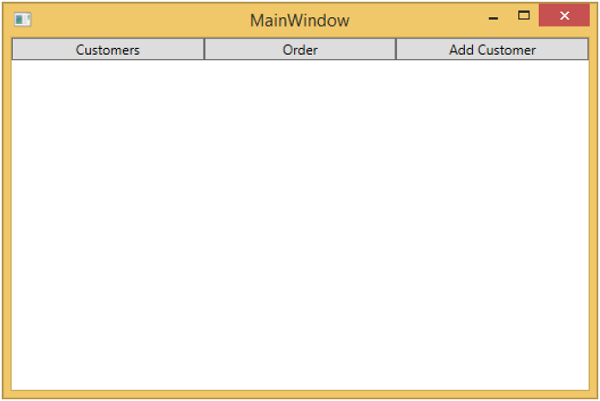
任何时候将当前视图模型设置为 CustomerListViewModel 的实例,它都会渲染出一个 CustomerListView 并连接了 ViewModel。它是一个订单 ViewModel,它会渲染出 OrderView 等等。
我们现在需要一个具有 CurrentViewModel 属性的 ViewModel 和一些逻辑和命令,以便能够在属性内切换 ViewModel 的当前引用。
让我们为这个 MainWindow 创建一个名为 MainWindowViewModel 的 ViewModel。我们可以从 XAML 创建我们的 ViewModel 的一个实例,并使用它来设置窗口的 DataContext 属性。为此,我们需要创建一个基类来封装 ViewModel 的 INotifyPropertyChanged 实现。
该类背后的主要思想是封装 INotifyPropertyChanged 实现并向派生类提供辅助方法,以便它们可以轻松触发适当的通知。以下是 BindableBase 类的实现。
using System;
using System.Collections.Generic;
using System.ComponentModel;
using System.Linq;
using System.Runtime.CompilerServices;
using System.Text;
using System.Threading.Tasks;

namespace MVVMHierarchiesDemo {

   class BindableBase : INotifyPropertyChanged {

      protected virtual void SetProperty<T>(ref T member, T val,
         [CallerMemberName] string propertyName = null) {
            if (object.Equals(member, val)) return;

            member = val;
            PropertyChanged(this, new PropertyChangedEventArgs(propertyName));
      }

      protected virtual void OnPropertyChanged(string propertyName) {
         PropertyChanged(this, new PropertyChangedEventArgs(propertyName));
      }

      public event PropertyChangedEventHandler PropertyChanged = delegate { };
   }
}
现在是时候开始使用我们的 CurrentViewModel 属性进行一些视图切换了。我们只需要某种方式来驱动此属性的设置。我们将使其最终用户可以命令进入客户列表或订单视图。首先在您的项目中添加一个新类,它将实现 ICommand 接口。下面是ICommand接口的实现。
using System;
using System.Windows.Input;

namespace MVVMHierarchiesDemo {

   public class MyICommand<T> : ICommand {

      Action<T> _TargetExecuteMethod;
      Func<T, bool> _TargetCanExecuteMethod;

      public MyICommand(Action<T> executeMethod) {
         _TargetExecuteMethod = executeMethod;
      }

      public MyICommand(Action<T> executeMethod, Func<T, bool> canExecuteMethod) {
         _TargetExecuteMethod = executeMethod;
         _TargetCanExecuteMethod = canExecuteMethod;
      }

      public void RaiseCanExecuteChanged() {
         CanExecuteChanged(this, EventArgs.Empty);
      }

      #region ICommand Members

      bool ICommand.CanExecute(object parameter) {

         if (_TargetCanExecuteMethod != null) {
            T tparm = (T)parameter;
            return _TargetCanExecuteMethod(tparm);
         }

         if (_TargetExecuteMethod != null) {
            return true;
         }

         return false;
      }

      // Beware - should use weak references if command instance lifetime is
         longer than lifetime of UI objects that get hooked up to command

      // Prism commands solve this in their implementation

      public event EventHandler CanExecuteChanged = delegate { };

      void ICommand.Execute(object parameter) {
         if (_TargetExecuteMethod != null) {
            _TargetExecuteMethod((T)parameter);
         }
      }

      #endregion
   }
}
我们现在需要为这些视图模型设置一些顶级导航,并且该切换的逻辑应该属于 MainWindowViewModel 内部。为此,我们将使用一个在 navigation 上调用的方法,它接受一个字符串目的地并返回 CurrentViewModel 属性。
private void OnNav(string destination) {

   switch (destination) {
      case "orders":
         CurrentViewModel = orderViewModelModel;
      break;
      case "customers":
      default:
         CurrentViewModel = custListViewModel;
      break;
   }
}
为了导航这些不同的视图,我们需要在 MainWindow.xaml 文件中添加两个按钮。以下是完整的 XAML 文件实现。
<Window x:Class = "MVVMHierarchiesDemo.MainWindow"
   xmlns = "http://schemas.microsoft.com/winfx/2006/xaml/presentation"
   xmlns:x = "http://schemas.microsoft.com/winfx/2006/xaml"
   xmlns:d = "http://schemas.microsoft.com/expression/blend/2008"
   xmlns:mc = "http://schemas.openxmlformats.org/markup-compatibility/2006"
   xmlns:local = "clr-namespace:MVVMHierarchiesDemo"
   xmlns:views = "clr-namespace:MVVMHierarchiesDemo.Views"
   xmlns:viewModels = "clr-namespace:MVVMHierarchiesDemo.ViewModel"
   mc:Ignorable = "d"
   Title = "MainWindow" Height = "350" Width = "525">

   <Window.DataContext>
      <local:MainWindowViewModel/>
   </Window.DataContext>

   <Window.Resources>
      <DataTemplate DataType = "{x:Type viewModels:CustomerListViewModel}">
         <views:CustomerListView/>
      </DataTemplate>

      <DataTemplate DataType = "{x:Type viewModels:OrderViewModel}">
         <views:OrderView/>
      </DataTemplate>
   </Window.Resources>

   <Grid>
      <Grid.RowDefinitions>
         <RowDefinition Height = "Auto" />
         <RowDefinition Height = "*" />
      </Grid.RowDefinitions>

      <Grid x:Name = "NavBar">
         <Grid.ColumnDefinitions>
            <ColumnDefinition Width = "*" />
            <ColumnDefinition Width = "*" />
            <ColumnDefinition Width = "*" />
         </Grid.ColumnDefinitions>

         <Button Content = "Customers"
            Command = "{Binding NavCommand}"
            CommandParameter = "customers"
            Grid.Column = "0" />

         <Button Content = "Order"
            Command = "{Binding NavCommand}"
            CommandParameter = "orders"
            Grid.Column = "2" />
      </Grid>

      <Grid x:Name = "MainContent" Grid.Row = "1">
         <ContentControl Content = "{Binding CurrentViewModel}" />
      </Grid>

   </Grid>

</Window>
以下是完整的 MainWindowViewModel 实现。
using MVVMHierarchiesDemo.ViewModel;
using MVVMHierarchiesDemo.Views;

using System;
using System.Collections.Generic;
using System.Linq;
using System.Text;
using System.Threading.Tasks;

namespace MVVMHierarchiesDemo {

   class MainWindowViewModel : BindableBase {

      public MainWindowViewModel() {
         NavCommand = new MyICommand<string>(OnNav);
      }

      private CustomerListViewModel custListViewModel = new CustomerListViewModel();

      private OrderViewModel orderViewModelModel = new OrderViewModel();

      private BindableBase _CurrentViewModel;

      public BindableBase CurrentViewModel {
         get {return _CurrentViewModel;}
         set {SetProperty(ref _CurrentViewModel, value);}
      }

      public MyICommand<string> NavCommand { get; private set; }

      private void OnNav(string destination) {

         switch (destination) {
            case "orders":
               CurrentViewModel = orderViewModelModel;
               break;
            case "customers":
            default:
               CurrentViewModel = custListViewModel;
               break;
         }
      }
   }
}
从 BindableBase 类派生所有的 ViewModel。当上面的代码编译执行后,你会看到下面的输出。
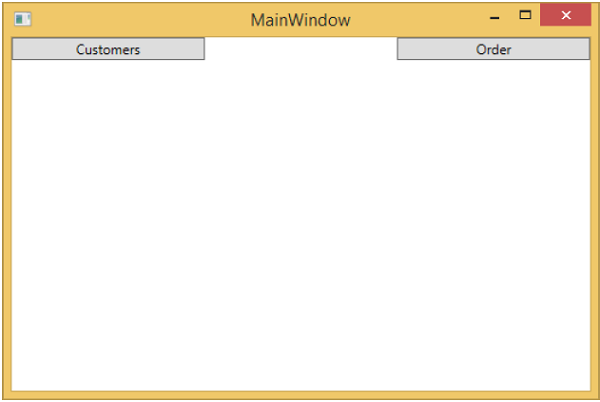
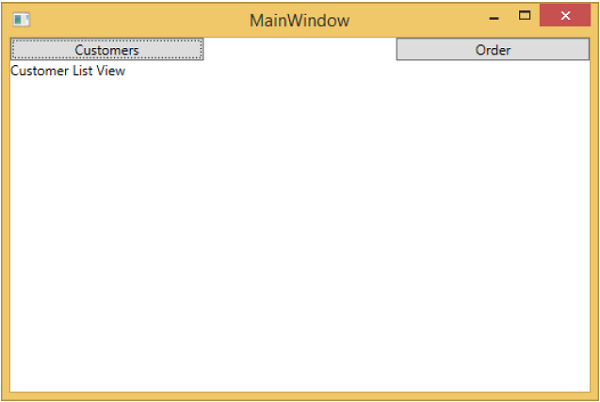
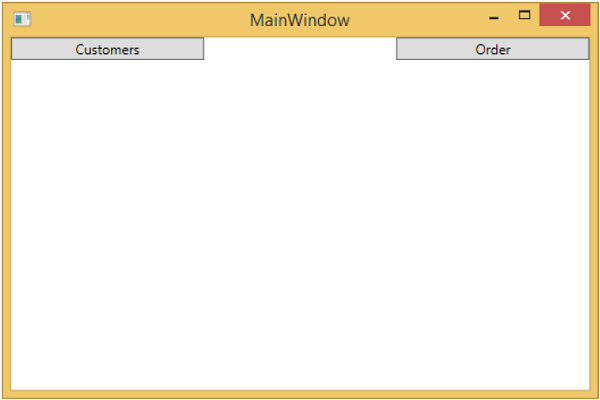
如您所见,我们在 MainWindow 上仅添加了两个按钮和一个 CurrentViewModel。如果您单击任何按钮,它将导航到该特定视图。让我们单击“客户”按钮,您将看到显示 CustomerListView。
我们建议您逐步执行上述示例,以便更好地理解。
MVVM – 验证
在本章中,我们将了解验证。我们还将研究一种使用 WPF 绑定已经支持但将其绑定到 MVVM 组件的简洁方法进行验证。
MVVM 中的验证
-
当您的应用程序开始接受来自最终用户的数据输入时,您需要考虑验证该输入。
-
确保它符合您的总体要求。
-
WPF 在绑定系统中具有一些用于验证输入的出色构建和功能,您在执行 MVVM 时仍然可以利用所有这些功能。
-
请记住,支持您的验证并定义哪些属性存在哪些规则的逻辑应该是 Model 或 ViewModel 的一部分,而不是 View 本身。
您仍然可以使用 WPF 数据绑定支持的所有表达验证方式,包括 –
- 设置在属性上抛出异常。
- 实现 IDataErrorInfo 接口。
- 实现 INotifyDataErrorInfo。
- 使用 WPF 验证规则。
通常,推荐使用 INotifyDataErrorInfo 并将其引入 WPF .net 4.5,它支持查询对象以查找与属性相关的错误,它还修复了所有其他选项的一些缺陷。具体来说,它允许异步验证。它允许属性有多个与之相关的错误。
添加验证
让我们看一个示例,在该示例中,我们将向输入视图添加验证支持,在大型应用程序中,您可能需要在应用程序中的许多地方使用它。有时在 Views 上,有时在 ViewModels 上,有时在这些辅助对象上有围绕模型对象的包装器。
将验证支持放在一个公共基类中是一个很好的做法,然后您可以从不同的场景中继承该基类。
基类将支持 INotifyDataErrorInfo,以便在属性更改时触发验证。
创建添加一个名为 ValidatableBindableBase 的新类。由于我们已经有一个用于处理属性更改的基类,让我们从中派生出基类并实现 INotifyDataErrorInfo 接口。
以下是 ValidatableBindableBase 类的实现。
using System;
using System.Collections.Generic;
using System.ComponentModel;

//using System.ComponentModel.DataAnnotations;
using System.Linq;
using System.Runtime.CompilerServices;
using System.Text;
using System.Threading.Tasks;
using System.Windows.Controls;

namespace MVVMHierarchiesDemo {

   public class ValidatableBindableBase : BindableBase, INotifyDataErrorInfo {
      private Dictionary<string, List<string>> _errors = new Dictionary<string, List<string>>();

      public event EventHandler<DataErrorsChangedEventArgs>
         ErrorsChanged = delegate { };

      public System.Collections.IEnumerable GetErrors(string propertyName) {

         if (_errors.ContainsKey(propertyName))
            return _errors[propertyName];
         else
            return null;
      }

      public bool HasErrors {
         get { return _errors.Count > 0; }
      }

      protected override void SetProperty<T>(ref T member, T val,
         [CallerMemberName] string propertyName = null) {

         base.SetProperty<T>(ref member, val, propertyName);
         ValidateProperty(propertyName, val);
      }

      private void ValidateProperty<T>(string propertyName, T value) {
         var results = new List<ValidationResult>();

         //ValidationContext context = new ValidationContext(this);
         //context.MemberName = propertyName;
         //Validator.TryValidateProperty(value, context, results);

         if (results.Any()) {
            //_errors[propertyName] = results.Select(c => c.ErrorMessage).ToList();
         } else {
            _errors.Remove(propertyName);
         }

         ErrorsChanged(this, new DataErrorsChangedEventArgs(propertyName));
      }
   }
}
现在在各自的文件夹中添加 AddEditCustomerView 和 AddEditCustomerViewModel 。以下是 AddEditCustomerView.xaml 的代码。
<UserControl x:Class = "MVVMHierarchiesDemo.Views.AddEditCustomerView"
   xmlns = "http://schemas.microsoft.com/winfx/2006/xaml/presentation"
   xmlns:x = "http://schemas.microsoft.com/winfx/2006/xaml"
   xmlns:mc = "http://schemas.openxmlformats.org/markup-compatibility/2006"
   xmlns:d = "http://schemas.microsoft.com/expression/blend/2008"
   xmlns:local = "clr-namespace:MVVMHierarchiesDemo.Views"
   mc:Ignorable = "d"
   d:DesignHeight = "300" d:DesignWidth = "300">

   <Grid>
      <Grid.RowDefinitions>
         <RowDefinition Height = "Auto" />
         <RowDefinition Height = "Auto" />
      </Grid.RowDefinitions>

      <Grid x:Name = "grid1"
         HorizontalAlignment = "Left"
         DataContext = "{Binding Customer}"
         Margin = "10,10,0,0"
         VerticalAlignment = "Top">

         <Grid.ColumnDefinitions>
            <ColumnDefinition Width = "Auto" />
            <ColumnDefinition Width = "Auto" />
         </Grid.ColumnDefinitions>

         <Grid.RowDefinitions>
            <RowDefinition Height = "Auto" />
            <RowDefinition Height = "Auto" />
            <RowDefinition Height = "Auto" />
            <RowDefinition Height = "Auto" />
         </Grid.RowDefinitions>

         <Label Content = "First Name:"
            Grid.Column = "0"
            HorizontalAlignment = "Left"
            Margin = "3"
            Grid.Row = "0"
            VerticalAlignment = "Center" />

         <TextBox x:Name = "firstNameTextBox"
            Grid.Column = "1"
            HorizontalAlignment = "Left"
            Height = "23"
            Margin = "3"
            Grid.Row = "0"
            Text = "{Binding FirstName, ValidatesOnNotifyDataErrors = True}"
            VerticalAlignment = "Center"
            Width = "120" />

         <Label Content = "Last Name:"
            Grid.Column = "0"
            HorizontalAlignment = "Left"
            Margin = "3"
            Grid.Row = "1"
            VerticalAlignment = "Center" />

         <TextBox x:Name = "lastNameTextBox"
            Grid.Column = "1"
            HorizontalAlignment = "Left"
            Height = "23"
            Margin = "3"
            Grid.Row = "1"
            Text = "{Binding LastName, ValidatesOnNotifyDataErrors = True}"
            VerticalAlignment = "Center"
            Width = "120" />

         <Label Content = "Email:"
            Grid.Column = "0"
            HorizontalAlignment = "Left"
            Margin = "3"
            Grid.Row = "2"
            VerticalAlignment = "Center" />

         <TextBox x:Name = "emailTextBox"
            Grid.Column = "1"
            HorizontalAlignment = "Left"
            Height = "23"
            Margin = "3"
            Grid.Row = "2"
            Text = "{Binding Email, ValidatesOnNotifyDataErrors = True}"
            VerticalAlignment = "Center"
            Width = "120" />

         <Label Content = "Phone:"
            Grid.Column = "0"
            HorizontalAlignment = "Left"
            Margin = "3"
            Grid.Row = "3"
            VerticalAlignment = "Center" />

         <TextBox x:Name = "phoneTextBox"
            Grid.Column = "1"
            HorizontalAlignment = "Left"
            Height = "23"
            Margin = "3"
            Grid.Row = "3"
            Text = "{Binding Phone, ValidatesOnNotifyDataErrors = True}"
            VerticalAlignment = "Center"
            Width = "120" />

      </Grid>

      <Grid Grid.Row = "1">
         <Button Content = "Save"
            Command = "{Binding SaveCommand}"
            HorizontalAlignment = "Left"
            Margin = "25,5,0,0"
            VerticalAlignment = "Top"
            Width = "75" />

         <Button Content = "Add"
            Command = "{Binding SaveCommand}"
            HorizontalAlignment = "Left"
            Margin = "25,5,0,0"
            VerticalAlignment = "Top"
            Width = "75" />

         <Button Content = "Cancel"
            Command = "{Binding CancelCommand}"
            HorizontalAlignment = "Left"
            Margin = "150,5,0,0"
            VerticalAlignment = "Top"
            Width = "75" />
      </Grid>

   </Grid>

</UserControl>
以下是 AddEditCustomerViewModel 实现。
using MVVMHierarchiesDemo.Model;

using System;
using System.Collections.Generic;
using System.Linq;
using System.Text;
using System.Threading.Tasks;

namespace MVVMHierarchiesDemo.ViewModel {

   class AddEditCustomerViewModel : BindableBase {

      public AddEditCustomerViewModel() {
         CancelCommand = new MyIcommand(OnCancel);
         SaveCommand = new MyIcommand(OnSave, CanSave);
      }

      private bool _EditMode;

      public bool EditMode {
         get { return _EditMode; }
         set { SetProperty(ref _EditMode, value);}
      }

      private SimpleEditableCustomer _Customer;

      public SimpleEditableCustomer Customer {
         get { return _Customer; }
         set { SetProperty(ref _Customer, value);}
      }

      private Customer _editingCustomer = null;

      public void SetCustomer(Customer cust) {
         _editingCustomer = cust;

         if (Customer != null) Customer.ErrorsChanged -= RaiseCanExecuteChanged;
         Customer = new SimpleEditableCustomer();
         Customer.ErrorsChanged += RaiseCanExecuteChanged;
         CopyCustomer(cust, Customer);
      }

      private void RaiseCanExecuteChanged(object sender, EventArgs e) {
         SaveCommand.RaiseCanExecuteChanged();
      }

      public MyIcommand CancelCommand { get; private set; }
      public MyIcommand SaveCommand { get; private set; }

      public event Action Done = delegate { };

      private void OnCancel() {
         Done();
      }

      private async void OnSave() {
         Done();
      }

      private bool CanSave() {
         return !Customer.HasErrors;
      }
   }
}
以下是 SimpleEditableCustomer 类的实现。
using System;
using System.Collections.Generic;
using System.Linq;
using System.Text;
using System.Threading.Tasks;

namespace MVVMHierarchiesDemo.Model {

   public class SimpleEditableCustomer : ValidatableBindableBase {
      private Guid _id;

      public Guid Id {
         get { return _id; }
         set { SetProperty(ref _id, value); }
      }

      private string _firstName;
      [Required]

      public string FirstName {
         get { return _firstName; }
         set { SetProperty(ref _firstName, value); }
      }

      private string _lastName;
      [Required]

      public string LastName {
         get { return _lastName; }
         set { SetProperty(ref _lastName, value); }
      }

      private string _email;
      [EmailAddress]

      public string Email {
         get { return _email; }
         set { SetProperty(ref _email, value); }
      }

      private string _phone;
      [Phone]

      public string Phone {
         get { return _phone; }
         set { SetProperty(ref _phone, value); }
      }
   }
}
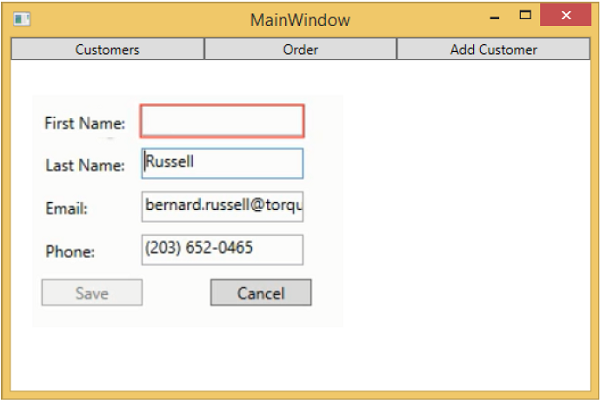
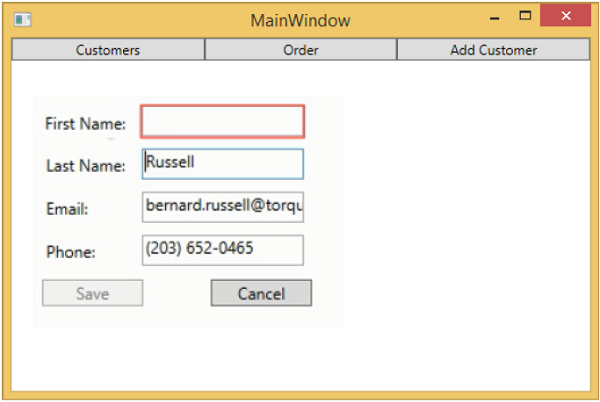
上述代码编译执行后,会看到如下窗口。
当您按下添加客户按钮时,您将看到以下视图。当用户将任何字段留空时,它将突出显示并且保存按钮将被禁用。
MVVM——依赖注入
在本章中,我们将简要讨论依赖注入。我们已经介绍了数据绑定将 Views 和 ViewModels 相互解耦,允许它们在不明确知道通信另一端发生了什么的情况下进行通信。
现在我们需要类似的东西来将我们的 ViewModel 与客户端服务分离。
在面向对象编程的早期,开发人员面临着在应用程序中创建和检索类实例的问题。针对这个问题已经提出了各种解决方案。
在过去几年中,依赖注入和控制反转 (IoC) 在开发人员中越来越流行,并且优先于一些较旧的解决方案,例如单例模式。
依赖注入/IoC 容器
IoC 和依赖注入是两种密切相关的设计模式,容器基本上是一块基础设施代码,可以为您完成这两种模式。
-
IoC 模式是关于委托构建的责任,依赖注入模式是关于为已经构建的对象提供依赖关系。
-
它们都可以被视为一种两阶段的构建方法。当您使用容器时,容器承担以下几个职责 –
- 它在被询问时构造一个对象。
- 容器将确定该对象所依赖的内容。
- 构建这些依赖项。
- 将它们注入正在构造的对象中。
- 递归地做过程。
让我们来看看我们如何使用依赖注入来打破 ViewModel 和客户端服务之间的解耦。我们将使用与此相关的依赖注入来连接保存处理 AddEditCustomerViewModel 表单。
首先,我们需要在我们的项目中的 Services 文件夹中创建一个新界面。如果您的项目中没有 services 文件夹,请先创建它并在 Services 文件夹中添加以下接口。
using MVVMHierarchiesDemo.Model;

using System;
using System.Collections.Generic;
using System.Linq;
using System.Text;
using System.Threading.Tasks;

namespace MVVMHierarchiesDemo.Services {

   public interface ICustomersRepository {
      Task<List<Customer>> GetCustomersAsync();
      Task<Customer> GetCustomerAsync(Guid id);
      Task<Customer> AddCustomerAsync(Customer customer);
      Task<Customer> UpdateCustomerAsync(Customer customer);
      Task DeleteCustomerAsync(Guid customerId);
   }
}
以下是 ICustomersRepository 的实现。
using MVVMHierarchiesDemo.Model;

using System;
using System.Collections.Generic;
using System.Linq; using System.Text;
using System.Threading.Tasks;

namespace MVVMHierarchiesDemo.Services {

   public class CustomersRepository : ICustomersRepository {
      ZzaDbContext _context = new ZzaDbContext();

      public Task<List<Customer>> GetCustomersAsync() {
         return _context.Customers.ToListAsync();
      }

      public Task<Customer> GetCustomerAsync(Guid id) {
         return _context.Customers.FirstOrDefaultAsync(c => c.Id == id);
      }

      public async Task<Customer> AddCustomerAsync(Customer customer){
         _context.Customers.Add(customer);
         await _context.SaveChangesAsync();
         return customer;
      }

      public async Task<Customer> UpdateCustomerAsync(Customer customer) {

         if (!_context.Customers.Local.Any(c => c.Id == customer.Id)) {
            _context.Customers.Attach(customer);
         }

         _context.Entry(customer).State = EntityState.Modified;
         await _context.SaveChangesAsync();
         return customer;

      }

      public async Task DeleteCustomerAsync(Guid customerId) {
         var customer = _context.Customers.FirstOrDefault(c => c.Id == customerId);

         if (customer != null) {
            _context.Customers.Remove(customer);
         }

         await _context.SaveChangesAsync();
      }
   }
}
进行保存处理的简单方法是在 AddEditCustomerViewModel 中添加 ICustomersRepository 的新实例并重载 AddEditCustomerViewModel 和 CustomerListViewModel 构造函数。
private ICustomersRepository _repo;

public AddEditCustomerViewModel(ICustomersRepository repo) {
   _repo = repo;
   CancelCommand = new MyIcommand(OnCancel);
   SaveCommand = new MyIcommand(OnSave, CanSave);
}
更新 OnSave 方法,如以下代码所示。
private async void OnSave() {
   UpdateCustomer(Customer, _editingCustomer);

   if (EditMode)
      await _repo.UpdateCustomerAsync(_editingCustomer);
   else
      await _repo.AddCustomerAsync(_editingCustomer);
   Done();
}

private void UpdateCustomer(SimpleEditableCustomer source, Customer target) {
   target.FirstName = source.FirstName;
   target.LastName = source.LastName;
   target.Phone = source.Phone;
   target.Email = source.Email;
}
以下是完整的 AddEditCustomerViewModel。
using MVVMHierarchiesDemo.Model;
using MVVMHierarchiesDemo.Services;

using System;
using System.Collections.Generic;
using System.Linq;
using System.Text;
using System.Threading.Tasks;

namespace MVVMHierarchiesDemo.ViewModel {

   class AddEditCustomerViewModel : BindableBase {
      private ICustomersRepository _repo;

      public AddEditCustomerViewModel(ICustomersRepository repo) {
         _repo = repo;
         CancelCommand = new MyIcommand(OnCancel);
         SaveCommand = new MyIcommand(OnSave, CanSave);
      }

      private bool _EditMode;

      public bool EditMode {
         get { return _EditMode; }
         set { SetProperty(ref _EditMode, value); }
      }

      private SimpleEditableCustomer _Customer;

      public SimpleEditableCustomer Customer {
         get { return _Customer; }
         set { SetProperty(ref _Customer, value); }
      }

      private Customer _editingCustomer = null;

      public void SetCustomer(Customer cust) {
         _editingCustomer = cust;

         if (Customer != null) Customer.ErrorsChanged -= RaiseCanExecuteChanged;
         Customer = new SimpleEditableCustomer();
         Customer.ErrorsChanged += RaiseCanExecuteChanged;
         CopyCustomer(cust, Customer);
      }

      private void RaiseCanExecuteChanged(object sender, EventArgs e) {
         SaveCommand.RaiseCanExecuteChanged();
      }

      public MyIcommand CancelCommand { get; private set; }
      public MyIcommand SaveCommand { get; private set; }

      public event Action Done = delegate { };

      private void OnCancel() {
         Done();
      }

      private async void OnSave() {
         UpdateCustomer(Customer, _editingCustomer);

         if (EditMode)
            await _repo.UpdateCustomerAsync(_editingCustomer);
         else
            await _repo.AddCustomerAsync(_editingCustomer);
         Done();
      }

      private void UpdateCustomer(SimpleEditableCustomer source, Customer target) {
         target.FirstName = source.FirstName;
         target.LastName = source.LastName;
         target.Phone = source.Phone;
         target.Email = source.Email;
      }

      private bool CanSave() {
         return !Customer.HasErrors;
      }

      private void CopyCustomer(Customer source, SimpleEditableCustomer target) {
         target.Id = source.Id;

         if (EditMode) {
            target.FirstName = source.FirstName;
            target.LastName = source.LastName;
            target.Phone = source.Phone;
            target.Email = source.Email;
         }
      }
   }
}
当上面的代码被编译和执行时,你会看到相同的输出,但现在 ViewModels 更加松散地解耦。
当您按下 Add Customer 按钮时,您将看到以下视图。当用户将任何字段留空时,它将突出显示并且保存按钮将被禁用。
MVVM – 事件
事件是一种对状态变化做出反应的编程结构,通知任何已注册通知的端点。事件主要用于通过鼠标和键盘通知用户输入,但它们的用途不限于此。每当检测到状态更改时,也许当对象已加载或初始化时,就可以触发事件以提醒任何感兴趣的第三方。
-
在使用 MVVM(模型-视图-视图模型)设计模式的 WPF 应用程序中,视图模型是负责处理应用程序的表示逻辑和状态的组件。
-
视图的代码隐藏文件不应包含处理从任何用户界面 (UI) 元素(如按钮或组合框)引发的事件的代码,也不应包含任何特定于域的逻辑。
-
理想情况下,视图的代码隐藏只包含一个调用 InitializeComponent 方法的构造函数,可能还有一些额外的代码来控制视图层或与视图层交互,这些代码在 XAML 中很难或低效地表达,例如复杂的动画。
让我们看一下我们应用程序中按钮单击事件的简单示例。以下是 MainWindow.xaml 文件的 XAML 代码,您将在其中看到两个按钮。
<Window x:Class = "MVVMHierarchiesDemo.MainWindow"
   xmlns = "http://schemas.microsoft.com/winfx/2006/xaml/presentation"
   xmlns:x = "http://schemas.microsoft.com/winfx/2006/xaml"
   xmlns:d = "http://schemas.microsoft.com/expression/blend/2008"
   xmlns:mc = "http://schemas.openxmlformats.org/markup-compatibility/2006"
   xmlns:local = "clr-namespace:MVVMHierarchiesDemo"
   xmlns:views = "clr-namespace:MVVMHierarchiesDemo.Views"
   xmlns:viewModels = "clr-namespace:MVVMHierarchiesDemo.ViewModel"
   mc:Ignorable = "d"
   Title = "MainWindow" Height = "350" Width = "525">

   <Window.DataContext>
      <local:MainWindowViewModel/>
   </Window.DataContext>

   <Window.Resources>
      <DataTemplate DataType = "{x:Type viewModels:CustomerListViewModel}">
         <views:CustomerListView/>
      </DataTemplate>

      <DataTemplate DataType = "{x:Type viewModels:OrderViewModel}">
         <views:OrderView/>
      </DataTemplate>
   </Window.Resources>

   <Grid>
      <Grid.RowDefinitions>
         <RowDefinition Height = "Auto" />
         <RowDefinition Height = "*" />
      </Grid.RowDefinitions>

      <Grid x:Name = "NavBar">
         <Grid.ColumnDefinitions>
            <ColumnDefinition Width = "*" />
            <ColumnDefinition Width = "*" />
            <ColumnDefinition Width = "*" />
         </Grid.ColumnDefinitions>

         <Button Content = "Customers"
            Command = "{Binding NavCommand}"
            CommandParameter = "customers"
            Grid.Column = "0" />

         <Button Content = "Order"
            Command = "{Binding NavCommand}"
            CommandParameter = "orders"
            Grid.Column = "2" />
      </Grid>

      <Grid x:Name = "MainContent" Grid.Row = "1">
         <ContentControl Content = "{Binding CurrentViewModel}" />
      </Grid>

   </Grid>

</Window>
可以看到,上面的XAML文件中没有使用按钮Click属性,而是使用Command和CommandParameter属性在按钮按下时加载不同的视图。现在您需要在 MainWindowViewModel.cs 文件中而不是在 View 文件中定义命令实现。以下是完整的 MainWindowViewModel 实现。
using MVVMHierarchiesDemo.ViewModel;
using MVVMHierarchiesDemo.Views;

using System;
using System.Collections.Generic;
using System.Linq;
using System.Text;
using System.Threading.Tasks;

namespace MVVMHierarchiesDemo {

   class MainWindowViewModel : BindableBase {

      public MainWindowViewModel() {
         NavCommand = new MyICommand<string>(OnNav);
      }

      private CustomerListViewModel custListViewModel = new CustomerListViewModel();
      private OrderViewModel orderViewModelModel = new OrderViewModel();

      private BindableBase _CurrentViewModel;

      public BindableBase CurrentViewModel {
         get { return _CurrentViewModel; }
         set { SetProperty(ref _CurrentViewModel, value); }
      }

      public MyICommand<string> NavCommand { get; private set; }

      private void OnNav(string destination) {

         switch (destination) {
            case "orders":
               CurrentViewModel = orderViewModelModel;
               break;
            case "customers":
               default:
               CurrentViewModel = custListViewModel;
               break;
         }
      }
   }
}
从 BindableBase 类派生所有的 ViewModel。当上面的代码编译执行后,你会看到下面的输出。
如您所见,我们在 MainWindow 上仅添加了两个按钮和一个 CurrentViewModel。现在,如果您单击任意按钮,它将导航到该特定视图。让我们单击“客户”按钮,您将看到显示 CustomerListView。

我们建议您以循序渐进的方式执行上述示例,以便更好地理解。
MVVM – 单元测试
单元测试背后的想法是采用离散的代码块(单元)并编写以预期方式使用代码的测试方法,然后进行测试以查看它们是否获得预期结果。
-
作为代码本身,单元测试就像项目的其余部分一样被编译。
-
它们也由测试运行软件执行,该软件可以加快每个测试的速度,有效地分别表示赞许或不赞许以指示测试是通过还是失败。
让我们看一下之前创建的示例。以下是学生模型的实现。
using System.ComponentModel;

namespace MVVMDemo.Model {

   public class StudentModel {}

   public class Student : INotifyPropertyChanged {
      private string firstName;
      private string lastName;

      public string FirstName {
         get { return firstName; }

         set {
            if (firstName != value) {
               firstName = value;
               RaisePropertyChanged("FirstName");
               RaisePropertyChanged("FullName");
            }
         }
      }

      public string LastName {
         get { return lastName; }

         set {
            if (lastName != value) {
               lastName = value;
               RaisePropertyChanged("LastName");
               RaisePropertyChanged("FullName");
            }
         }
      }

      public string FullName {
         get {
            return firstName + " " + lastName;
         }
      }

      public event PropertyChangedEventHandler PropertyChanged;

      private void RaisePropertyChanged(string property) {
         if (PropertyChanged != null) {
            PropertyChanged(this, new PropertyChangedEventArgs(property));
         }
      }
   }
}
下面是StudentView的实现。
<UserControl x:Class="MVVMDemo.Views.StudentView"
   xmlns = "http://schemas.microsoft.com/winfx/2006/xaml/presentation"
   xmlns:x = "http://schemas.microsoft.com/winfx/2006/xaml"
   xmlns:mc = "http://schemas.openxmlformats.org/markup-compatibility/2006"
   xmlns:d = "http://schemas.microsoft.com/expression/blend/2008"
   xmlns:local = "clr-namespace:MVVMDemo.Views"
   xmlns:viewModel = "clr-namespace:MVVMDemo.ViewModel"
   xmlns:data = "clr-namespace:MVVMDemo.Model"
   xmlns:vml = "clr-namespace:MVVMDemo.VML"
   vml:ViewModelLocator.AutoHookedUpViewModel = "True"
   mc:Ignorable = "d"
   d:DesignHeight = "300" d:DesignWidth = "300">

   <UserControl.Resources>
      <DataTemplate DataType = "{x:Type data:Student}">

         <StackPanel Orientation = "Horizontal">
            <TextBox Text = "{Binding Path = FirstName, Mode = TwoWay}"
               Width = "100" Margin = "3 5 3 5"/>

            <TextBox Text = "{Binding Path = LastName, Mode = TwoWay}"
               Width = "100" Margin = "0 5 3 5"/>

            <TextBlock Text = "{Binding Path = FullName, Mode = OneWay}"
               Margin = "0 5 3 5"/>
         </StackPanel>

      </DataTemplate>
   </UserControl.Resources>

   <Grid>
      <StackPanel Orientation = "Horizontal">
         <ListBox ItemsSource = "{Binding Students}"
            SelectedItem = "{Binding SelectedStudent}"/>

         <Button Content = "Delete"
            Command = "{Binding DeleteCommand}"
            HorizontalAlignment = "Left"
            VerticalAlignment = "Top"
            Width = "75" />
      </StackPanel>
   </Grid>

</UserControl>
以下是 StudentViewModel 的实现。
using MVVMDemo.Model;

using System.Collections.ObjectModel;
using System.Windows.Input;
using System;

namespace MVVMDemo.ViewModel {

   public class StudentViewModel {

      public MyICommand DeleteCommand { get; set;}

      public StudentViewModel() {
         LoadStudents();
         DeleteCommand = new MyICommand(OnDelete, CanDelete);
      }

      public ObservableCollection<Student> Students {
         get;
         set;
      }

      public void LoadStudents() {
         ObservableCollection<Student> students = new ObservableCollection<Student>();

         students.Add(new Student { FirstName = "Mark", LastName = "Allain" });
         students.Add(new Student { FirstName = "Allen", LastName = "Brown" });
         students.Add(new Student { FirstName = "Linda", LastName = "Hamerski" });

         Students = students;
      }

      private Student _selectedStudent;

      public Student SelectedStudent {
         get {
            return _selectedStudent;
         }

         set {
            _selectedStudent = value;
            DeleteCommand.RaiseCanExecuteChanged();
         }
      }

      private void OnDelete() {
         Students.Remove(SelectedStudent);
      }

      private bool CanDelete() {
         return SelectedStudent != null;
      }

      public int GetStudentCount() {
         return Students.Count;
      }
   }
}
以下是 MainWindow.xaml 文件。
<Window x:Class = "MVVMDemo.MainWindow"
   xmlns = "http://schemas.microsoft.com/winfx/2006/xaml/presentation"
   xmlns:x = "http://schemas.microsoft.com/winfx/2006/xaml"
   xmlns:d = "http://schemas.microsoft.com/expression/blend/2008"
   xmlns:mc = "http://schemas.openxmlformats.org/markup-compatibility/2006"
   xmlns:local = "clr-namespace:MVVMDemo"
   xmlns:views = "clr-namespace:MVVMDemo.Views"
   mc:Ignorable = "d"
   Title = "MainWindow" Height = "350" Width = "525">

   <Grid>
      <views:StudentView x:Name = "StudentViewControl"/>
   </Grid>

</Window>
下面是 MyICommand 实现,它实现了 ICommand 接口。
using System;
using System.Windows.Input;

namespace MVVMDemo {

   public class MyICommand : ICommand {
      Action _TargetExecuteMethod;
      Func<bool> _TargetCanExecuteMethod;

      public MyICommand(Action executeMethod) {
         _TargetExecuteMethod = executeMethod;
      }

      public MyICommand(Action executeMethod, Func<bool> canExecuteMethod) {
         _TargetExecuteMethod = executeMethod;
         _TargetCanExecuteMethod = canExecuteMethod;
      }

      public void RaiseCanExecuteChanged() {
         CanExecuteChanged(this, EventArgs.Empty);
      }

      bool ICommand.CanExecute(object parameter) {

         if (_TargetCanExecuteMethod != null) {
            return _TargetCanExecuteMethod();
         }

         if (_TargetExecuteMethod != null) {
            return true;
         }

         return false;
      }

      // Beware - should use weak references if command instance lifetime
         is longer than lifetime of UI objects that get hooked up to command

      // Prism commands solve this in their implementation

      public event EventHandler CanExecuteChanged = delegate { };

      void ICommand.Execute(object parameter) {
         if (_TargetExecuteMethod != null) {
            _TargetExecuteMethod();
         }
      }
   }
}
编译并执行上述代码后,您将在主窗口中看到以下输出。

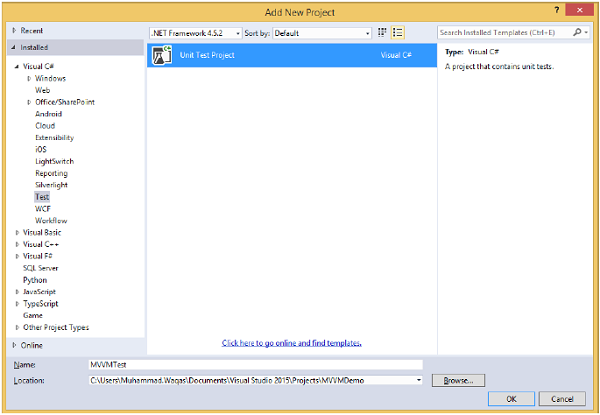
要为上述示例编写单元测试,让我们向解决方案添加一个新的测试项目。
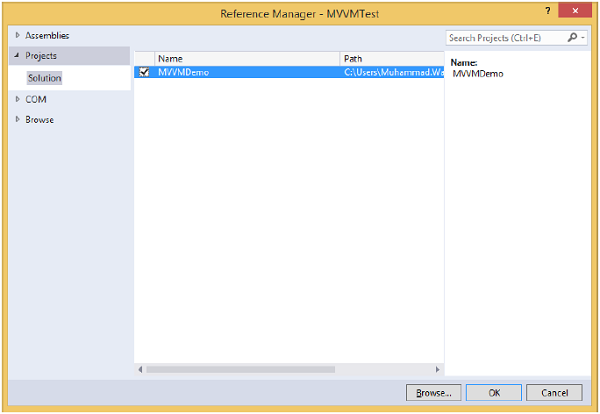
通过右键单击“引用”添加对项目的引用。
选择现有项目并单击确定。
现在让我们添加一个简单的测试,它将检查学生人数,如下面的代码所示。
using System;

using Microsoft.VisualStudio.TestTools.UnitTesting;
using MVVMDemo.ViewModel;

namespace MVVMTest {
   [TestClass]

   public class UnitTest1 {
      [TestMethod]

      public void TestMethod1() {
         StudentViewModel sViewModel = new StudentViewModel();
         int count = sViewModel.GetStudentCount();
         Assert.IsTrue(count == 3);
      }
   }
}
要执行此测试,请选择测试 → 运行 → 所有测试菜单选项。
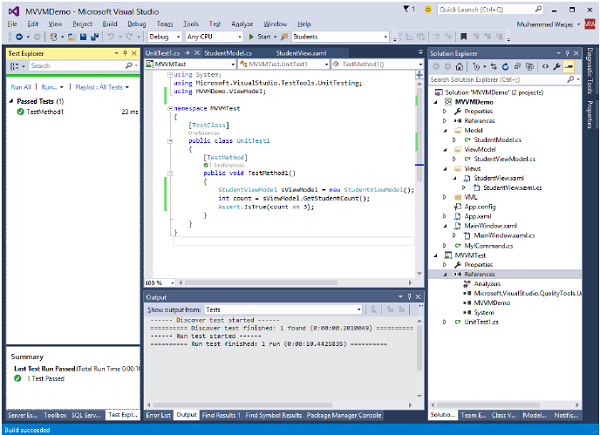
可以在Test Explorer中看到Test通过了,因为在StudentViewModel中,添加了三个学生。将计数条件从 3 更改为 4,如下面的代码所示。
using System;

using Microsoft.VisualStudio.TestTools.UnitTesting;
using MVVMDemo.ViewModel;

namespace MVVMTest {
   [TestClass]

   public class UnitTest1 {
      [TestMethod] public void TestMethod1() {
         StudentViewModel sViewModel = new StudentViewModel();
         int count = sViewModel.GetStudentCount();
         Assert.IsTrue(count == 4);
      }
   }
}
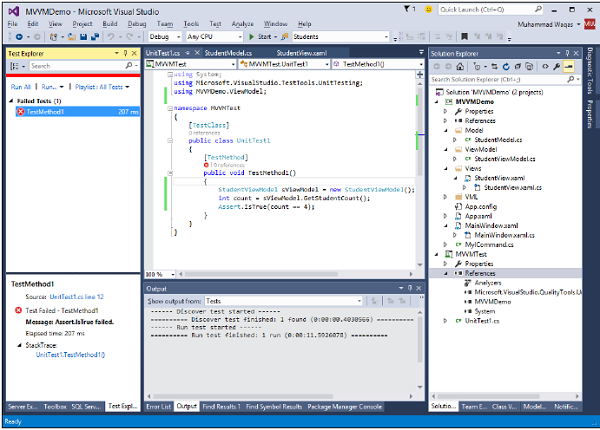
当再次执行测试计划时,您会看到测试失败,因为学生数不等于 4。
我们建议您以循序渐进的方式执行上述示例,以便更好地理解。
MVVM – 框架
在本章中,我们将讨论可用的 MVVM 工具包或框架。您还可以使用这些框架,这样您就不必编写一堆重复的代码来自己实现 MVVM 模式。以下是一些最流行的框架 –
- 棱镜
- MVVM灯
- 卡利本微

棱镜
Prism 以示例和文档的形式提供指导,帮助您轻松设计和构建丰富、灵活且易于维护的 Windows Presentation Foundation (WPF) 桌面应用程序。使用 Microsoft Silverlight 浏览器插件和 Windows 应用程序构建的富 Internet 应用程序 (RIA)。
-
Prism 使用体现重要架构设计原则的设计模式,例如关注点分离和松散耦合。
-
Prism 帮助您使用松散耦合的组件设计和构建应用程序,这些组件可以独立发展,但可以轻松无缝地集成到整个应用程序中。
-
这些类型的应用程序称为复合应用程序。
Prism 具有许多开箱即用的功能。以下是 Prism 的一些重要功能。
MVVM 模式
Prism 支持 MVVM 模式。它有一个 Bindablebase 类,类似于前面章节中实现的类。
它有一个灵活的 ViewModelLocator,它有约定,但允许您覆盖这些约定并以松散耦合的方式声明性地连接您的视图和视图模型。
模块化
它能够将您的代码分解成完全松散耦合的类库,并在运行时将它们组合成一个整体供最终用户使用,同时代码保持完全解耦。
用户界面组成/区域
它能够将视图插入容器,而无需执行插入操作的视图,需要对 UI 容器本身进行显式引用。
导航
Prism 具有位于区域之上的导航功能,例如向前和向后导航以及允许您的视图模型直接参与导航过程的导航堆栈。
命令
Prism 有命令,所以它们有一个委托命令,它与我们在前几章中使用的 MyICommand 非常相似,只是它有一些额外的健壮性来保护您免受内存泄漏。
发布/订阅事件
Prism 还支持 Pub/Sub 事件。这些是松散耦合的事件,其中发布者和订阅者可以有不同的生命周期,并且不必彼此显式引用以通过事件进行通信。
MVVM灯
MVVM Light 由 Laurent Bugnion 开发,可帮助您将视图与模型分开,从而创建更清洁、更易于维护和扩展的应用程序。
-
它还创建可测试的应用程序并允许您拥有更薄的用户界面层(这更难以自动测试)。
-
该工具包特别强调在 Blend 中打开和编辑用户界面,包括创建设计时数据,使 Blend 用户在使用数据控件时能够“看到一些东西”。
卡利本微
这是另一个小型开源框架,可帮助您实现 MVVM 模式并支持许多开箱即用的功能。
-
Caliburn Micro 是一个小而强大的框架,专为跨所有 XAML 平台构建应用程序而设计。
-
凭借对 MVVM 和其他经过验证的 UI 模式的强大支持,Caliburn Micro 将使您能够快速构建解决方案,而无需牺牲代码质量或可测试性。
