WPF – 调试
WPF – 调试
它是一种系统机制,用于识别和修复一段代码中与您期望的行为不同的错误或缺陷。调试子系统紧密耦合的复杂应用程序并不容易,因为修复一个子系统中的错误可能会在另一个子系统中创建错误。
在 C# 中调试
在 WPF 应用程序中,程序员处理两种语言,例如 C# 和 XAML。如果您熟悉使用任何过程语言(例如 C# 或 C/C++)进行调试,并且还知道断点的用法,那么您可以轻松调试应用程序的 C# 部分。
让我们举一个简单的例子来演示如何调试 C# 代码。创建一个名为WPFDebuggingDemo的新 WPF 项目。从工具箱中拖动四个标签、三个文本框和一个按钮。查看以下 XAML 代码。
<Window x:Class = "WPFDebuggingDemo.Window1"
   xmlns = "http://schemas.microsoft.com/winfx/2006/xaml/presentation"
   xmlns:x = "http://schemas.microsoft.com/winfx/2006/xaml"
   Title = "Window1" Height = "400" Width = "604">

   <Grid>
      <TextBox Height = "23" Margin = "0,44,169,0" Name = "textBox1"
         VerticalAlignment = "Top" HorizontalAlignment = "Right" Width = "120" />

      <TextBox Height = "23" Margin = "0,99,169,0" Name = "textBox2"
         VerticalAlignment = "Top" HorizontalAlignment = "Right" Width = "120" />

      <TextBox HorizontalAlignment = "Right" Margin = "0,153,169,0"
         Name = "textBox3" Width = "120" Height = "23" VerticalAlignment = "Top" />

      <Label Height = "28" Margin = "117,42,0,0" Name = "label1"
         VerticalAlignment = "Top" HorizontalAlignment = "Left" Width = "120">
         Item 1</Label>

      <Label Height = "28" HorizontalAlignment = "Left"
         Margin = "117,99,0,0" Name = "label2" VerticalAlignment = "Top" Width = "120">
         Item 2</Label>

      <Label HorizontalAlignment = "Left" Margin = "117,153,0,181"
         Name = "label3" Width = "120">Item 3</Label>

      <Button Height = "23" HorizontalAlignment = "Right" Margin = "0,0,214,127"
         Name = "button1" VerticalAlignment = "Bottom" Width = "75"
         Click = "button1_Click">Total</Button>

      <Label Height = "28" HorizontalAlignment = "Right"
         Margin = "0,0,169,66" Name = "label4" VerticalAlignment = "Bottom" Width = "120"/>

   </Grid>

</Window>
下面给出了实现按钮单击事件的 C# 代码。
using System;
using System.Collections.Generic;
using System.Linq;
using System.Text;

using System.Windows;
using System.Windows.Controls;
using System.Windows.Data;
using System.Windows.Documents;
using System.Windows.Input;
using System.Windows.Media;
using System.Windows.Media.Imaging;
using System.Windows.Navigation;
using System.Windows.Shapes;

namespace WPFDebuggingDemo {
   /// <summary>
      /// Interaction logic for Window1.xaml
   /// </summary>

   public partial class Window1 : Window {

      public Window1() {
         InitializeComponent();
      }

      private void button1_Click(object sender, RoutedEventArgs e) {

         if (textBox1.Text.Length > 0 && textBox2.Text.Length > 0 && textBox2.Text.Length > 0) {
            double total = Convert.ToDouble(textBox1.Text) +
            Convert.ToDouble(textBox2.Text) + Convert.ToDouble(textBox3.Text);
            label4.Content = total.ToString();
         }
         else {
            MessageBox.Show("Enter the value in all field.");
         }
      }
   }
}
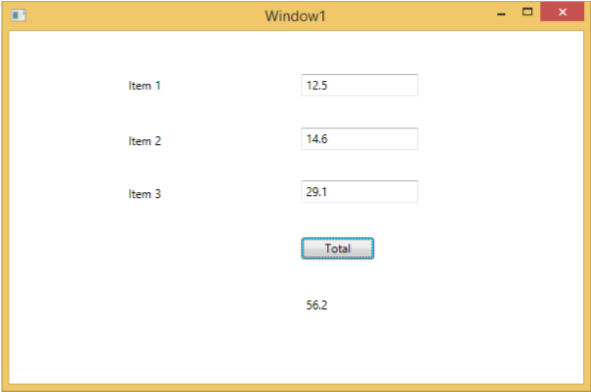
当您编译并执行上述代码时,将产生以下窗口。现在在文本框中输入值并按下总计按钮。在对文本框中输入的所有值求和后,您将获得总值。
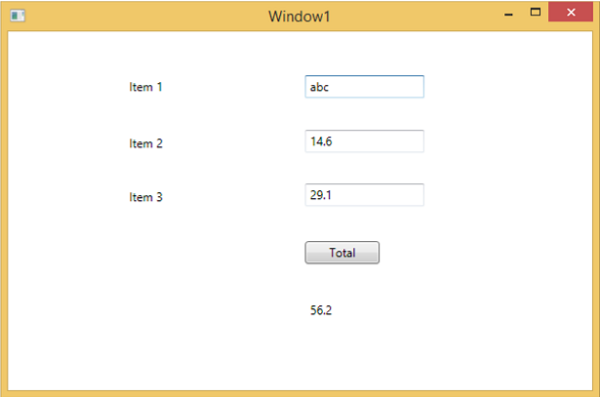
如果您尝试输入实际值以外的值,则上述应用程序将崩溃。要查找并解决问题(为什么会崩溃),您可以在按钮单击事件中插入断点。
让我们在第 1 项中写上“abc”,如下所示。
单击 Total 按钮后,您将看到程序在断点处停止。
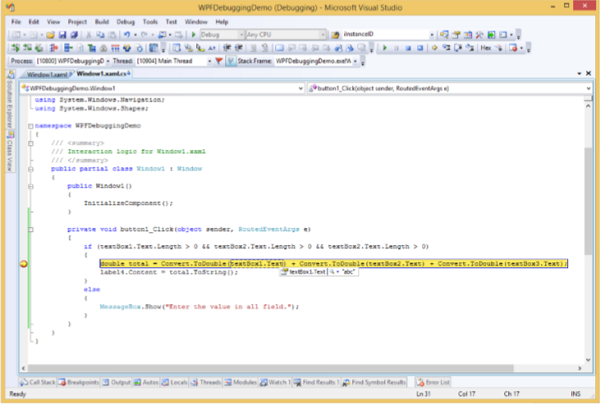
现在将光标移向 textbox1.Text,您将看到程序正在尝试将abc值与其他值相加,这就是程序崩溃的原因。
在 XAML 中调试
如果您期望在 XAML 中进行相同类型的调试,那么您会惊讶地发现,目前还不可能像调试任何其他过程语言代码那样调试 XAML 代码。当您在 XAML 代码中听到术语调试时,它意味着尝试并发现错误。
-
在数据绑定中,您的数据不会显示在屏幕上,您也不知道为什么
-
或者问题与复杂的布局有关。
-
或者对齐问题或边距颜色、覆盖等问题,使用一些广泛的模板,如列表框和组合框。
调试 XAML 程序通常是为了检查绑定是否有效;如果它不工作,然后检查什么是错的。不幸的是,除了 Silverlight 之外,无法在 XAML 绑定中设置断点,但我们可以使用“输出”窗口来检查数据绑定错误。让我们看一下下面的 XAML 代码,找出数据绑定中的错误。
<Window x:Class = "DataBindingOneWay.MainWindow"
   xmlns = "http://schemas.microsoft.com/winfx/2006/xaml/presentation"
   xmlns:x = "http://schemas.microsoft.com/winfx/2006/xaml"
   Title = "MainWindow" Height = "350" Width = "604">

   <Grid>
      <StackPanel Name = "Display">
         <StackPanel Orientation = "Horizontal" Margin = "50, 50, 0, 0">
            <TextBlock Text = "Name: " Margin = "10" Width = "100"/>
            <TextBlock Margin = "10" Width = "100" Text = "{Binding FirstName}"/>
         </StackPanel>

         <StackPanel Orientation = "Horizontal" Margin = "50,0,50,0">
            <TextBlock Text = "Title: " Margin = "10" Width = "100"/>
            <TextBlock Margin = "10" Width = "100" Text = "{Binding Title}" />
         </StackPanel>

      </StackPanel>
   </Grid>

</Window>
两个文本块的文本属性静态设置为“Name”和“Title”,而其他两个文本块文本属性绑定到“FirstName”和“Title”,但类变量是Employee类中的Name和Title,如下所示。
我们故意写了一个不正确的变量名,以便了解在未显示所需输出时我们可以在哪里找到这种类型的错误。
using System;
using System.Collections.Generic;
using System.Linq;
using System.Text;
using System.Threading.Tasks;

namespace DataBindingOneWay {

   public class Employee {
      public string Name { get; set; }
      public string Title { get; set; }

      public static Employee GetEmployee() {

         var emp = new Employee() {
            Name = "Ali Ahmed", Title = "Developer"
         };

         return emp;
      }
   }
}
下面是 C# 代码中 MainWindow 类的实现。
using System;
using System.Windows;
using System.Windows.Controls;

namespace DataBindingOneWay {
   /// <summary>
      /// Interaction logic for MainWindow.xaml
   /// </summary>

   public partial class MainWindow : Window {

      public MainWindow() {
         InitializeComponent();
         DataContext = Employee.GetEmployee();
      }
   }
}
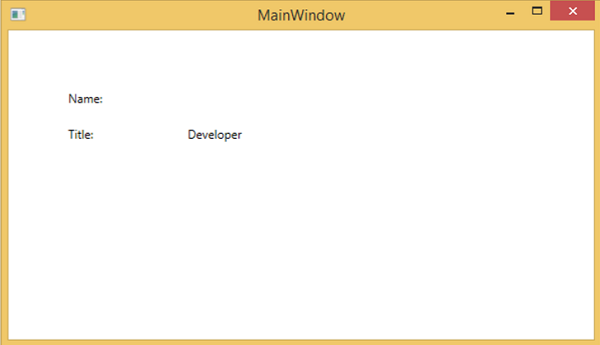
让我们运行这个应用程序,您可以立即在我们的 MainWindow 中看到我们已成功绑定到该 Employee 对象的 Title 但名称未绑定。
要检查名称发生了什么,让我们查看生成大量日志的输出窗口。
最容易发现的错误就是搜索错误,你会发现下面的错误,上面写着“BindingExpression path error: ‘FirstName’ property not found on ‘object”’Employe”
System.Windows.Data Error: 40 : BindingExpression path error: 'FirstName'
   property not found on 'object' ''Employee' (HashCode=11611730)'.
   BindingExpression:Path = FirstName; DataItem = 'Employee' (HashCode = 11611730);
   target element is 'TextBlock' (Name=''); target property is 'Text' (type 'String')
这清楚地表明 FirstName 不是 Employee 类的成员,因此它有助于解决应用程序中的此类问题。
当您再次将 FirstName 更改为 Name 时,您将看到所需的输出。
XAML 的 UI 调试工具
使用 Visual Studio 2015 为 XAML 引入了 UI 调试工具,以在运行时检查 XAML 代码。在这些工具的帮助下,XAML 代码以正在运行的 WPF 应用程序的可视化树以及树中不同 UI 元素属性的形式呈现。要启用这些工具,请按照以下步骤操作。
- 转到“工具”菜单,然后从“工具”菜单中选择“选项”。
- 它将打开以下对话框。
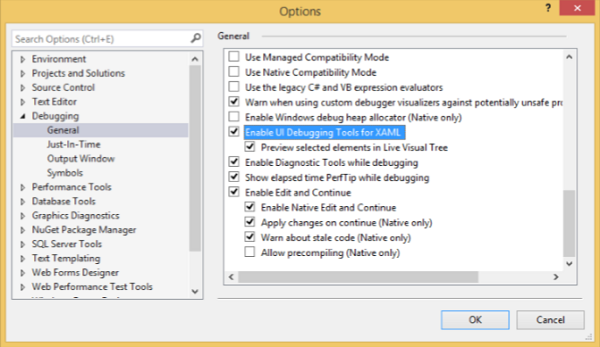
- 转到左侧调试项下的常规选项。
- 勾选突出显示的选项,即“启用 XAML 的 UI 调试工具”,然后单击“确定”按钮。
现在运行任何 XAML 应用程序或使用以下 XAML 代码。
<Window x:Class = "XAMLTestBinding.MainWindow"
   xmlns = "http://schemas.microsoft.com/winfx/2006/xaml/presentation"
   xmlns:x = "http://schemas.microsoft.com/winfx/2006/xaml"
   Title = "MainWindow" Height = "350" Width = "604">

   <StackPanel>
      <ComboBox Name = "comboBox"  Margin = "50" Width = "100">
         <ComboBoxItem Content = "Green" />
         <ComboBoxItem  Content = "Yellow" IsSelected = "True" />
         <ComboBoxItem Content = "Orange" />
      </ComboBox>

      <TextBox  Name = "textBox" Margin = "50" Width = "100" Height = "23"
         VerticalAlignment = "Top" Text  =
         "{Binding ElementName = comboBox, Path = SelectedItem.Content, Mode = TwoWay, UpdateSourceTrigger = PropertyChanged}"
         Background = "{Binding ElementName = comboBox, Path = SelectedItem.Content}">
      </TextBox>

   </StackPanel>

</Window>
当您执行应用程序时,它将显示实时可视树,其中所有元素都显示在树中。
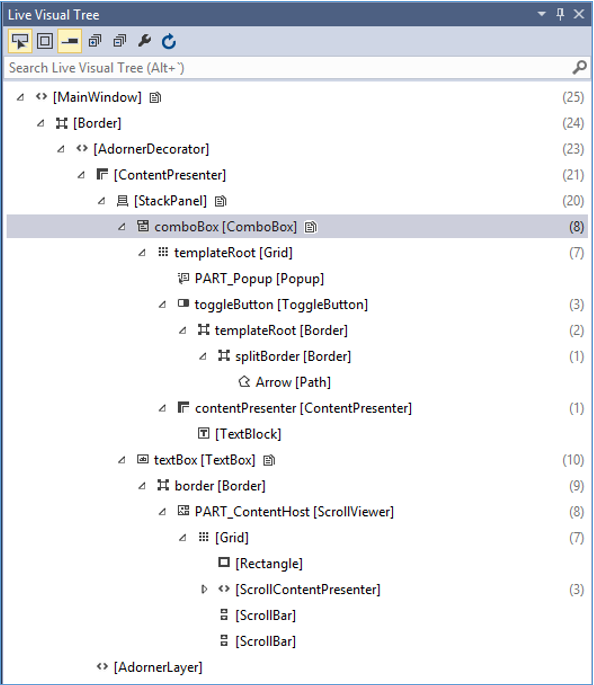
此实时可视化树显示了完整的布局结构,以了解 UI 元素所在的位置。但是此选项仅在 Visual Studio 2015 中可用。如果您使用的是 Visual Studio 的旧选项,则不能使用此工具,但是还有另一个工具可以与 Visual Studio 集成,例如 XAML Spy for Visual Studio . 你可以从xamlspy下载
