WPF – 模板
WPF – 模板
模板描述了控件的整体外观和视觉外观。对于每个控件,都有一个与之关联的默认模板,它赋予控件外观。在 WPF 应用程序中,当您想要自定义控件的视觉行为和视觉外观时,您可以轻松创建自己的模板。
逻辑和模板之间的连接可以通过数据绑定来实现。下面列出了样式和模板之间的主要区别–
-
样式只能使用该控件的默认属性更改控件的外观。
-
使用模板,您可以访问控件的更多部分而不是样式。您还可以指定控件的现有行为和新行为。
有两种最常用的模板 –
- 控制模板
- 数据模板
控制模板
控件模板定义控件的视觉外观。所有的 UI 元素都具有某种外观和行为,例如,按钮具有外观和行为。单击事件或鼠标悬停事件是响应单击和悬停而触发的行为,并且还有一个按钮的默认外观,可以通过控制模板进行更改。
例子
我们举一个简单的例子。我们将创建两个按钮(一个是模板,另一个是默认按钮)并用一些属性初始化它们。
<Window x:Class = "TemplateDemo.MainWindow"
   xmlns = "http://schemas.microsoft.com/winfx/2006/xaml/presentation"
   xmlns:x = "http://schemas.microsoft.com/winfx/2006/xaml"
   Title = "MainWindow" Height = "350" Width = "604">

   <Window.Resources>
      <ControlTemplate x:Key = "ButtonTemplate" TargetType = "Button">

         <Grid>
            <Ellipse x:Name = "ButtonEllipse" Height = "100" Width = "150" >
               <Ellipse.Fill>
                  <LinearGradientBrush StartPoint = "0,0.2" EndPoint = "0.2,1.4">
                     <GradientStop Offset = "0" Color = "Red" />
                     <GradientStop Offset = "1" Color = "Orange" />
                  </LinearGradientBrush>
               </Ellipse.Fill>
            </Ellipse>

            <ContentPresenter Content = "{TemplateBinding Content}"
               HorizontalAlignment = "Center" VerticalAlignment = "Center" />
         </Grid>

         <ControlTemplate.Triggers>

            <Trigger Property = "IsMouseOver" Value = "True">
               <Setter TargetName = "ButtonEllipse" Property = "Fill" >
                  <Setter.Value>
                     <LinearGradientBrush StartPoint = "0,0.2" EndPoint = "0.2,1.4">
                        <GradientStop Offset = "0" Color = "YellowGreen" />
                        <GradientStop Offset = "1" Color = "Gold" />
                     </LinearGradientBrush>
                  </Setter.Value>
               </Setter>
            </Trigger>

            <Trigger Property = "IsPressed" Value = "True">
               <Setter Property = "RenderTransform">
                  <Setter.Value>
                     <ScaleTransform ScaleX = "0.8" ScaleY = "0.8"
                        CenterX = "0" CenterY = "0"  />
                  </Setter.Value>
               </Setter>
               <Setter Property = "RenderTransformOrigin" Value = "0.5,0.5" />
            </Trigger>

         </ControlTemplate.Triggers>

      </ControlTemplate>
   </Window.Resources>

   <StackPanel>
      <Button Content = "Round Button!"
         Template = "{StaticResource ButtonTemplate}"
         Width = "150" Margin = "50" />
      <Button Content = "Default Button!" Height = "40"
         Width = "150" Margin = "5" />
   </StackPanel>

</Window>
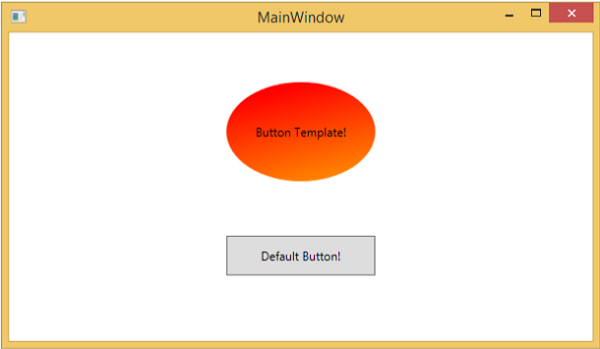
当您编译并执行上述代码时,会显示以下 MainWindow。

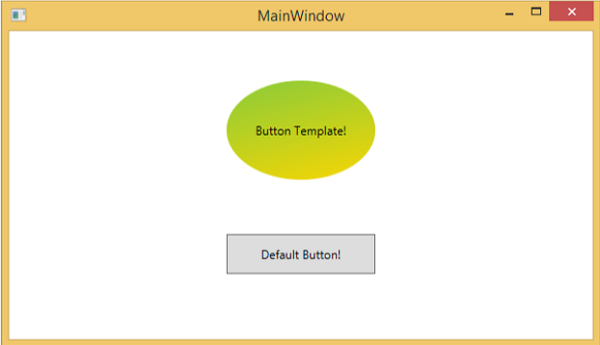
当您将鼠标移到带有自定义模板的按钮上时,它会改变其颜色,如下所示。

数据模板
数据模板定义并指定数据集合的外观和结构。它提供了在任何 UI 元素上格式化和定义数据表示的灵活性。多用于数据相关的Item控件,如ComboBox、ListBox等。
例子
-
我们通过一个简单的例子来理解数据模板的概念。创建一个名为WPFDataTemplates的新 WPF 项目。
-
在以下 XAML 代码中,我们将创建一个数据模板作为资源来保存标签和文本框。还有一个按钮和一个列表框来显示数据。
<Window x:Class = "WPFDataTemplates.MainWindow"
   xmlns = "http://schemas.microsoft.com/winfx/2006/xaml/presentation"
   xmlns:x = "http://schemas.microsoft.com/winfx/2006/xaml"
   xmlns:d = "http://schemas.microsoft.com/expression/blend/2008"
   xmlns:mc = "http://schemas.openxmlformats.org/markup-compatibility/2006"
   xmlns:local = "clr-namespace:WPFDataTemplates"
   xmlns:loc = "clr-namespace:WPFDataTemplates"
   mc:Ignorable = "d" Title = "MainWindow" Height = "350" Width = "525">

   <Window.Resources>
      <DataTemplate DataType = "{x:Type loc:Person}">

         <Grid>
            <Grid.RowDefinitions>
               <RowDefinition Height = "Auto" />
               <RowDefinition Height = "Auto" />
            </Grid.RowDefinitions>

            <Grid.ColumnDefinitions>
               <ColumnDefinition Width = "Auto" />
               <ColumnDefinition Width = "200" />
            </Grid.ColumnDefinitions>

            <Label Name = "nameLabel" Margin = "10"/>
            <TextBox Name = "nameText" Grid.Column = "1" Margin = "10"
               Text = "{Binding Name}"/>
            <Label Name = "ageLabel" Margin = "10" Grid.Row = "1"/>
            <TextBox Name = "ageText" Grid.Column = "1" Grid.Row = "1" Margin = "10"
               Text = "{Binding Age}"/>
         </Grid>

      </DataTemplate>
   </Window.Resources>

   <Grid>
      <Grid.RowDefinitions>
         <RowDefinition Height = "Auto" />
         <RowDefinition Height = "*" />
      </Grid.RowDefinitions>

      <ListBox ItemsSource = "{Binding}" />
      <StackPanel Grid.Row = "1" >
         <Button Content = "_Show..." Click = "Button_Click" Width = "80" HorizontalAlignment = "Left" Margin = "10"/>
      </StackPanel>

   </Grid>

</Window>
这是C#中的实现,其中将 Person 对象列表分配给 DataContext、Person 类和按钮单击事件的实现。
using System.Collections.Generic;
using System.Windows;

namespace WPFDataTemplates {

   public partial class MainWindow : Window {

      Person src = new Person { Name = "Ali", Age = 27 };
      List<Person> people = new List<Person>();

      public MainWindow() {
         InitializeComponent();
         people.Add(src);
         people.Add(new Person { Name = "Mike", Age = 62 });
         people.Add(new Person { Name = "Brian", Age = 12 });
         this.DataContext = people;
      }

      private void Button_Click(object sender, RoutedEventArgs e) {
         string message = src.Name + " is " + src.Age;
         MessageBox.Show(message);
      }
   }

   public class Person {
      private string nameValue;

      public string Name {
         get { return nameValue; }
         set { nameValue = value; }
      }

      private double ageValue;

      public double Age {
         get { return ageValue; }
         set {
            if (value != ageValue) {
            ageValue = value;
            }
         }
      }
   }

}
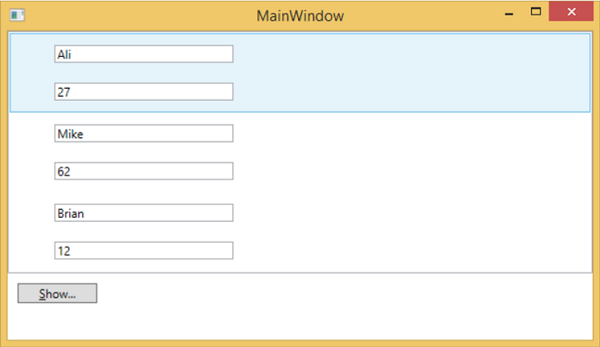
当您编译并执行上述代码时,将产生以下窗口。它包含一个列表,在列表框内,每个列表框项都包含显示在标签和文本框上的 Person 类对象数据。

